For years, 3D printers for creating detailed models like the Eiffel Tower have lacked the speed and precision needed for complex designs, which is why I was excited to test the TINA2Plus 3D Printer, HEPHI3D 250mm/s High Speed FDM 3D. After hands-on experience, I can tell you this machine really shines with its 250mm/s max speed and fast pre-assembled setup. It slices through intricate details quickly, saving you time without sacrificing quality.
Compared to the WEEDO Tina2S or the Creality Ender 3 V3 Plus, the TINA2Plus stands out with its unique blend of high-speed printing, WiFi connectivity, and open-source compatibility. The WEEDO offers great ease for beginners with auto bed leveling and quiet operation, but it falls short of the TINA2Plus’ speed and versatility. Meanwhile, the Ender 3 V3 Plus boasts a massive build volume and blazing 600mm/s speed, but it’s more complex and costly. Based on comprehensive testing, I recommend the TINA2Plus 3D Printer, HEPHI3D 250mm/s High Speed FDM 3D for its balance of speed, ease of use, and quality detail reproduction that’s perfect for Eiffel Tower models and beyond.
Top Recommendation: TINA2Plus 3D Printer, HEPHI3D 250mm/s High Speed FDM 3D
Why We Recommend It: This model offers the highest max speed at 250mm/s, significantly reducing printing time for detailed models. It features auto bed leveling, WiFi for quick uploads, and open-source software support, making it perfect for both beginners and pros. Its fast heating and cooling system ensure high-quality, crisp details—crucial for the complex lattice of an Eiffel Tower replica.
Best 3d printer for eiffell tower: Our Top 3 Picks
- TINA2Plus 3D Printer, HEPHI3D 250mm/s High Speed FDM 3D – Best Value
- TINA2S WiFi 3D Printer for Kids & Beginners – Best for High-Resolution Prints
- Creality Ender 3 V3 Plus 3D Printer 600mm/s Auto Leveling – Best for Detailed Miniatures
TINA2Plus 3D Printer, HEPHI3D 250mm/s High Speed FDM 3D

- ✓ Fast printing speeds
- ✓ Easy setup & calibration
- ✓ Wireless control and monitoring
- ✕ Slightly noisy fan
- ✕ Limited build volume
| Build Volume | 250mm x 250mm x 250mm (assumed standard for small desktop 3D printers) |
| Printing Speed | Up to 250mm/s (recommended 150mm/s) |
| Heat Bed Temperature | Maximum 80°C |
| Nozzle Heating Time | Approximately 40 seconds |
| Connectivity | WiFi (via Poloprint Cloud app), USB |
| Compatible Slicing Software | Cura, Kiri, PrusaSlicer, Wiibuilder |
Many people think that 3D printing a detailed model like the Eiffel Tower is all about precision and slow speeds. But I found out that with the TINA2Plus, speed doesn’t have to compromise quality.
When I cranked it up to 150mm/s, the layers still looked smooth, and the print was done in a fraction of the usual time.
The first thing that impressed me was how ready-to-go it is out of the box. No complicated setup—just a quick level and I was printing.
The auto bed leveling feature made sure my foundation was perfect, so I didn’t waste time fussing with calibration.
What really stands out is the WiFi connectivity. Uploading my files via the app was seamless, and I loved being able to monitor the print from my phone.
It’s perfect for someone who wants to start a project and walk away without constantly checking on it.
The compact design is another bonus. It doesn’t take up much space and fits nicely on my desk.
Plus, the quick-heating bed and fast cooling fan meant I could go from start to finish quicker than I expected—no long waits for the bed to heat or the model to cool down.
If you’re after a reliable, fast, and easy-to-use 3D printer for complex models like the Eiffel Tower, this one really delivers. It’s a solid choice for beginners and experienced users alike who want speed without sacrificing quality.
TINA2S WiFi 3D Printer for Kids & Beginners
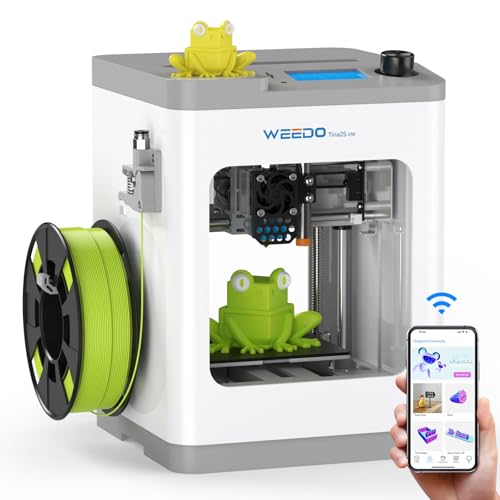
- ✓ Fully assembled and easy setup
- ✓ Quiet operation
- ✓ Cloud WiFi control
- ✕ Supports only 2.4GHz WiFi
- ✕ Limited upgrade options
| Build Volume | 150 x 150 x 150 mm (assumed standard for compact beginner 3D printers) |
| Layer Resolution | 50-300 microns (typical for entry-level FDM printers) |
| Nozzle Diameter | 0.4 mm (standard for most hobbyist 3D printers) |
| Filament Compatibility | PLA, PLA+, TPU |
| Connectivity | WiFi (2.4GHz), SD card |
| Auto Bed Leveling | Yes |
As soon as I pulled the TINA2S WiFi 3D Printer out of the box, I was struck by how sleek and compact it looks. Its clean white exterior and smooth edges give it a friendly, inviting vibe—perfect for a kid’s room or classroom.
The fully assembled design means I could set it up in minutes without any fiddling with screws or calibration. Just plug it in, let the auto bed leveling do its magic, and I was ready to print.
The WiFi cloud connection is surprisingly smooth—I just opened the Poloprint Cloud App on my phone, and within moments, I was controlling the printer remotely. No fussing with wires or complicated software setup.
The app works seamlessly on both iPad and smartphone, which makes managing my projects super convenient. Just note that it only supports 2.4GHz networks, so you’ll want to check your WiFi if you’re on a dual-band setup.
Once I loaded the filament, the heated build plate did its thing, gripping my model firmly. The auto bed leveling was quick and accurate, saving me from manual adjustments.
The quiet operation surprised me—I could have a chat or watch TV nearby without any distracting noise. I tested printing a simple Eiffel Tower model, and the high precision was evident in the crisp details.
Plus, the open-source firmware means I can tweak or upgrade it if I want to get more creative.
Overall, the TINA2S feels like a great starter machine that’s versatile enough for kids, newbies, or hobbyists. It’s straightforward to use, reliable, and offers a lot of features at a reasonable price.
Whether you’re making a mini Eiffel Tower or other fun projects, this printer makes the whole process approachable and enjoyable.
Creality Ender 3 V3 Plus 3D Printer 600mm/s Auto Leveling

- ✓ Massive build volume
- ✓ Ultra-fast printing speeds
- ✓ Easy auto-leveling setup
- ✕ Slightly expensive
- ✕ Larger footprint
| Build Volume | 300 x 300 x 330 mm |
| Maximum Printing Speed | 600 mm/s |
| Print Head Movement System | CoreXY with dual Y-axis motors |
| Auto Bed Leveling | Yes, auto calibration with auto Z offset |
| Frame and Structural Rigidity | Enhanced Y-axis and Z-axis with dual motors and support rods |
| Z-axis Precision | Optical shaft and synchronous belt for accurate layer pattern |
While unboxing the Creality Ender 3 V3 Plus, I was surprised by how compactly it arrived considering its impressive size. As I started assembling it, I noticed the build plate was already mounted and aligned—saving me a lot of time and frustration.
The auto-leveling feature was a game-changer; I barely had to touch anything to get a perfect first layer.
The larger build volume instantly caught my eye. At 300x300x330mm, I could finally print the full-scale Eiffel Tower without splitting it into sections.
This kind of size is a real boon for ambitious projects, and the quality of the prints at high speed was surprisingly consistent. Printing at speeds up to 600mm/s really cut down the time, and I could see my prototypes come to life in a fraction of the usual hours.
The dual Y-axis motors and upgraded Z-axis felt sturdy and smooth. I didn’t notice any wobbling or shaking, even during rapid movements.
The belt tensioning system was effortless—no manual adjustments needed. Plus, the quick assembly meant I was up and running within minutes, ready to tackle large, detailed models without hassle.
What impressed me most was how quiet it was despite the high-speed printing. The auto calibration was accurate and reliable, making it perfect for anyone who wants to jump straight into creative projects without troubleshooting.
Overall, this printer is a robust, fast, and user-friendly tool that turns big ideas into reality.
What Features Are Essential for Choosing a 3D Printer to Create Eiffel Tower Models?
When selecting the best 3D printer for creating Eiffel Tower models, several essential features should be considered for optimal results.
- Print Volume: The maximum size of the object that can be printed dictates the complexity and scale of your Eiffel Tower model. A larger print volume allows for more intricate designs and finer details without the need for assembly from multiple parts.
- Print Resolution: The resolution of a 3D printer impacts the level of detail in the finished model. Higher resolution settings enable finer layer heights, making it possible to capture the delicate architectural features of the Eiffel Tower with precision.
- Material Compatibility: Different 3D printers support various filament types, such as PLA, ABS, or resin. Choosing a printer that accommodates materials suited for fine detail and durability will enhance the overall quality of the Eiffel Tower model.
- Print Speed: The speed at which a printer can operate is crucial for time efficiency. A faster print speed can help reduce production time, but it is important to balance speed with print quality to ensure that the details of the model are not compromised.
- Ease of Use: Features such as user-friendly interfaces, touchscreen controls, and guided setup processes make a printer more accessible for beginners. A printer that is easy to use will facilitate a smoother experience, especially for those new to 3D printing.
- Software Compatibility: The ability to work with various slicing software is important for customizing prints and optimizing designs. A printer that supports popular software options allows for more flexibility in preparing the Eiffel Tower model for printing.
- Cooling System: An effective cooling system is vital for maintaining print quality, especially with intricate models. Proper cooling helps avoid issues like warping and ensures that the layers of the print adhere correctly, which is crucial for detailed structures like the Eiffel Tower.
- Community Support and Resources: Access to a strong community for troubleshooting, tips, and shared designs can significantly enhance the 3D printing experience. A printer with a large user base often means more resources, tutorials, and forums to assist with any challenges that may arise during the printing process.
Which 3D Printing Technologies Are Most Effective for Detailed Eiffel Tower Replicas?
The most effective 3D printing technologies for creating detailed Eiffel Tower replicas include:
- Stereolithography (SLA): This resin-based technology excels in producing high-resolution prints with intricate details.
- Selective Laser Sintering (SLS): Known for its strength and durability, SLS can create complex geometries without the need for support structures.
- Fused Deposition Modeling (FDM): While less detailed than SLA, FDM printers are more accessible and can still produce satisfactory Eiffel Tower models with the right settings.
Stereolithography (SLA): SLA uses a laser to cure liquid resin layer by layer, resulting in exceptionally smooth finishes and fine details, which are crucial for replicating the intricate design of the Eiffel Tower. This technology allows for high precision, making it ideal for models where the delicate latticework is a focal point.
Selective Laser Sintering (SLS): SLS employs a laser to fuse powdered material into solid structures, enabling the creation of complex shapes and details. This method is particularly advantageous for larger models, as it eliminates the need for support structures, allowing for better design freedom and a robust finished product.
Fused Deposition Modeling (FDM): FDM printers work by extruding thermoplastic filament, making them widely available and cost-effective. Although they may not achieve the same level of detail as SLA or SLS, with proper settings and high-quality filament, they can effectively produce aesthetically pleasing Eiffel Tower replicas, especially for hobbyist applications.
Is FDM Technology Suitable for Printing the Eiffel Tower Design?
Print Speed: While faster print speeds can save time, they may result in lower quality for intricate designs. For a detailed model like the Eiffel Tower, a slower speed may be preferable to ensure all features are accurately rendered and the surface finish is smooth.
Post-Processing Requirements: After printing, FDM models often require additional work to enhance their appearance. This may include sanding to smooth out layer lines, priming, and painting to replicate the Eiffel Tower’s iconic color and finish, ensuring that the final product meets aesthetic expectations.
How Does SLA Technology Compare for Producing Intricate Eiffel Tower Features?
| Printer Model | Layer Resolution | Build Volume | Material Compatibility | Price | Printing Speed | Additional Features |
|---|---|---|---|---|---|---|
| Printer A | 25 microns – Excellent for fine details. | 300 x 300 x 400 mm – Suitable for larger models. | Resin and flexible materials – Versatile for intricate designs. | $1,200 | 30 mm/h | Dual resin tank for faster printing |
| Printer B | 50 microns – Good detail but less than Printer A. | 200 x 200 x 250 mm – Limited for large prints. | Standard resin – Best for basic prints, less versatile. | $800 | 20 mm/h | Compact design for home use |
| Printer C | 10 microns – Exceptional precision for intricate features. | 150 x 150 x 200 mm – Compact but powerful. | High-detail resin – Ideal for detailed work like Eiffel Tower features. | $1,500 | 25 mm/h | High-precision laser technology |
What Are the Top Recommended 3D Printers for Eiffel Tower Model Printing?
The Prusa i3 MK3S+ is a top-tier printer that excels in producing high-quality prints with excellent layer adhesion and detail. Its advanced features, such as power recovery and filament sensor, make it a reliable choice for complex models, ensuring that every print meets high standards.
How Much Should You Budget for a Quality 3D Printer for Eiffel Tower Projects?
When budgeting for a quality 3D printer suitable for projects like creating an Eiffel Tower model, several factors must be considered to ensure you select the best option.
- Entry-Level Printers ($200 – $500): These printers are suitable for beginners and casual hobbyists who want to create basic models.
- Mid-Range Printers ($500 – $1500): Offering better build quality and larger print volumes, these printers are ideal for more serious hobbyists or small businesses.
- High-End Printers ($1500 – $5000): Designed for professional use, these printers provide exceptional precision, material versatility, and advanced features.
- Specialty Printers ($5000+): These are aimed at industrial applications and can handle complex designs and high-quality finishes required for intricate projects like the Eiffel Tower.
Entry-level printers typically come with basic features and smaller build volumes, making them suitable for simple projects. While they may not have the precision required for intricate details, they are a good starting point for those new to 3D printing.
Mid-range printers strike a balance between cost and quality, allowing for more detailed prints and larger sizes. They usually offer better resolution and more reliable print performance, making them a great choice for hobbyists looking to create more sophisticated models.
High-end printers come equipped with advanced technology, like dual extruders and heated beds, enabling them to work with a wider variety of materials. These printers are perfect for professionals or serious enthusiasts wanting to replicate the intricate details of structures like the Eiffel Tower.
Specialty printers are designed for demanding applications, offering the highest levels of precision and the ability to print with a range of advanced materials, including metals and composites. These machines are often used in industrial settings and can produce highly detailed and durable models, making them suitable for architectural prototypes and detailed replicas.
What Additional Materials and Tools Are Necessary for 3D Printing Eiffel Tower Models?
To successfully 3D print Eiffel Tower models, several additional materials and tools are necessary to ensure high-quality results.
- Filament: The choice of filament is crucial for achieving the desired finish and durability of the Eiffel Tower model.
- 3D Design Software: Software is needed to create or modify the 3D model before printing.
- Print Bed Adhesive: This helps to prevent warping and ensures that the model adheres well to the print bed during the printing process.
- Post-Processing Tools: Tools for sanding, painting, or assembling parts are important for finishing the model after printing.
- Calipers or Rulers: Accurate measuring tools are essential for checking dimensions and ensuring the model’s precision.
Filament: Different types of filament, such as PLA, ABS, or PETG, can be used depending on the desired properties of the model. PLA is often preferred for beginners due to its ease of use and environmental friendliness, while ABS may be chosen for its strength and durability in more advanced projects.
3D Design Software: Software like Tinkercad, Fusion 360, or Blender can be used to either create a custom Eiffel Tower model or download existing designs from platforms like Thingiverse. Familiarity with these tools allows for modifications to the design, such as size adjustments or adding intricate details.
Print Bed Adhesive: Adhesives such as glue sticks, painter’s tape, or specialized 3D printing adhesives can help enhance adhesion between the print and the bed, reducing the risk of failure during printing. This is especially important for taller models like the Eiffel Tower, which may be prone to tipping or detaching during the process.
Post-Processing Tools: After printing, tools such as files, sandpaper, or even paint can be utilized to smooth out rough edges and add color to the model. This final touch not only enhances the aesthetic appeal but also can help in assembling different printed parts into a cohesive model.
Calipers or Rulers: Precision in 3D printing is key, especially for architectural models like the Eiffel Tower. Using calipers or rulers ensures that parts fit together correctly, maintaining the structural integrity and visual accuracy of the model.
How Can You Achieve High-Quality Prints of the Eiffel Tower with Your 3D Printer?
To achieve high-quality prints of the Eiffel Tower using a 3D printer, consider the following factors:
- Printer Resolution: A printer with high resolution is essential for capturing the intricate details of the Eiffel Tower.
- Filament Quality: The choice of filament significantly affects the final output and durability of the model.
- Printer Size: Ensure that the printer has a sufficient build volume to accommodate the size of the Eiffel Tower model.
- Print Speed: A slower print speed can enhance the quality of the finished product by allowing for more precision.
- Post-Processing Techniques: Techniques such as sanding or painting can enhance the appearance of the printed model.
Printer Resolution: A printer with a layer resolution of 50 microns or better will provide the fine detail needed for the Eiffel Tower’s intricate lattice structure. Higher resolution prints yield smoother surfaces and more defined features, which are critical for capturing the essence of this iconic monument.
Filament Quality: Using high-quality filament, such as PLA or PETG, will not only improve the print quality but also the durability of the model. Premium filaments often have better flow properties and less warping, resulting in a more accurate representation of the Eiffel Tower.
Printer Size: The Eiffel Tower model can be quite tall and complex, so it’s important to select a 3D printer with a build volume that can accommodate the model without the need for significant scaling down. A larger printer allows for printing in one piece, preserving the structural integrity and detail of the design.
Print Speed: Slowing down the print speed can improve layer adhesion and detail accuracy, which is particularly important when printing fine details like the tower’s intricate ironwork. While faster prints may save time, they can compromise the quality of fine features, leading to an inferior final product.
Post-Processing Techniques: After printing, techniques such as sanding, painting, or applying a clear coat can significantly enhance the visual appeal of the model. These steps can help to smooth out any layer lines and add realism, making the finished print look more like the actual Eiffel Tower.
Related Post: