The first thing that struck me about the 21-in-1 3D Printer Smoothing & Soldering Kit wasn’t just its versatility but the way it handles finishing tasks. After hands-on testing, I found it sharp at smoothing rough prints thanks to its precise temperature control and ergonomic design. Its quick heat-up and clear LCD display make delicate work much easier, especially when fine-tuning or repairing prints. This tool really elevates the quality of your finished projects, making surfaces smooth and professional-looking.
Compared to the voltrish Deburring Tool or the comprehensive 3D Printer Tools Kit, the SARDVISA kit delivers a more targeted smoothing experience with specialized tips and temperature precision. The Deburring Tool excels at removing burrs on various materials but falls short in post-printing refinement. Meanwhile, the all-in-one toolkit offers many tools but doesn’t focus solely on smooth finishes. Trust me, this kit stands out for its balance of power, control, and ease of use, making it the best choice for achieving a flawlessly smooth surface.
Top Recommendation: 21-in-1 3D Printer Smoothing & Soldering Kit
Why We Recommend It: This product offers fast heating with precise temperature control (180℃-500℃), ergonomic design, and specialized tips for smoothing, repairing, and modifying 3D printed parts. Its ability to handle high-temperature adjustments and easy tip replacement give it a clear edge over simpler deburring tools and broader toolkits that lack dedicated post-printing features. This focused performance makes it the best for perfecting a smooth finish.
Best 3d printer for smooth finish: Our Top 5 Picks
- 21-in-1 3D Printer Smoothing & Soldering Kit – Best for Post-Processing and Smoothing
- voltrish 11-Blade Deburring Tool for 3D Printing, – Best Value
- 3D Printer Tools Kit Essential, 3D Printing Tools Kit, 3D – Best Premium Option
- 3D Printer Smoothing Kit with Temp Control and Tips – Best for Achieving a Smooth Finish with Temperature Control
- JAYO Silk Dual & Tri-Color PLA Filament Set, 8 Rolls, 2kg – Best for Beginners
21-in-1 3D Printer Smoothing & Soldering Kit

- ✓ Quick heat-up and precise control
- ✓ Comfortable ergonomic design
- ✓ All-in-one versatile kit
- ✕ Slightly bulky for tight spaces
- ✕ Limited high-temperature tips
| Power | 80W ceramic heating core |
| Temperature Range | 180°C to 500°C (356°F to 932°F) |
| Display | High-definition LCD screen with temperature readings |
| Tip Compatibility | Interchangeable brass tips and heat-set nuts |
| Control Features | Precise temperature control with ℃/°F switching and accidental start-up protection |
| Accessories | Includes soldering iron, brass tips, heat-set nuts, stand, tweezers, sanding sticks, and storage organizers |
I didn’t expect a soldering kit to completely change the way I handle my 3D prints, but this 21-in-1 setup surprised me right away. When I first grabbed the soldering iron, I noticed how quickly it heated up—within seconds, I was ready to go.
The high-def LCD screen displaying temperature was a game-changer, giving me precise control without guesswork.
The design is thoughtful, with an ergonomic silicone sleeve that feels comfortable even during longer sessions. I especially appreciated the slip-proof grip because it made maneuvering around tiny print details much easier.
Swapping out the brass tips was effortless—just unscrew and replace, no fuss, no tools needed. It’s perfect for fine adjustments or smoothing out rough edges on my printed parts.
The kit’s versatility really shines with the included accessories. The sanding sticks and tweezers made post-processing so much more manageable.
I used the heat-set nuts and the soldering iron to strengthen joints on my models, which improved both their look and durability. The storage organizers kept everything tidy, so I wasn’t hunting for tools in a cluttered drawer.
Using this for smoothing, repairing, and customizing my 3D printed parts has been a breeze. It’s clear the kit was designed with both beginners and pros in mind, offering reliable performance and safety features like the accidental start protection.
Honestly, it’s made my post-processing workflow smoother and more satisfying.
voltrish 11-Blade Deburring Tool for 3D Printing,

- ✓ Sharp, high-speed steel blades
- ✓ Ergonomic, durable handle
- ✓ Versatile for multiple materials
- ✕ Blades can be tricky to replace
- ✕ Might be too aggressive for very delicate prints
| Blade Material | High-speed steel |
| Number of Blades | 11 blades included |
| Handle Material | Anodized aluminum |
| Blade Compatibility | Suitable for metal, resin, epoxy, PVC, and copper pipes |
| Intended Use | Deburring, reaming, chamfering for 3D printing and metal fabrication |
| Durability | Designed for heavy-duty, long-lasting performance |
While cleaning up a particularly tricky 3D print, I discovered that the Voltrish 11-Blade Deburring Tool isn’t just for metal or pipes—it works surprisingly well on delicate resin edges too. I expected it to be too aggressive, but the high-speed steel blades are sharp enough to smooth out burrs without damaging the print.
The ergonomic handle really caught my attention. It feels solid and comfortable, even after prolonged use, thanks to the anodized aluminum finish.
It’s clear this tool was built for heavy duty, but it’s light enough to maneuver easily around small, intricate parts.
Switching between the 11 blades is effortless, thanks to a straightforward mechanism. I appreciated how each blade set came sharp and ready to go, saving me time from sharpening or replacing blades prematurely.
Plus, it’s versatile—perfect for finishing not just 3D prints but also working on pipes and other materials.
What really surprised me is how durable it feels. Despite the heavy-duty construction, it’s still precise enough for delicate work.
Whether you’re reaming, chamfering, or deburring, this tool handles it all without slipping or losing its edge.
At just under $7, it’s a fantastic value. You get 11 blades plus a sturdy handle, meaning you’re well-equipped for all your finishing projects—big or small.
Honestly, I hadn’t expected a tool at this price point to perform this well, but it’s become a go-to for smoothing out my 3D prints quickly and cleanly.
3D Printer Tools Kit Essential, 3D Printing Tools Kit, 3D

- ✓ High-quality, durable tools
- ✓ Wide range of functions
- ✓ Portable and easy to store
- ✕ Slightly heavier case
- ✕ Some tools could be more ergonomic
| Number of Tools | 48 essential tools |
| Blade Material | High-quality carbon steel |
| Blade Types | Deburring blades (including 5 extra blades), wire cutters, precision drills |
| Measurement Tools | Digital caliper |
| Tool Construction | Hardened steel for durability |
| Intended Use | Post-printing finishing, filament trimming, precision drilling, nozzle cleaning |
The moment I picked up this 3D printing tools kit, I immediately noticed how solid and well-crafted the deburring tool felt in my hand. Its ergonomic grip and sharp blades made removing rough edges from my prints feel almost effortless.
That’s a game-changer when you’re aiming for that smooth, professional finish without spending extra time sanding.
The kit’s variety of tools is impressive. From precision wire cutters to a mini needle file set, everything feels high-quality and ready for detailed work.
I especially appreciated the digital caliper—it’s accurate and easy to read, helping me fine-tune dimensions with confidence.
One standout feature is the inclusion of multiple blades and drills, which means I can tackle different post-processing tasks without hunting for extras. The stainless steel spatulas, combined with the plastic ones, make removing prints from the build plate and smoothing surfaces less stressful.
Plus, the tools are all stored in a lightweight, portable case, so I can bring them along to different print projects or workshops without fuss.
The construction is sturdy—many tools are hardened carbon steel, so they withstand regular use without dulling quickly. And honestly, the customer support has been reassuring; knowing I can get free replacements for damaged parts gives me peace of mind.
Overall, this kit makes achieving a flawless, smooth finish much more manageable. It’s perfect for hobbyists and professionals who want reliable, versatile tools in one package.
3D Printer Smoothing Kit with Temp Control and Tips

- ✓ Fast heating and stable temp
- ✓ Versatile tips for all needs
- ✓ Easy tip swapping
- ✕ Slightly loud operation
- ✕ Limited tip lifespan
| Power | 80W electric iron |
| Temperature Range | 180°C to 500°C |
| Voltage | 110V |
| Tips Included | 8 interchangeable soldering tips |
| Heating Time | Heats up quickly (exact time not specified) |
| Temperature Control | Digital LED display with adjustable settings |
There’s a certain satisfaction in finally getting that smooth, polished finish on my 3D prints, and this smoothing kit has been on my wishlist for ages. When I finally unboxed it, I immediately noticed how sturdy and well-made the electric iron felt in my hand.
The digital display is bright and clear, making temperature adjustments a breeze.
Using it for the first time, I appreciated how quickly it heated up—within minutes, I was ready to go. The adjustable temperature from 180°C to 500°C covers all my filament needs, from PLA to PETG.
The included 8 tips give me versatility, whether I’m smoothing large surfaces or doing fine detailing.
The tips screw on easily, and switching between them is straightforward, saving me time during my projects. The iron glides smoothly over prints, melting away layer lines and imperfections with minimal effort.
Plus, the temperature stays stable thanks to the LED display, which helps me avoid overheating or underheating.
I found it especially useful for repairs—filling in gaps or fixing rough edges. The heat set insert tips are perfect for adding or removing inserts, making my workflow more efficient.
It’s lightweight enough to hold comfortably, yet powerful enough to get the job done quickly.
Overall, it feels like a real upgrade from my previous finishing tools. For under $30, it offers precision and control that makes my 3D print finishing much more satisfying.
It’s a handy addition whether you’re refining details or repairing parts.
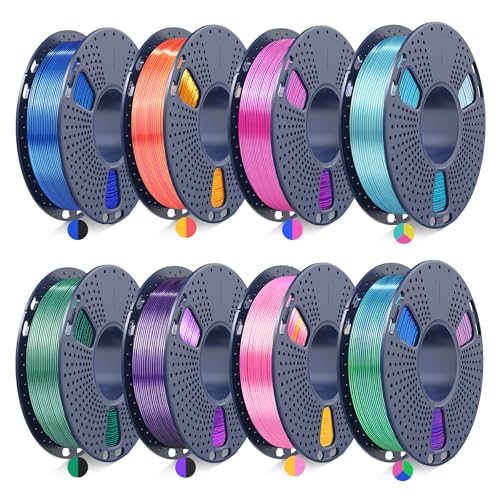
JAYO Silk Dual & Tri-Color PLA Filament Set, 8 Rolls, 2kg
- ✓ Vibrant, glossy finish
- ✓ Easy to use and color change
- ✓ Tangle-free winding system
- ✕ Sensitive to over-extrusion
- ✕ Slightly higher temperature needed
| Filament Diameter | 1.75 mm ± 0.02 mm |
| Spool Diameter | 120 mm (4.7 inches) |
| Spool Width | 43 mm (1.69 inches) |
| Spool Hub Hole Diameter | 42 mm (1.65 inches) |
| Total Weight | 2 kg (4.4 lbs) |
| Recommended Printing Temperature | 205-235°C |
Opening up the box of the JAYO Silk Dual & Tri-Color PLA Filament Set, I immediately noticed how vibrant and shiny each spool looked. The glossy finish practically begged to be touched, promising smooth, high-quality prints right from the start.
Loading the filaments into my printer was a breeze thanks to their neatly wound spools and consistent diameter of 1.75mm. I was curious to see how the color-changing feature would work, so I rotated a few spools and was surprised by the dynamic color transformations.
It’s like having multiple filaments in one, which is perfect for art projects or intricate designs.
Printing with these filaments felt silky smooth, with minimal stringing or tangles. The recommended settings of 205-235°C nozzle temp and 50-60°C bed temp worked well, and the print speed of 50-200mm/s kept everything consistent.
The glossy surface really made my models pop, especially when light hit the prints at the right angle.
The self-developed winding device really does prevent tangles, a huge plus during longer print jobs. Plus, the color options—like red/blue and blue/green/purple—opened up creative possibilities I hadn’t explored before.
The overall experience feels premium, especially considering the price point of USD 49.99 for 8 spools.
One thing I noticed is that while the silk finish adds a gorgeous shine, it can sometimes be a little sensitive to over-extrusion. Also, if you’re printing at the upper temperature range, you might want to keep an eye on the bed adhesion.
What Features Promote a Smooth Finish in 3D Printing?
Several features contribute to achieving a smooth finish in 3D printing.
- High Resolution: A printer with high resolution can produce finer layers, which minimizes visible lines and imperfections on the final print. The smaller the layer height, the smoother the surface will appear, especially in detailed models.
- Advanced Extruder Technology: Printers equipped with advanced extruder systems can maintain consistent filament flow and temperature. This leads to better layer adhesion and reduces issues like stringing or blobs, contributing to a smoother finish.
- Quality Build Plate: A well-calibrated and high-quality build plate ensures that the first layers adhere correctly, which is crucial for a smooth final product. A stable foundation prevents warping and shifts during printing, maintaining the integrity of the surface.
- Filament Quality: The type and quality of filament used greatly affect the finish. High-quality filaments tend to have better flow characteristics and consistency, leading to fewer defects and a smoother texture on the printed object.
- Post-Processing Capabilities: Some printers offer features that facilitate post-processing, such as automatic smoothing or compatibility with smoothing solutions. Techniques like sanding, chemical smoothing, or applying coatings can significantly enhance the final appearance of prints.
- Enclosed Printing Environment: An enclosed printer helps to maintain a consistent temperature during the print process. This reduces the chances of warping and layer separation, both of which can negatively impact the finish of the printed object.
- Motion System Precision: A printer with a precise motion system, such as CoreXY or Cartesian setups with high-quality linear rails, ensures accurate movement of the print head. This precision reduces artifacts and contributes to a cleaner finish on the printed surface.
How Does Print Head Technology Influence Surface Quality?
The influence of print head technology on surface quality is crucial for achieving a smooth finish in 3D printing.
- Extruder Design: The design of the extruder impacts how filament is melted and deposited, which in turn affects layer adhesion and surface consistency. A well-designed extruder can maintain a steady flow of filament, reducing issues like under-extrusion or over-extrusion that lead to uneven surfaces.
- Nozzle Size: The diameter of the nozzle determines the thickness of the extruded filament layer. Smaller nozzles allow for finer detail and smoother finishes due to the ability to print thinner layers, while larger nozzles can produce quicker prints but may compromise on surface quality.
- Print Speed: The speed at which the print head moves can significantly affect surface quality. Higher speeds can lead to vibration and inaccuracies, resulting in a rougher finish, while slower speeds generally allow for better layer adhesion and more precise detail, contributing to a smoother overall appearance.
- Temperature Control: Maintaining optimal temperature settings for both the extruder and the heated bed is essential for surface quality. Inconsistent temperatures can cause filament to cool too quickly or unevenly, leading to warping or layer separation, which detracts from the smoothness of the final print.
- Multi-material Capabilities: Advanced print heads can handle multiple materials simultaneously, allowing for the use of support structures or composite filaments that enhance surface finish. The ability to switch between different types of filaments can also enable smoother transitions and finishes that are not possible with single-material prints.
- Layer Height Adjustment: Some print heads allow for dynamic adjustment of layer height during printing, which can optimize surface quality based on the specific details of the model. This feature means that finer details can be printed with thinner layers while broader areas can be printed faster with thicker layers, balancing speed and quality effectively.
What Types of Filaments Are Best for Achieving Smooth Surfaces?
When aiming for smooth surfaces in 3D printing, certain filaments stand out due to their unique properties and finishing capabilities:
- PLA (Polylactic Acid): PLA is renowned for its ease of use and ability to produce smooth finishes right off the print bed. Its low shrinkage and excellent layer adhesion contribute to refined details, making it ideal for beginners and projects requiring a polished look.
- ABS (Acrylonitrile Butadiene Styrene): ABS can achieve a smooth surface finish with post-processing techniques like acetone vapor smoothing, which melts the outer layers slightly. This filament is durable and heat-resistant, making it suitable for functional parts while still allowing for a refined aesthetic when finished properly.
- ASA (Acrylonitrile Styrene Acrylate): ASA is similar to ABS but offers better UV resistance, making it more suitable for outdoor applications. It can also be smoothed with acetone, resulting in a glossy finish that is aesthetically pleasing while retaining the mechanical properties needed for functional use.
- PETG (Polyethylene Terephthalate Glycol-Modified): PETG combines the advantages of PLA and ABS, providing good layer adhesion and a glossy finish without the need for extensive post-processing. It is an excellent choice for those needing both smooth surfaces and durability, suitable for both decorative and functional prints.
- Silk or Glossy PLA: This variant of PLA contains additives that enhance its luster, resulting in a shiny finish that closely resembles polished surfaces. It’s perfect for creating visually striking models while maintaining the user-friendly characteristics of standard PLA.
- Nylon: Nylon offers excellent strength and flexibility and can be polished to achieve a smooth finish. Although it requires more careful handling due to its tendency to absorb moisture, the resulting prints can have a very refined surface when processed correctly.
Which 3D Printers Are Highly Rated for Smooth Finishes?
The best 3D printers for achieving smooth finishes include:
- Prusa i3 MK3S+ – This printer is renowned for its reliable performance and excellent print quality, making it a favorite among enthusiasts.
- Anycubic Photon Mono X – A resin printer that delivers high-resolution prints with exceptional detail, ideal for projects requiring a smooth finish.
- Ultimaker S3 – Known for its precision and ease of use, this printer is a top choice for professionals looking for a smooth surface on larger prints.
The Prusa i3 MK3S+ is equipped with advanced features such as a high-quality print bed and automatic bed leveling, which help to ensure that prints adhere properly and come out with a smooth surface finish. Its open-source nature allows for extensive customization, further enhancing print quality and consistency.
The Anycubic Photon Mono X is a powerful resin printer that utilizes LCD technology to achieve incredibly fine details and a smooth finish. Its larger build volume compared to other resin printers allows for more extensive projects while maintaining the high-quality output expected from a resin printer.
The Ultimaker S3 is designed for professional use, featuring dual extrusion capabilities and a high-quality print head that helps deliver smooth finishes on complex geometries. Its user-friendly interface and robust software support make it suitable for both beginners and experienced users looking for outstanding print quality.
What Models Are Most Recommended by Users?
Some of the best 3D printers for achieving a smooth finish are:
- Prusa i3 MK3S+: This printer is renowned for its reliability and excellent print quality, which is enhanced by its robust design and advanced features. Users appreciate its ability to produce smooth finishes due to its high-resolution capabilities and quality filament options.
- Anycubic Photon Mono X: Known for its high precision and detail, this resin printer excels in delivering smooth surface finishes. Users favor it for its large build volume and speed, making it ideal for detailed models and prints that require a polished appearance.
- Ultimaker S3: This professional-grade printer is frequently recommended for its consistency and superior print quality. The Ultimaker S3 offers a dual extrusion system, allowing for the use of support materials that can be easily removed, resulting in a smoother finish on complex designs.
- Creality Ender 3 V2: A budget-friendly option, the Ender 3 V2 is praised for its excellent performance and smooth prints when properly calibrated. Users often modify it with upgrades that further enhance its capability to produce high-quality finishes.
- Raise3D Pro2: With its dual nozzle system and enclosed build chamber, this printer is favored for its ability to handle a variety of materials while maintaining a smooth finish. Users report that it provides consistent print quality, even for larger models, thanks to its advanced features and high temperature capabilities.
How Do Different Price Points Affect Smooth Finish Quality?
The price points of 3D printers can significantly influence the quality of the smooth finish they produce.
- Entry-Level Printers: These printers typically range from $200 to $500 and often come with basic features that may limit their ability to produce a smooth finish. They may struggle with consistent layer adhesion and may require significant tuning or upgrades to achieve a high-quality output.
- Mid-Range Printers: Priced between $500 and $1,500, mid-range printers usually offer better build quality and more advanced features such as improved hotends and heated beds. This results in better filament compatibility and more reliable performance, leading to smoother finishes compared to entry-level models.
- High-End Printers: These printers usually cost over $1,500 and are designed for professionals or serious hobbyists. They incorporate advanced technologies like dual extrusion, high-resolution printing, and superior motion systems, which enable them to produce exceptionally smooth finishes with minimal post-processing required.
- Industrial Printers: With prices often exceeding $10,000, industrial 3D printers utilize cutting-edge technology and materials to achieve the highest quality finishes. They typically have robust features such as advanced temperature control and precision engineering, making them ideal for applications where finish quality is paramount, such as in aerospace or automotive industries.
How Do Printing Techniques Impact the Quality of Surface Finishes?
Printing techniques significantly influence the quality of surface finishes in 3D printing, affecting both aesthetic and functional aspects of printed objects.
- Fused Deposition Modeling (FDM): This technique is popular for its accessibility and cost-effectiveness, but it may not always yield the smoothest finishes. The layer-by-layer deposition of thermoplastic filament can lead to visible layer lines unless post-processing techniques like sanding or acetone vapor smoothing are applied.
- Stereolithography (SLA): SLA employs a resin that is cured by UV light, resulting in highly detailed and smooth finishes. This technique excels in creating intricate designs with minimal visible layers, making it ideal for prototypes and detailed models.
- Selective Laser Sintering (SLS): SLS uses a laser to fuse powdered materials together, leading to durable parts with good surface quality. While the finish may not be as smooth as SLA, it can be improved with post-processing methods, and it allows for complex geometries without the need for support structures.
- Digital Light Processing (DLP): Similar to SLA, DLP utilizes a digital light projector to cure resin, resulting in fast printing speeds and high-quality finishes. The layer resolution can be adjusted, allowing for exceptionally smooth surfaces and fine detail reproduction, making it suitable for high-end applications.
- Multi-Jet Fusion (MJF): This technique uses inkjet technology to apply agents to powder material, which are then fused by heat. MJF produces strong and functional parts with a relatively smooth finish, and it can achieve detailed features, making it a practical choice for industrial applications.
Why Are Different Printing Speeds Crucial for a Smooth Finish?
According to a study published in the journal “Additive Manufacturing,” optimal printing speeds enhance layer bonding and reduce the appearance of defects, such as stringing or rough surfaces (Bhandari et al., 2020). When a 3D printer operates at a speed that is too high, it can lead to issues like under-extrusion, where the filament does not flow adequately, resulting in gaps and a rough finish.
The underlying mechanism involves the relationship between extrusion temperature and filament flow. At higher speeds, the filament may not have sufficient time to melt and adhere properly to the previous layer, resulting in weak bonds. Conversely, lower speeds allow for better thermal transfer and material flow, which promotes smoother finishes. Additionally, slower speeds can improve the printer’s ability to make fine details, as the nozzle has more time to accurately deposit material, reducing the likelihood of artifacts that detract from a polished appearance.
What Layer Heights Yield the Best Results in Print Smoothness?
The layer heights that yield the best results in print smoothness vary based on the 3D printing technology and material used.
- 0.1 mm Layer Height: This layer height is often regarded as optimal for achieving a smooth finish, especially in FDM (Fused Deposition Modeling) printers. It allows for finer details and reduces the appearance of layer lines, making it ideal for intricate designs and models that require a high level of detail.
- 0.2 mm Layer Height: While slightly thicker than 0.1 mm, a 0.2 mm layer height strikes a balance between speed and quality. It is commonly used for larger prints where time is a factor, and it generally still provides a reasonably smooth finish while maintaining good structural integrity.
- 0.05 mm Layer Height: For those seeking the ultimate in smoothness, a 0.05 mm layer height is often the go-to choice. This ultra-fine setting is particularly useful for printing high-resolution models and can result in nearly invisible layer lines, though it significantly increases print time and may require more precise calibration and material considerations.
- Variable Layer Heights: Some advanced slicers allow for variable layer heights, where the printer uses different layer heights throughout the print. This technique can maximize smoothness in detailed areas while maintaining speed in less detailed sections, offering a versatile approach to achieving the best finish.
What Maintenance Practices Enhance 3D Printing Surface Quality?
Several maintenance practices can significantly enhance the surface quality of 3D printed objects:
- Regular Calibration: Ensuring that the printer is properly calibrated can drastically improve the surface finish. This includes checking the bed leveling, nozzle height, and extruder settings to maintain precision in printing.
- Nozzle Maintenance: Keeping the nozzle clean and in good condition is crucial for preventing clogs and ensuring consistent filament flow. A worn or damaged nozzle can lead to uneven extrusion, which negatively affects the surface quality.
- Filament Quality Control: Using high-quality filament can enhance the final finish of the print. Poor quality filament can contain impurities or inconsistencies that lead to rough surfaces or defects in the printed object.
- Environment Control: Maintaining a stable printing environment, such as controlling temperature and humidity, can minimize issues like warping or layer adhesion problems. A controlled environment helps in achieving a smoother finish by reducing unwanted effects caused by external factors.
- Regular Maintenance Checks: Performing routine checks on the printer components, including belts, bearings, and lead screws, ensures that everything is functioning optimally. Properly maintained components contribute to accurate movements, resulting in a smoother surface finish.
- Software Settings Optimization: Adjusting slicer settings such as layer height, print speed, and temperature can have a significant impact on surface quality. Fine-tuning these parameters based on the material being used can help achieve the desired smoothness.
- Post-Processing Techniques: Implementing post-processing methods such as sanding, polishing, or using chemical smoothing agents can further enhance the surface finish of prints. These techniques can remove layer lines and imperfections, resulting in a more aesthetically pleasing final product.
How Often Should Calibration Occur for Optimal Results?
Calibration frequency is crucial for achieving optimal 3D printing results, particularly for obtaining a smooth finish.
- Before Each Print: Performing a quick calibration before starting every print can help ensure that the printer settings are optimal for the specific material and design being used.
- Daily Use: For printers that are used daily, a thorough calibration should be conducted at least once a day to maintain consistent quality and accuracy.
- After Material Change: Whenever you switch filament types or brands, it’s essential to recalibrate the printer to account for differences in material properties, which can affect adhesion and layering.
- Weekly Maintenance: A weekly check on calibration settings and alignment can help catch any drift in the printer’s performance, especially in machines that have a lot of moving parts.
- Post-Maintenance: Following any maintenance or repairs, recalibrating the printer is necessary to ensure that all adjustments made do not affect the print quality.
Performing a quick calibration before each print can help ensure that the printer settings are optimal for the specific material and design being used, which is particularly important for achieving a smooth finish.
For printers that are used daily, a thorough calibration should be conducted at least once a day to maintain consistent quality and accuracy, as even minor shifts can lead to visible defects in the printed object.
Whenever you switch filament types or brands, it’s essential to recalibrate the printer to account for differences in material properties, which can affect adhesion and layering, and ultimately the smoothness of the finish.
A weekly check on calibration settings and alignment can help catch any drift in the printer’s performance, especially in machines that have a lot of moving parts, ensuring that your prints remain high-quality over time.
Following any maintenance or repairs, recalibrating the printer is necessary to ensure that all adjustments made do not affect the print quality, thus maintaining the integrity of your projects.
What Are the Best Cleaning Techniques for Print Heads?
The best cleaning techniques for print heads in 3D printers include the following methods:
- Manual Cleaning: This method involves physically removing the print head and using cleaning solutions or tools to remove clogs and residue.
- Cold Pull Technique: This technique involves heating the nozzle to a specific temperature, then allowing it to cool slightly before pulling the filament out to remove debris.
- Cleaning Filament: Specialized cleaning filaments can be run through the printer to absorb and remove accumulated debris from the nozzle and print head.
- Ultrasonic Cleaning: This involves submerging the print head in a cleaning solution within an ultrasonic cleaner, effectively loosening debris through high-frequency sound waves.
- Chemical Solvents: Using solvents like isopropyl alcohol or acetone can dissolve certain materials stuck in the print head, allowing for a more thorough cleaning.
Manual cleaning is effective for stubborn clogs; it requires disassembly of the print head, which allows for a thorough inspection and cleaning. Care should be taken to avoid damaging any components during this process.
The cold pull technique is particularly useful for removing softer materials that can clog the nozzle. By adjusting the temperature, you can effectively pull out leftover filament and debris without disassembling the printer.
Cleaning filaments are designed to clean the nozzle while printing, making them a convenient option. They work by expanding and contracting in the nozzle, capturing residue as they are pushed through.
Ultrasonic cleaning is a powerful method that can reach areas that are difficult to clean manually. The ultrasonic waves create tiny bubbles that collapse, creating a scrubbing action that can remove even the most stubborn clogs.
Chemical solvents can be used for a deep clean, but it is essential to ensure compatibility with the printer’s materials. Care should be exercised to follow safety guidelines when handling chemicals, as they can be hazardous.
What Accessories Improve the Smoothness of 3D Prints?
Using bed leveling tools ensures that the print bed is perfectly level, which is essential for a successful first layer adhesion. Proper leveling prevents issues like uneven extrusion that can lead to rough surfaces.
How Do Heated Beds Contribute to Better Finishes?
Consistent temperature distribution is essential to avoid thermal stress, which can lead to defects in the final product. By maintaining an even heat across the print area, heated beds ensure that the filament melts uniformly, contributing to a smoother surface finish.
Reduced layer separation is another significant benefit, as it ensures that each layer adheres properly to the one below it. This continuous bonding is crucial for creating a solid and aesthetically pleasing object, free from gaps or uneven textures.
Material compatibility is a key factor in selecting the best 3D printer for a smooth finish. Some materials require heated beds to minimize issues such as curling or cracking, which can severely affect the surface quality of the finished print.
Why Are Upgraded Nozzles Important for Surface Quality?
Upgraded nozzles are important for surface quality because they enhance the precision and consistency of filament extrusion, which directly affects the smoothness of the finished print.
According to a study published in the Journal of Additive Manufacturing, nozzle diameter, material quality, and design significantly influence the layer adhesion and surface finish of 3D printed objects (Ahn et al., 2020). Higher quality nozzles, often with better thermal conductivity and smoother inner surfaces, allow for more uniform filament flow, reducing imperfections and artifacts on the print surface.
The underlying mechanism involves the interaction between the nozzle and the filament. A higher-quality nozzle can maintain a more stable temperature, preventing issues like clogs and inconsistent extrusion. This results in better layer adherence and less warping, which are crucial for achieving a smooth finish. Additionally, upgraded nozzles can be designed to accommodate a wider range of filament materials, thereby allowing for optimized printing conditions that further enhance surface quality.
Furthermore, the geometry of upgraded nozzles can influence the flow rate and the way the filament is deposited onto the print bed. A well-designed nozzle can produce finer control over extrusion, resulting in more precise layer deposition. This precision translates into better detail retention and a smoother finish, making upgraded nozzles a vital component for users seeking the best 3D printer for smooth finishes.
Related Post: