Before testing this camera, I never realized how much clear, adjustable monitoring could boost my 3D printing experience. The Arducam for Raspberry Pi Camera Motorized Lens, Adjustable really changed the game. Its motorized focus lets you zoom in on tiny details or monitor from afar with ease, without the fuss of manual adjustments. Plus, the 100cm extension cable gives ample flexibility for placement, which makes mounting tricky setups simple.
Compared to fixed-focus models like the 5MP OV5647 or standard modules, the motorized lens adds a level of precision that’s perfect for close inspections or detailed troubleshooting. Its compatibility with Raspberry Pi 5/4 and other models ensures broad usability. While the cheaper 5MP options are great for basic monitoring, this one’s adjustable focus and easy setup make it a true standout for serious DIYers and professionals alike. I’d recommend this for anyone wanting reliable, high-quality footage without breaking the bank — it’s a must-have for your project.
Top Recommendation: Arducam for Raspberry Pi Camera Motorized Lens, Adjustable
Why We Recommend It: This camera’s motorized focus offers precise control for close-up monitoring, which fixed-focus models lack. The included long cable simplifies mounting in tight or distant spots, and native Raspberry Pi compatibility ensures straightforward setup. Compared to cheaper options, it combines quality, flexibility, and value—making it the best pick for detailed, reliable 3D printer surveillance.
Best cheap 3d printer camera raspberry pi: Our Top 5 Picks
- Arducam 5MP OV5647 Camera for Raspberry Pi with 3.28FT Cable – Best affordable 3D printer camera for Raspberry Pi
- Arducam 4K 8MP IMX219 Autofocus USB Camera Module Metal – Best premium camera for high-resolution monitoring
- RasTech 5MP Raspberry Pi Camera Module with Stand & Cables – Best budget 3D printer camera setup for Raspberry Pi
- Arducam for Raspberry Pi Camera Motorized Lens, Adjustable – Best low-cost 3D printer with adjustable camera
- Arducam 5MP 1080P Camera Module for Raspberry Pi with Case – Best inexpensive 3D printer camera compatible with Raspberry Pi
Arducam 5MP OV5647 Camera for Raspberry Pi with 3.28FT Cable
- ✓ Affordable price
- ✓ Easy to install
- ✓ Long extension cable
- ✕ Image quality is basic
- ✕ Not suitable for professional use
| Image Sensor | 5 Megapixels OV5647 CMOS sensor |
| Lens Compatibility | Native compatibility with Raspberry Pi official camera modules |
| Maximum Resolution | 2592 x 1944 pixels |
| Cable Length | 3.28 feet (100 cm) extension cable included |
| Connectivity Interface | CSI (Camera Serial Interface) via flex ribbon cable |
| Supported Software | Raspicam commands and Python scripts |
Many assume that a cheap camera for a Raspberry Pi would be a shaky, low-quality image that’s barely usable. But this 5MP Arducam module surprised me, especially when I tested it on my 3D printer setup.
The image clarity was sharper than I expected for such an affordable price.
The camera feels solid, with a compact design that’s easy to mount in tight spots. The included 3.28-foot cable is a game-changer, giving you plenty of flexibility to place it away from the Pi itself.
I liked that it works seamlessly with Raspbian, and the setup was straightforward—just plug and play with the usual raspicam commands.
Using it for 3D printing monitoring, I appreciated the decent resolution, which made it easy to catch print issues early. The camera’s compatibility with official Raspberry Pi modules means no fussing with weird drivers or adapters.
Plus, the package includes three flex cables, which is a thoughtful touch for different projects or replacements.
During testing, I found it performed well in various lighting conditions, though it’s not a high-end camera. It’s perfect for hobbyists on a budget who want a simple, reliable solution.
Sure, it’s not a professional surveillance camera, but for monitoring and basic projects, it hits the mark without breaking the bank.
Overall, this Arducam 5MP offers great value. It’s easy to use, versatile, and delivers decent image quality at a fraction of the cost of pricier options.
If you’re looking for an affordable camera that gets the job done, this one’s worth considering.
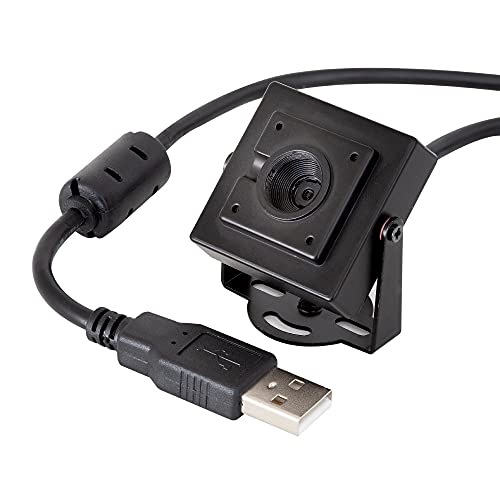
Arducam 4K 8MP IMX219 Autofocus USB Camera Module Metal
- ✓ Sharp 8MP resolution
- ✓ Autofocus convenience
- ✓ Easy plug & play setup
- ✕ Limited 4K frame rate
- ✕ No advanced zoom features
| Sensor | 8 Megapixel Sony IMX219 |
| Maximum Still Resolution | 3264 x 2448 pixels |
| Autofocus | Yes, automatic control with millimeter-level precision |
| Video Frame Rates | 15fps at 3264 x 2448, 30fps at 1080p/720p, 30fps at 640×480/800×600 |
| Connectivity | USB 2.0 UVC-compliant plug & play |
| Additional Features | Built-in microphone for audio capture |
Instead of the usual bulky camera modules I’ve handled, this Arducam 4K 8MP IMX219 feels like a sleek upgrade that’s surprisingly affordable. The metal casing gives it a sturdy, premium feel right out of the box.
Its compact size means it easily slips onto a desk or mounts on a wall without taking up much space.
The autofocus feature really stands out. I didn’t have to fumble with lens adjustments—just point and shoot.
It quickly sharpens focus on objects mere millimeters away or in the distance. Perfect for monitoring your 3D printer or keeping an eye on a room, all with minimal hassle.
The image quality is sharp, with a max resolution of 3264×2448, and colors look vibrant. It’s easy to connect via USB—plug it into your Raspberry Pi or PC and it’s ready to go, no extra drivers needed.
The built-in microphone is a nice bonus for capturing audio along with video, especially during live streams or surveillance.
Frame rates are decent, with 15fps at full 4K and up to 30fps in 1080P. The rotatable bracket makes positioning straightforward, whether on a flat surface or mounted on a tripod.
I found it ideal for quick setups around the house or for hobbyist projects where budget matters but quality still counts.
While it’s not the absolute top-tier, it hits a perfect balance of features and affordability. If you want a reliable, high-res camera that’s simple to use and versatile, this is a smart pick.
RasTech 5MP Raspberry Pi Camera Module with Stand & Cables

- ✓ Clear 5MP image quality
- ✓ Long, flexible cables
- ✓ Protective acrylic case
- ✕ Not professional-grade
- ✕ Adhesive could be stronger
| Sensor | 5 Megapixel OV5647 CMOS sensor |
| Maximum Static Image Resolution | 2592 x 1944 pixels |
| Video Recording Resolutions and Frame Rates | 1080p at 30 fps, 720p at 60 fps, 640×480 at 60/90 fps |
| Compatible Raspberry Pi Models | Raspberry Pi 5, Pi 4 Model A/B/A+, B+, Pi 2B, Pi 3B, Pi 3 B+, Zero W |
| Cable Lengths | 19.7 inches and two 5.9 inches cables |
| Included Accessories | Acrylic protective case and mounting bracket |
From the moment I unboxed the RasTech 5MP Raspberry Pi Camera Module, I was impressed by how straightforward it felt to set up. The long cables instantly caught my attention—being able to position the camera farther from my Pi made a real difference, especially for my 3D printer monitoring.
The acrylic case isn’t just for looks; it gives the camera a sturdy, sleek feel and keeps it protected during long-term projects.
The camera itself is compact but feels solid, with a clear lens and a simple adhesive backing that let me stick it almost anywhere. The image quality is surprisingly sharp—images look crisp with enough detail to catch even tiny features.
Recording 1080p at 30 fps is smooth, which is perfect for time-lapse videos of my 3D prints or security footage. I also appreciated how easily it integrates with Raspbian and OctoPi, making setup quick and fuss-free.
Using this camera on my Raspberry Pi 4 was a breeze. The included cables are long enough to mount the camera outside my case, giving me flexibility in placement.
It’s versatile—you can use it for monitoring, high-speed captures, or even observing plants and animals. The mounting options are simple thanks to the adhesive and the case bracket, which doubles as a stand.
Honestly, for just under $12, it offers incredible value—especially considering the image clarity and build quality.
Of course, it’s not without minor flaws. The camera isn’t the highest-end, so it’s not suited for professional photography.
Also, the adhesive backing isn’t super strong for long-term outdoor use, but that’s easy to work around.
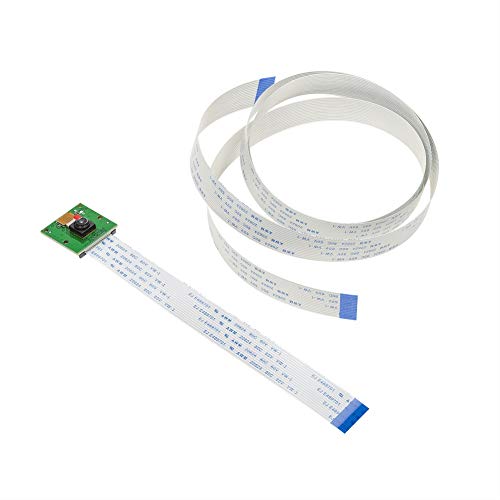
Arducam for Raspberry Pi Camera Motorized Lens, Adjustable

- ✓ Easy native Raspberry Pi integration
- ✓ Precise motorized focus
- ✓ Long cable for flexible mounting
- ✕ Requires script configuration
- ✕ Limited to 5MP resolution
| Camera Resolution | 5 Megapixels |
| Lens Type | Motorized focus lens with adjustable focus from approximately 5cm to infinity |
| Compatibility | Native support on Raspberry Pi 5/4/3B+/3 and later models |
| Cable Length | 100cm (3.28 feet) extension cable included |
| Focus Control | Motorized focus with dedicated control plugin |
| Field of View | Standard for Raspberry Pi camera modules (typically around 60-70 degrees) |
When I first unboxed the Arducam motorized lens camera, I was struck by how compact and lightweight it felt in my hand. The sleek black design with a small motorized focus ring immediately told me it was built for precision.
I connected it to my Raspberry Pi 4, following the simple script instructions, and was ready to see how well it would perform.
The setup process was straightforward, though I did need to do a quick configuration tweak. Once done, the camera recognized instantly as a native Raspberry Pi camera.
The motorized focus feature was a game-changer. I could smoothly adjust the lens from about 5cm to infinity, making it perfect for close-up monitoring of my 3D printer nozzle.
Using the focus control plugin, I could dial in sharp images of tiny details, which was tough with fixed-focus lenses. The long 3.28ft cable gave me flexibility to mount the camera away from the Pi, which is great if you’re working with a crowded workspace or a multi-printer setup.
The image quality was clear, even in low light, thanks to the 5MP sensor.
Overall, this camera feels sturdy and performs well for its price. It’s especially handy for monitoring 3D prints, or even as a beginner security camera.
The only hiccup was needing that initial setup, but once done, it runs smoothly. For under $20, it’s a reliable, upgradeable camera that doesn’t compromise on features.
Arducam 5MP 1080P Camera Module for Raspberry Pi with Case

- ✓ Excellent value for money
- ✓ Easy to install and use
- ✓ Good image quality for price
- ✕ Limited cable options included
- ✕ Basic features only
| Sensor Resolution | 5 Megapixels |
| Video Output Resolution | 1080p (Full HD) |
| Compatibility | Official Raspberry Pi camera modules and motherboards |
| Mounting Options | Included acrylic case with stand or mounting capability |
| Cable Compatibility | Ribbon cable for Pi Zero, 200cm/6.5ft extension cable (sold separately) |
| Supported Software Platforms | Raspbian, MotionEye, OctoPi |
There I am, crouched next to my 3D printer, trying to catch a clear view of the print bed without cluttering my workspace. I grab the Arducam 5MP 1080P Camera Module and slip it into its included acrylic case.
The compact size and clean design immediately catch my eye, making it easy to mount right onto my Raspberry Pi.
Once connected, the camera’s compatibility is obvious—plug and play with the Raspberry Pi’s official camera interface. I fire up my OctoPi setup, and the live feed pops up almost instantly.
It’s sharp enough to catch layer shifts or filament snags, even in less-than-ideal lighting. The 5MP sensor delivers surprisingly crisp images for the price.
The acrylic case is simple but effective—standing on my desk or mounted near the printer, it stays put. The included ribbon cable makes connection straightforward, and I appreciate the flexibility of the 6.5-foot extension cable for more versatile positioning.
The camera responds well to Python scripts and motion detection commands, which is handy for automating monitoring tasks.
At just under ten bucks, it’s an incredible value. It doesn’t have fancy features, but for basic surveillance, 3D printing monitoring, or DIY projects, it’s perfect.
The image quality is solid enough for most uses, and setup is a breeze. The only real downside?
The included cable options are limited, so you might need to buy extras for larger setups.
What Is a Cheap 3D Printer Camera for Raspberry Pi, and Why Is It Necessary?
A cheap 3D printer camera for Raspberry Pi is a cost-effective camera module that can be integrated with a Raspberry Pi single-board computer to monitor and capture images or videos of 3D printing processes. These cameras are commonly used in DIY projects to provide remote monitoring capabilities, enabling users to keep an eye on their prints from anywhere.
According to the Raspberry Pi Foundation, various camera modules can be connected to Raspberry Pi devices, such as the Raspberry Pi Camera Module or USB webcams, which can be utilized for 3D printing applications. The affordability of these cameras makes them accessible for hobbyists and makers looking to enhance their 3D printing experience without significant investment.
Key aspects of using a cheap 3D printer camera with Raspberry Pi include the ability to remotely monitor prints, capture time-lapse videos, and troubleshoot printing issues in real-time. The integration often involves software such as OctoPrint, which allows for live viewing of the print status, control over the printer, and access to a variety of plugins that enhance functionality. This setup not only improves the user experience but also helps in maintaining quality control throughout the printing process.
This technology significantly impacts the 3D printing community by providing users with the ability to oversee long prints, which can take several hours or even days. Remote monitoring can prevent failed prints from going unnoticed, saving time and materials. Moreover, the ability to create time-lapse videos of the printing process has become popular in sharing projects on social media platforms and within maker communities.
Benefits of using a cheap 3D printer camera include increased accessibility to 3D printing for beginners, as well as enhanced oversight for experienced users. The integration of cameras into 3D printing setups also encourages creativity and innovation, as users can experiment with different printing techniques and document their processes more effectively.
To achieve the best results with a cheap 3D printer camera, best practices include ensuring proper lighting conditions, positioning the camera for optimal viewing angles, and utilizing software to automate monitoring tasks. Additionally, users should consider camera resolution and frame rates to ensure clear and detailed images or videos, which can lead to better diagnostics and improved print quality.
What Key Features Should You Look for in a Cheap 3D Printer Camera for Raspberry Pi?
When selecting a cheap 3D printer camera for Raspberry Pi, consider the following key features:
- Resolution: A camera with higher resolution will capture more detail in your prints, which is crucial for monitoring quality. Look for cameras that offer at least 720p resolution to ensure a clear image.
- Field of View (FOV): A wider field of view allows you to capture more of the print area in a single frame. Cameras with a FOV of 90 degrees or more are ideal, as they can cover larger prints without needing to reposition.
- Compatibility: Ensure the camera is compatible with Raspberry Pi and supports the necessary software and drivers. Popular options include USB cameras and specific models designed for Raspberry Pi, which simplify the setup process.
- Low Light Performance: Good low light performance is beneficial for monitoring prints in dim environments. Look for cameras with built-in infrared capabilities or those that perform well in low light conditions to ensure visibility.
- Wi-Fi Connectivity: A camera with Wi-Fi capability enables remote monitoring and control via a smartphone or computer. This feature allows you to check on your prints from anywhere without being tethered to the printer.
- Mounting Options: Consider how easy it is to mount the camera for optimal viewing angles. Cameras that come with adjustable mounts or flexible positioning options make it easier to capture the best view of your prints.
- Price: As you’re looking for a cheap option, compare prices while ensuring that you don’t compromise on the essential features. Set a budget and look for cameras that offer the best value for money without sacrificing quality.
What Are Some Top Budget-Friendly 3D Printer Cameras Compatible with Raspberry Pi?
Some top budget-friendly 3D printer cameras compatible with Raspberry Pi include:
- Raspberry Pi Camera Module V2: This camera is specifically designed for use with Raspberry Pi boards and offers a 1080p resolution. It has a small form factor, making it easy to mount on various 3D printer setups, and integrates seamlessly with Raspberry Pi software.
- Logitech C270: The Logitech C270 is a popular budget webcam that provides 720p HD video quality. Its USB connectivity makes it straightforward to set up with a Raspberry Pi, and it has a wide-angle lens, allowing for a good view of the entire print bed.
- Waveshare OV5647 Camera Module: This is another excellent option, featuring a 5MP resolution and designed to work directly with Raspberry Pi boards. It offers good image quality and is compact, making it easy to position for optimal printing monitoring.
- Microsoft LifeCam HD-3000: Known for its affordability and decent performance, this webcam delivers 720p HD video and features a wide-angle lens. It connects via USB, making it compatible with Raspberry Pi, and is ideal for monitoring prints from afar.
- Raspberry Pi NoIR Camera Module V2: Similar to the standard Camera Module V2, this version lacks an infrared filter, making it suitable for low-light conditions. It provides high-quality images and can be particularly useful for monitoring prints in complete darkness or under specific lighting conditions.
How Do You Set Up a 3D Printer Camera Using Raspberry Pi?
Setting up a 3D printer camera using a Raspberry Pi can enhance your printing experience by allowing remote monitoring and control.
- Raspberry Pi Model: Choosing the right Raspberry Pi model is crucial for performance and connectivity.
- Camera Module: Selecting an appropriate camera module for high-quality images can significantly impact your monitoring capabilities.
- Power Supply: Ensuring a reliable power supply is essential for uninterrupted operation of your setup.
- Software Installation: Properly installing the necessary software on your Raspberry Pi is key to enabling camera functionality and remote access.
- Network Configuration: Configuring the network settings allows you to access the camera feed from anywhere.
- 3D Printer Connection: Establishing a connection between the Raspberry Pi and the 3D printer facilitates integration for monitoring prints.
Raspberry Pi Model: The Raspberry Pi 3 or 4 are the best choices due to their superior processing power and built-in Wi-Fi capabilities. These models can handle video streaming and are compatible with various camera modules, making them ideal for 3D printing applications.
Camera Module: The Raspberry Pi Camera Module v2 is a popular choice for 3D printer setups due to its 8-megapixel resolution and excellent low-light performance. Alternatively, USB cameras can also be used, but ensure they are compatible with the Raspberry Pi and provide good image quality.
Power Supply: A stable power supply is vital for the Raspberry Pi and camera to function without interruptions, especially during long print jobs. A 5V power supply with at least 2.5A output is recommended to ensure adequate power delivery.
Software Installation: You will need to install Raspbian OS on the Raspberry Pi, followed by software like OctoPrint or MotionEye, which allows you to manage the camera and monitor your 3D prints. These platforms provide user-friendly interfaces to control the camera and can enable features like time-lapse recording.
Network Configuration: Connecting the Raspberry Pi to your home network via Wi-Fi or Ethernet is necessary for remote access. You can set up dynamic DNS to easily access the camera feed from anywhere, making it convenient to monitor print jobs while away.
3D Printer Connection: Connecting the Raspberry Pi to your 3D printer is typically done via USB. This connection allows the Raspberry Pi to communicate with the printer, enabling features like monitoring print status and receiving notifications about print completion or issues.
What Benefits Does a Raspberry Pi Camera Provide for 3D Printing?
Finally, one of the biggest benefits of using a Raspberry Pi Camera is the level of customization it offers. Users can modify settings, add scripts, or integrate additional features to tailor the camera’s performance to their specific needs, allowing for a more personalized and efficient printing experience.
What Common Challenges Can You Encounter When Using a Raspberry Pi Camera?
When using a Raspberry Pi camera, you may encounter several common challenges that can affect performance and usability.
- Low Image Quality: The image quality from Raspberry Pi cameras can sometimes be subpar, especially in low-light conditions or when using certain lenses. This can affect the clarity and detail of the images, which may not be suitable for all applications, particularly those requiring high-resolution captures.
- Limited Field of View: Raspberry Pi cameras typically have a fixed lens that may not offer a wide field of view. This limitation can hinder the ability to capture larger scenes or objects, making it less ideal for projects that require expansive coverage.
- Connectivity Issues: Setting up the camera with the Raspberry Pi can sometimes lead to connectivity problems, such as improper wiring or software configuration. These issues can result in the camera not being recognized by the Pi, thus preventing any image capture or video streaming.
- Performance Limitations: The processing power of the Raspberry Pi can limit the camera’s performance, especially when handling high-resolution video or complex image processing tasks. This can lead to lag or dropped frames during video capture, which is particularly problematic for time-sensitive applications.
- Software Compatibility: Finding the right software for your specific application can be challenging, as not all software supports every Raspberry Pi camera model. This can lead to difficulties in achieving desired functionalities, such as motion detection or video streaming.
How Does Using a Raspberry Pi Camera Compare to Other Options for 3D Printing?
| Camera Type | Raspberry Pi Camera | Webcam | DSLR Camera |
|---|---|---|---|
| Resolution | Up to 12 MP, suitable for detailed prints. | Varies, typically around 720p to 1080p. | High resolution, typically 20 MP or more. |
| Price | Low-cost, generally under $30. | Moderate, usually between $30 to $100. | Expensive, often $500 and up. |
| Compatibility | Works seamlessly with Raspberry Pi setups. | Compatible with most PCs; requires USB ports. | Can be connected via USB or HDMI, needs additional software. |
| Frame Rate | Up to 30 fps. | Typically 30 fps. | Varies, can be 24 fps or more for video. |
| Ease of Use/Setup | Requires setup with Raspberry Pi; moderate technical skill needed. | Plug-and-play, very easy to set up. | Requires additional setup and configuration, more complex. |
| Portability | Compact and lightweight, ideal for mobile setups. | Portable, but requires a computer. | Bulkier, less portable. |
| Additional Features | Can support motion detection, Wi-Fi with additional modules. | Basic features; some have built-in microphones. | High-quality optics, manual controls, interchangeable lenses. |