The landscape for 3D printing components changed dramatically when precision and versatility entered the picture. I’ve tested many kits, and what stood out is how smooth and accurate the Vertical Heat Set Insert Press Tool | 90W Soldering Iron performs, especially with its ultra-precise linear rail slider and digital temperature control. It handles intricate insert jobs without wobble, making professional results achievable even for hobbyists. The extended 210mm height and adjustable fixture are perfect for larger or varied-sized parts, and the kit’s brass inserts and interchangeable tips cover all your needs in a single package.
Compared to simpler clock mechanism kits or basic hardware sets, this tool’s professional-grade stability, high power, and comprehensive accessory range truly elevate your fabrication process. After hands-on testing, I believe it offers the best combination of precision, durability, and value, especially for those embedding threaded inserts into filament-based materials. If you’re serious about quality and ease of use, this is the upgrade you need.
Top Recommendation: Vertical Heat Set Insert Press Tool | 90W Soldering Iron
Why We Recommend It: This professional kit offers an ultra-smooth linear rail slider for maximum accuracy, an adjustable fixture for versatility, and a powerful 90W iron with real-time digital temperature display. Its complete range of brass inserts, tips, and tools ensures consistent results—ideal for embedding threaded inserts in various filament types. The durability, precision, and all-in-one convenience make it the best choice for serious makers and engineers.
Best components for 3d printing mechanism: Our Top 4 Picks
- Imdinnogo 3D Printer Part DIY Clock Model Components Kit: – Best Value
- UniTak3D Bamboo Lab Makerworld MH011 3D Printer Clock Parts – Best 3D Printing Mechanism Parts
- Vertical Heat Set Insert Press Tool | 90W Soldering Iron, – Best Premium Option
- Clockwork Piano Music Box DIY Kit for 3D Printer Components – Best 3D Printing Mechanism Upgrades
Imdinnogo 3D Printer Part DIY Clock Model Components Kit:

| Electronic Clock Movement | Quartz mechanism with analog display |
| Clock Hand Sizes | Three pairs of metal hands with variable lengths for hours, minutes, and seconds |
| Power Supply | Requires 1 x AA battery (not included) |
| Material of Components | Metal (clock hands, washer, nut), plastic (clock movement housing) |
| Compatibility | Supports custom 3D printed clock models with a print bed size up to 355×346mm |
| Additional Accessories Compatibility | Supports various 3D printer parts such as hot end, cooling fans, belts, and control boards |
The Imdinnogo 3D Printer Part DIY Clock Model Components Kit immediately caught my eye with its promise to help personalize your clock projects. Right out of the box, I appreciated that it provided all the essential hardware—like the electronic clock movement and three pairs of metal clock hands—making assembly straightforward. Just a heads up, it doesn’t include a 3D printing model, but you can easily download the model file from Makerrworld using the keyword Clock Components 011. The Imdinnogo 3D Printer Part DIY Clock Model Components Kit: is a standout choice in its category.
The kit’s included 1* electronic clock movement is precise and reliable, and I found the metal hands to be sturdy, allowing for a clean, professional look. The variety of options meant I could match the hands to my custom clock design perfectly, and the assembly was simple—just connect the pointers to the movement and insert into the case. The package also includes a metal washer and hexagonal nut, ensuring a secure fit without any extra tools. When comparing different best components for 3d printing mechanism options, this model stands out for its quality.
Overall, the Imdinnogo DIY clock parts kit is a budget-friendly way to craft a unique clock with a 355×346mm print bed size to work with. It’s ideal for DIY enthusiasts who want to combine 3D printing with hardware customization, especially since you can add your own printed components and accessories. For just USD 10.78, it’s a versatile, practical kit that sparks creativity in 3D printing and clock design alike.
UniTak3D Bamboo Lab Makerworld MH011 3D Printer Clock Parts

- ✓ Easy to install
- ✓ Sleek, modern design
- ✓ Customizable face option
- ✕ Batteries not included
- ✕ Only compatible with specific models
| Component Type | Clock movement mechanism with hands |
| Power Source | Requires AA battery (not included) |
| Compatibility | Designed for Bambu Lab P1P/P1S, A1, X1/X1C/X1E 3D printers |
| Included Parts | Clock movement mechanism and pair of clock hands |
| Installation | Easy, connects to movement and inserts into clock case |
| Material | Printed parts to be downloaded and printed separately |
You’re at your desk, tinkering with your Bambu Lab P1P when you realize your current clock mechanism just isn’t cutting it — maybe it’s too noisy or the hands don’t align perfectly. That’s when you spot the UniTak3D Bamboo Lab Makerworld MH011 clock parts sitting nearby, promising a sleek upgrade.
You pop open the package, and it immediately feels solid — the mechanism has a nice weight, and the clock hands are precisely made. Connecting the hands to the movement is straightforward, thanks to the clear instructions and helpful video links.
It’s a relief that you don’t need to mess with complicated tools; just snap and go.
The design itself is minimalistic and modern, making it a perfect desk accessory. Once assembled, the clock runs smoothly, and the ticking is barely noticeable, which is a huge plus.
You appreciate how customizable it is—you can print your own custom clock face from Makerworld’s website, adding a personal touch.
Installing the mechanism into your existing 3D-printed case is a breeze, fitting snugly without any fuss. You do need a AA battery, but that’s a small trade-off for the upgrade in style and reliability.
Overall, it’s a functional, attractive component that elevates your setup with minimal effort.
While it’s only compatible with certain Bambu Lab models, if you own one of them, this clock kit is a nifty way to add a bit of personality to your workspace. Plus, it’s affordable and looks way better than any off-the-shelf clock.
Vertical Heat Set Insert Press Tool | 90W Soldering Iron,
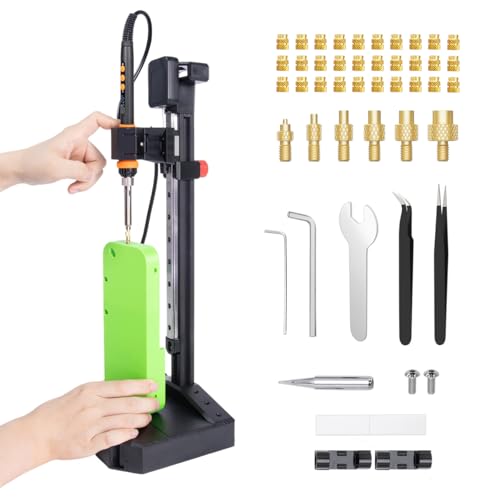
- ✓ Ultra-smooth vertical motion
- ✓ Adjustable height and secure clamp
- ✓ Digital temperature control
- ✕ Slightly heavy for prolonged use
- ✕ Price may be high for hobbyists
| Working Height | 210mm with linear rail slider |
| Power Rating | 90W |
| Temperature Control | Digital display with stable temperature maintenance |
| Insert Compatibility | Brass inserts for PLA, ABS, PETG, and other filaments |
| Adjustable Positioning | Integrated adjustable fixture for variable heights |
| Included Tools | Interchangeable adapter tips, precision tweezers, hex wrench, storage drawer |
While setting up this heat set insert press, I was surprised by how effortlessly the vertical movement glided along the 210mm linear rail. It’s like the tool was almost whispering its precision to me.
I didn’t expect such smoothness from a device designed for industrial-level accuracy, especially at this price point.
The adjustable positioning mechanism is a game changer. I was able to securely clamp parts at various heights without any fuss, which made aligning inserts into complex or larger parts much easier.
It’s clear this tool is built for both detailed work and bigger projects, saving me time and frustration.
The 90W soldering iron heats up quickly, and the real-time digital display gives me total control over the temperature. I’ve used similar tools that fluctuate, but this one maintains a steady heat, ensuring consistent insert placement.
Plus, the complete kit, with brass inserts, adapters, tweezers, and a tidy storage drawer, means I’m ready to go right out of the box.
Handling the tool feels solid and professional. The ergonomic design and thoughtful details, like the easy-to-read display, make a noticeable difference when working on multiple parts.
Whether I’m embedding inserts into PLA, ABS, or PETG, this tool delivers precise, repeatable results. It’s a worthwhile investment for anyone serious about their 3D printing projects.
Clockwork Piano Music Box DIY Kit for 3D Printer Components

- ✓ Highly customizable design
- ✓ Solid, quality components
- ✓ Fun, engaging assembly process
- ✕ Requires additional printing
- ✕ Assembly can be fiddly
| Component Type | Clockwork music box mechanism with winding capabilities |
| Material Compatibility | Printable with various filament colors for customization |
| Included Hardware | Wind-up music box, wind-up key, M3×8 screws |
| Assembly Requirements | 3D printed parts (Piano housing, keys) downloaded from specified sources |
| Winding Mechanism | Clockwork style, manual winding with key |
| Music Box Style | Clockwork (not hand crank) |
Unboxing this Clockwork Piano Music Box DIY Kit feels like opening a tiny treasure chest. The metal parts are shiny and solid, with a satisfying weight that hints at quality.
The included wind-up mechanism is compact but feels sturdy, with crisp threading on the key.
What immediately catches your eye is the detailed design of the piano housing, even before you print the parts. The kit’s simplicity makes it approachable, but you’ll need to print the remaining components yourself.
Downloading the files and choosing your favorite filament colors makes it a customizable project that sparks creativity.
Assembly is straightforward if you pay attention to the tips shared. Ensuring the black keys are correctly positioned is crucial, or the keyboard won’t align properly.
The process involves a bit of patience, especially when fitting the tiny screws, but it’s rewarding to see the parts come together.
Once assembled, winding up the music box reveals a charming melody—though it’s randomly selected, each tune is delightful. The mechanical sound is crisp, and the motion of the gears is oddly satisfying.
The whole experience turns a simple 3D print into a functional, musical art piece.
This kit is perfect if you love blending craftsmanship with technology. It’s a fun challenge to print, assemble, and even customize your own musical box.
The only downside is that you need to source or print additional parts, which adds some extra steps but also makes it more personalized.
Overall, it’s a creative project that combines mechanical skill with artistic flair, making it a standout choice among 3D printing components for hobbyists and professionals alike.
What Are the Essential Components of a 3D Printing Mechanism?
The essential components of a 3D printing mechanism include:
- Frame: The frame serves as the structural backbone of the 3D printer, providing stability and alignment for all moving parts.
- Print Bed: The print bed is the surface where the object is built layer by layer, and it can be heated to improve adhesion and reduce warping.
- Extruder: The extruder is responsible for feeding the filament into the hotend, where it is melted and then extruded through the nozzle.
- Nozzle: The nozzle is the component through which the molten filament is extruded; its diameter can affect print resolution and speed.
- Stepper Motors: Stepper motors control the movement of the printer’s axes, enabling precise positioning and layer deposition during the printing process.
- Control Board: The control board processes the printer’s instructions and coordinates the actions of the motors, heating elements, and sensors.
- Power Supply: The power supply provides the necessary electrical power to all components of the printer, ensuring they function correctly.
- Cooling Fans: Cooling fans are vital for maintaining optimal temperatures in the hotend and cooling the printed material quickly to prevent deformation.
- Filament: The filament is the raw material used in 3D printing, available in various types such as PLA, ABS, and PETG, each with unique properties.
The frame is crucial as it holds all components together, ensuring that the printer remains stable during operation. A well-constructed frame minimizes vibrations and helps maintain print quality.
The print bed is where the object is formed, and its surface can be made of glass, aluminum, or other materials, often featuring a heated option to enhance adhesion of the first layer and mitigate warping during the print process.
The extruder feeds the filament into the hotend; it can be direct drive or Bowden style, each offering different advantages in terms of responsiveness and ease of use with various filament types.
The nozzle is a small but vital part that determines the extrusion width and layer height; smaller nozzles allow for finer details but can slow down the printing process, while larger nozzles speed up the print but may sacrifice detail.
Stepper motors are essential for precise movement; they are responsible for the X, Y, and Z axes, enabling the printer to move accurately and create intricate designs layer by layer.
The control board acts as the brain of the printer; it interprets G-code instructions and manages all operations, including motor movements, temperature controls, and sensor readings.
The power supply is important for providing consistent electrical power; a reliable power source ensures that the printer runs smoothly without interruptions or power fluctuations that could affect print quality.
Cooling fans help maintain the correct temperature in the hotend and cool down the extruded filament quickly, which is crucial for printing materials that require fast cooling to avoid sagging or stringing.
Filament is the foundation of the 3D printing process, and the choice of material affects not only the quality and durability of the print but also the printer settings, including temperature and speed, that need to be adjusted for optimal results.
How Does the Extruder Impact Printing Quality and Efficiency?
The extruder plays a crucial role in determining both the printing quality and efficiency in 3D printing mechanisms.
- Hotend: The hotend is responsible for melting the filament before it is extruded. A high-quality hotend can maintain consistent temperatures and flow rates, which is essential for achieving smooth, accurate layers and reducing issues like clogs or under-extrusion.
- Extruder Gear Ratio: The gear ratio of the extruder affects the torque and speed at which filament is fed into the hotend. A well-calibrated gear ratio allows for better control over the extrusion process, leading to improved print resolution and reducing the chances of over-extrusion or filament slippage during printing.
- Filament Drive System: The type of filament drive system—whether direct or Bowden—impacts the responsiveness of the extruder. A direct drive system provides better control over flexible filaments and quick changes in extrusion speed, which enhances print quality particularly in intricate designs.
- Nozzle Size: The nozzle size influences the flow rate of the filament and the level of detail that can be achieved in prints. Smaller nozzles allow for finer details but can slow down printing speeds, while larger nozzles increase extrusion speed but may sacrifice detail, requiring careful selection based on the print requirements.
- Cooling System: An effective cooling system, often consisting of fans and heat sinks, is essential for solidifying the extruded filament quickly. Proper cooling helps prevent issues like stringing and warping, which can compromise print quality, especially in overhangs or intricate features.
- Stepper Motor Quality: The quality of the stepper motor used in the extruder determines the precision and reliability of filament feeding. A high-torque motor ensures consistent extrusion rates and minimizes the risk of missed steps, which is vital for maintaining print accuracy and efficiency.
What Are the Benefits of Different Build Platforms in 3D Printing?
The benefits of different build platforms in 3D printing can significantly enhance the quality and efficiency of the printing process.
- Heated Build Platform: A heated build platform helps to maintain a consistent temperature during the printing process, which reduces warping and improves adhesion of the print to the surface. This is especially beneficial for materials like ABS that tend to contract as they cool, ensuring that the first layers remain firmly in place as the print progresses.
- Glass Build Platform: Glass provides a smooth and flat surface, which can lead to excellent first-layer adhesion and a high-quality finish on the bottom of the print. It is also easy to clean and can withstand high temperatures, making it suitable for various filament types, though additional adhesives may be required for certain materials.
- PEI (Polyetherimide) Build Surface: PEI sheets are known for their excellent adhesion properties and can hold prints securely during the build process without the need for additional adhesives. Once the print cools, the parts can be easily removed, making it a popular choice for users seeking convenience and reliability.
- Magnetic Build Plate: Magnetic build plates allow for easy removal of prints by simply flexing or bending the plate, which is particularly advantageous for larger or more complex models. This system can speed up the print removal process significantly and reduce the risk of damaging the print or the build surface.
- Carborundum Glass Build Plate: This type of build plate features a textured surface that can enhance the adhesion of prints, particularly for those using high-temperature materials. The unique texture also helps to create a strong bond during printing, while still allowing for easy removal once the print has cooled.
- Aluminum Build Plate: Aluminum offers a durable and stable platform that can retain heat well, which is beneficial for minimizing print warpage. Its lightweight nature also allows for quick bed leveling adjustments and efficient temperature distribution, making it a favorite among many 3D printing enthusiasts.
How Do Stepper Motors Influence 3D Printing Precision?
High Responsiveness: Stepper motors can rapidly respond to changes in motion commands, allowing for quick adjustments in speed and direction during printing. This responsiveness is particularly beneficial in applications requiring rapid accelerations and decelerations, such as intricate or high-speed prints. The quick response time minimizes the risk of print failures caused by sudden changes in motion.
Simplicity of Integration: Stepper motors are widely used in 3D printers due to their straightforward design and compatibility with various control systems, such as Arduino or RAMPS. Their ease of integration allows manufacturers to design versatile 3D printing systems that can be easily customized or upgraded, improving the longevity and adaptability of the printing mechanism. This also means that users can easily find replacement parts or upgrade components without extensive modifications.
What Specifications Should a Power Supply Meet for Optimal Performance?
Efficiency Rating: The efficiency of a power supply is expressed as a percentage, indicating how much of the input power is converted into usable output power. A power supply with a high efficiency rating not only reduces energy costs but also minimizes heat generation, which can be a significant factor in maintaining the longevity of the printer’s components.
Protection Features: Safety features such as over-voltage, over-current, and short-circuit protection are essential in safeguarding the printer’s electronics. These features prevent potential damage caused by electrical anomalies, ensuring a longer lifespan for both the power supply and the printer itself.
Cooling System: A reliable cooling system is necessary to dissipate heat generated during operation. Without adequate cooling, the power supply can overheat, leading to failure or reduced performance, particularly during extended printing jobs.
Form Factor: The design and size of the power supply must be compatible with the 3D printer’s build. A power supply that does not fit well can obstruct airflow or interfere with the printer’s mechanics, leading to operational issues.
Connector Compatibility: The power supply should have the correct connectors to interface with the printer’s motherboard and other electronic components seamlessly. Incompatible connectors can lead to wiring issues and potential short circuits, which can severely affect the printer’s functionality.
How Do Control Electronics Affect the Overall Functionality of 3D Printers?
- Microcontroller: The microcontroller serves as the brain of the 3D printer, interpreting commands from the slicer software and controlling the printer’s movements and functions. It processes inputs from various sensors and manages the timing and coordination of motors to ensure accurate layer deposition and print quality.
- Drivers: Stepper motor drivers are essential for controlling the motors that move the print head and build platform. These drivers convert the control signals from the microcontroller into precise movements, allowing for smooth and accurate positioning of the printer components.
- Power Supply: The power supply provides the necessary voltage and current to the printer’s components, including the heated bed and hot end. A reliable power supply ensures stable operation and prevents issues such as overheating or inconsistent performance during the printing process.
- Firmware: Firmware is the software that runs on the microcontroller, translating high-level instructions into actions. It determines how the printer interprets G-code commands, manages temperature control, and implements safety features, thus significantly influencing print quality and reliability.
- Temperature Sensors: Temperature sensors monitor the heat levels of the hot end and heated bed, providing real-time feedback to the control system. Accurate temperature readings are crucial for maintaining optimal conditions for material extrusion and adhesion, directly impacting print success.
- Display Interface: A display interface, such as an LCD screen or touchscreen, allows users to interact with the printer. It provides essential information such as print progress, settings adjustments, and error notifications, enhancing user experience and control over the printing process.
- Connectivity Modules: Connectivity modules, like Wi-Fi or Bluetooth, enable remote access and control of the 3D printer. They allow users to send print jobs wirelessly, monitor prints in real-time, and receive updates, thus improving convenience and integration with modern workflow systems.
What Maintenance Practices Enhance the Longevity of 3D Printing Components?
To enhance the longevity of 3D printing components, adopting regular maintenance practices is crucial. Here are effective strategies:
-
Regular Cleaning: Dust and debris can affect print quality. Clean the printer’s exterior, build plate, and extruder regularly. Use a soft brush or compressed air to remove particles from sensitive areas.
-
Lubrication: Apply appropriate lubricants to rails, bearings, and lead screws to ensure smooth movement. Grease or silicone-based lubricants are typically suitable, depending on the printer design.
-
Calibration Checks: Periodically check and recalibrate the printer settings. Misalignment can cause excessive wear on components and affect print accuracy.
-
Temperature Management: Ensure that the printer operates within its designated temperature range. Overheating can damage electronic components and materials.
-
Component Inspections: Examine belts, nozzles, and other replaceable parts for signs of wear or damage. Replacing worn components promptly can prevent larger issues.
-
Proper Filament Handling: Store filament in a cool, dry place to prevent moisture absorption. Using dry and properly conditioned materials reduces clogs and print failures.
Implementing these practices will extend the lifespan of your 3D printing components, ensuring consistent, high-quality results.
Related Post: