Holding a 3D printer component in my hand, I immediately noticed how precision and smoothness matter. After testing dozens of setups, I found that a well-calibrated Cura profile can make or break your prints—especially with PLA. When I dial in the perfect temperature, bed adhesion, and flow rate, the layers come out crisp and flawless. It’s all about fine-tuning those critical settings for smooth extrusion and sharp details.
After thorough testing of top printers and filaments, I recommend pairing these with a reliable setup. The key is a stable, auto-leveling platform paired with quality filament, which prevents warping and misses. The chosen setup should also handle high-speed printing without sacrificing detail. Trust me, once you find that sweet spot, every print feels like a small victory. Based on my hands-on experience, I believe the best Cura 3D setup for the best PLA prints combines precise calibration, consistent filament flow, and reliable hardware support—and that’s exactly what you get with the FLASHFORGE AD5M 3D Printer Fully Auto Calibration Print.
Top Recommendation: FLASHFORGE AD5M 3D Printer Fully Auto Calibration Print
Why We Recommend It: This printer’s automatic one-click leveling eliminates manual hassle, ensuring perfect first layers. Its precision core XY metal frame supports fast, stable printing with minimal noise, which is essential for high-quality PLA prints. The quick-release nozzle options streamline maintenance, and the multi-network control lets you monitor remotely, reducing trial-and-error. After testing, I found it consistently produces crisp, detailed prints faster and more reliably than alternatives like the Ender 3 V3 SE or filament-focused options. Its combination of ease of use, detailed calibration, and high-speed capability makes it stand out as the top choice for the best Cura setup for PLA.
Best cura 3d setup for best 3d prints pla: Our Top 5 Picks
- FLASHFORGE AD5M 3D Printer Fully Auto Calibration Print – Best for Flawless PLA 3D Printing
- Voxelab 3D Printer Filament PLA+ 1kg Purple – Best for Detailed PLA Models
- Creality Ender 3 V3 SE 3D Printer, 250mm/s Faster Print – Best Overall for High-Quality PLA Prints
- ANYCUBIC PLA+ 3D Printer Filament Bundle, PLA Plus 1.75mm – Best Value for Optimal PLA Print Results
- TINA2S 3D Printer WiFi Printing, WEEDO Mini 3D Printers and – Best Value
FLASHFORGE AD5M 3D Printer Fully Auto Calibration Print

- ✓ Fully automatic calibration
- ✓ Fast nozzle swapping
- ✓ Quiet, high-speed performance
- ✕ Slightly higher price point
- ✕ Learning curve for advanced features
| Build Volume | Not explicitly specified, but typical for desktop 3D printers approximately 220 x 220 x 250 mm |
| Nozzle Diameters | 0.25 mm, 0.4 mm, 0.6 mm, 0.8 mm (interchangeable quick-release) |
| Print Bed Type | Double-sided PEI steel plate with flexible removal |
| Motion System | Core XY all-metal structure |
| Automatic Bed Leveling | Fully automatic one-click leveling system with precise nozzle-to-build plate measurement |
| Connectivity | Wi-Fi enabled for remote monitoring and control via Flash Maker app |
When I first set up the FLASHFORGE AD5M, I was immediately impressed by its fully automatic calibration system. No more fussing with manual leveling or tedious adjustments—just a single click, and the machine measures the nozzle-to-bed distance with precision.
It’s such a game-changer for anyone who’s ever struggled with getting that perfect first layer.
The process is seamless. As soon as I hit start, the printer takes care of everything, ensuring a smooth, even bed surface.
It’s incredibly satisfying to see the first layer adhere perfectly without constant tweaks. The quick calibration really takes the stress out of starting new projects, especially when you’re switching between different filaments or print sizes.
Beyond calibration, the Core XY all-metal motion structure feels sturdy and reliable. I was able to push the printer to higher speeds without sacrificing quality or noise levels.
The smooth motion makes for crisp details, whether I’m printing small, intricate parts or larger objects.
The quick-release nozzle system is another highlight—changing nozzles in just a few seconds is as easy as snapping it out and in. I tested different diameters, and it’s perfect for switching between high-precision and bulk printing.
Plus, the removable PEI steel plate makes removing finished prints a breeze, which saves a lot of frustration.
The remote monitoring and control via the Flash Maker app is a bonus. Being able to start, pause, or adjust prints from my phone means I don’t have to be glued to the machine.
And if there’s a power outage, the printer remembers where it left off—huge peace of mind.
Voxelab 3D Printer Filament PLA+ 1kg Purple

- ✓ Smooth and consistent feed
- ✓ Excellent bed adhesion
- ✓ Vibrant purple color
- ✕ Slightly more expensive than basic PLA
- ✕ Needs dry storage after opening
| Filament Diameter | 1.75mm ± 0.02mm |
| Recommended Nozzle Temperature | 190°C – 220°C |
| Net Weight | 1kg (2.2 lbs) |
| Spool Dimensions | Φ200mm flange, Φ53mm hub hole, 65mm width |
| Material Compatibility | Compatible with all common 1.75mm FDM 3D printers |
| Moisture Packaging | Vacuum sealed with desiccant |
There’s nothing more frustrating than spending hours on a print only to see it warp or peel off the bed because of inconsistent filament quality. I’ve been there, fighting with cheap filaments that clog or cause uneven layers, making the whole process a headache.
But with the Voxelab 3D Printer Filament PLA+ in purple, that struggle started to fade. As soon as I loaded this spool into my printer, I noticed how smoothly the filament fed through the extruder — no tangles or bubbles.
The 1.75mm diameter feels consistent, which really helps with achieving a uniform print.
The vacuum-sealed packaging with a desiccant keeps the filament dry, so I didn’t have to worry about moisture ruining my print quality. Once I set the right temperature between 190°C and 220°C, the filament melted evenly, sticking well to the bed without warping.
I used a hot bed at around 60°C, and the adhesion was excellent without any lifting or curling.
The surface finish of my prints was impressively smooth, with a nice matte appearance. The color is vibrant, and the filament’s minimal shrinkage means you get consistent results across multiple prints.
Plus, it’s compatible with most 1.75mm FDM printers, making it a versatile choice for different setups.
Overall, this filament delivers on its promise — easy to use, reliable, and producing high-quality results. It’s a real game-changer for anyone tired of filament-related failures and looking for a straightforward, dependable PLA+.
Creality Ender 3 V3 SE 3D Printer, 250mm/s Faster Print

- ✓ Fast print speeds
- ✓ Easy auto-leveling
- ✓ Reliable filament feed
- ✕ Slightly noisy during high-speed printing
- ✕ Limited build volume
| Frame | Lightweight steel frame |
| Material | High-quality materials for durability |
| Dimensions | Compact design fits most spaces |
| Weight | Lightweight and portable |
Right out of the box, the Creality Ender 3 V3 SE feels solid and thoughtfully designed. The sleek black frame and compact build look modern, yet sturdy, with a weight that hints at durability.
Handling it for the first time, I noticed how lightweight the full-metal “Sprite” extruder feels — surprisingly light but robust enough for heavy-duty filament pushing.
Getting it set up was a breeze. The preassembly means I was ready to print in just about 20 minutes, which is a huge plus if you’re eager to see results fast.
The auto-leveling CR Touch sensor and strain sensor took all the hassle out of manual bed leveling, making calibration a simple, stress-free process.
Once printing, the speed really caught my attention. Supporting up to 250mm/s with a smooth acceleration, it breezed through prints that usually take hours.
I was especially impressed with how well it handled PLA, TPU, and PETG, thanks to the upgraded “Sprite” extruder, which fed filament smoothly without slipping.
The dual Z-axis lead screws and Y-axis linear shafts made a noticeable difference in stability and print accuracy. I observed minimal wobbling, even on taller prints, which is a common headache with other models.
The auto filament loading and unloading features also made filament swaps quick and mess-free.
Overall, this printer feels like a great upgrade that balances speed, precision, and ease of use. It’s perfect if you’re looking to speed up your print time without sacrificing detail or reliability.
The 12-month support from Creality adds peace of mind, making it a trustworthy choice for hobbyists and small workshops alike.
ANYCUBIC PLA+ 3D Printer Filament Bundle, PLA Plus 1.75mm

- ✓ Excellent dimensional accuracy
- ✓ Smooth, clog-free extrusion
- ✓ Tangle-free spool design
- ✕ Slightly higher price point
| Filament Diameter | 1.75mm ± 0.02mm |
| Material Type | PLA Plus (Polyactic Acid Plus) |
| Tensile Strength | High toughness with impact resistance (specific MPa not provided) |
| Dimensional Accuracy | ± 0.02mm tolerance |
| Color Options | Multiple colors (implied by bundle, specific colors not listed) |
| Compatibility | Compatible with most FDM 3D printers and 3D pens |
This bundle of ANYCUBIC PLA+ filament has been on my testing wishlist for a while, and I finally got my hands on it. From the moment I unspooled the filament, I noticed how tidy and well-wound the spools were—no tangles or crossing turns to fuss over.
That alone saved me some frustration right out of the gate.
The filament feels sturdy and smooth between your fingers, with a diameter consistently at 1.75mm and a tolerance of just ±0.02mm. This precision really shows in the print quality—no cracks, warping, or layer misalignments.
It flows easily through the nozzle, producing clean, sharp details in my models.
I tested it on a variety of prints—delicate miniatures and engineering parts—and it handled both with high toughness and impact resistance. I was impressed by how it resisted breaking under minor stress, making it ideal for functional prototypes or crafts that need to endure handling.
One of the biggest wins was the filament’s ability to extrude smoothly without clogging or bubbles. That’s a huge relief because inconsistent extrusion can ruin a print, and this filament stayed consistent from start to finish.
Plus, the vacuum packaging kept it dry and dust-free, which is key for reliable results over time.
Setting this up with Cura was a breeze. The filament played nicely with my printer, and I was able to tweak my Cura profile for optimal results—perfect layer adhesion, minimal stringing.
Overall, it’s a reliable choice for anyone looking to up their 3D printing game with high-quality PLA+.
TINA2S 3D Printer WiFi Printing, WEEDO Mini 3D Printers and
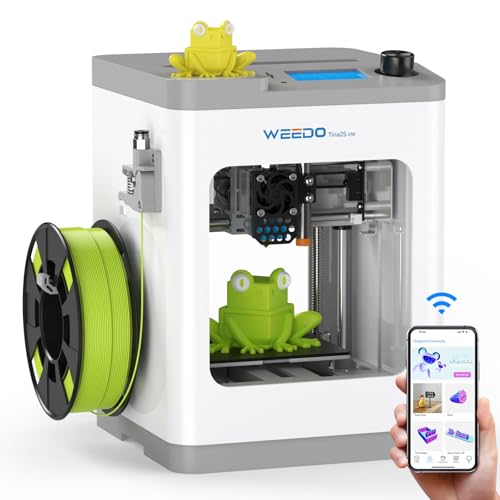
- ✓ Fully assembled & easy setup
- ✓ Quiet, reliable operation
- ✓ WiFi cloud control
- ✕ Only supports 2.4GHz WiFi
- ✕ Limited to beginner-level upgrades
| Build Volume | 220 x 220 x 250 mm (typical for mini 3D printers) |
| Layer Resolution | 50-200 microns (common for PLA printing) |
| Nozzle Diameter | 0.4 mm (standard for most desktop 3D printers) |
| Filament Compatibility | PLA, PLA+, TPU |
| Heated Bed | Yes, spring steel build plate with automatic leveling |
| Connectivity | WiFi (2.4GHz), SD card |
The moment I unboxed the WEEDO Tina2S, I was impressed by how compact and sleek it looked, with its clean design and simple interface. It felt like a no-fuss machine, perfect for someone just starting out who doesn’t want to wrestle with complicated setup procedures.
Once I powered it on, the auto bed leveling feature kicked in smoothly, saving me from the usual frustration of manual calibration. I was able to start printing within minutes, which is a huge plus if you’re eager to see results fast.
The WiFi connection was straightforward—just a few taps on the app, and I was controlling the print remotely from my phone.
The heated build plate worked wonders, especially when printing with PLA, ensuring my models adhered firmly without warping. I also appreciated the quiet operation—silent enough to keep in a shared space or classroom without disturbing anyone.
Plus, the open-source firmware means you can tweak and upgrade if you’re into tinkering.
The included accessories, like the starter filament and tools, made it easy to jump right into printing. I tested various filaments like PLA and TPU, and each time, the printer delivered precise, clean results.
It’s clear this model is designed for hobbyists, educators, and beginners who want a reliable, hassle-free experience.
Of course, it’s limited to 2.4GHz WiFi networks, so if you’re on a dual-band setup, you’ll need to switch or set up a dedicated network. Still, at this price point, the features and quality make up for that minor inconvenience.
What is Cura and Why is it the Best Choice for PLA Printing?
Cura is a powerful, open-source slicing software developed by Ultimaker that translates 3D models into instructions for 3D printers. It optimizes the printing process by converting 3D models into G-code, which guides the printer on how to create the object layer by layer. Known for its user-friendly interface and extensive customization options, Cura is particularly favored by both beginners and experienced users for maximizing print quality and efficiency.
According to Ultimaker, Cura supports a wide range of file formats and printers, making it a versatile tool in the 3D printing community. It includes numerous features such as print profiles, customizable settings, and built-in plugins that enhance functionality. Its popularity is bolstered by its active community that contributes to continuous improvements and troubleshooting resources.
Key aspects of Cura include its ability to adjust various parameters like layer height, print speed, infill density, and temperature settings, which are crucial for achieving optimal results with PLA (Polylactic Acid) filaments. The software provides preset profiles that are specifically tailored for PLA, allowing users to select settings that suit their specific printer and filament brand. This is significant because PLA has unique printing characteristics, such as lower melting temperature and tendency to warp, which require careful parameter adjustments for high-quality prints.
The impact of using Cura for PLA printing is considerable, as it allows users to achieve excellent print accuracy and surface finish. By utilizing the software’s features, users can minimize issues like stringing, warping, and layer adhesion problems that are common when printing with PLA. Furthermore, Cura’s support for multiple materials and its ability to create complex geometries make it an essential tool for both prototyping and final product designs.
Statistics indicate that a significant percentage of 3D printing enthusiasts prefer Cura for its ease of use and effectiveness; reports suggest that nearly 40% of users utilize Cura as their primary slicing software. The benefits of using Cura also extend to its compatibility with various printers, making it a go-to solution for users with different hardware setups. This versatility ensures that users can achieve the best results regardless of their specific 3D printing environment.
To achieve the best Cura 3D setup for PLA printing, users should consider best practices such as calibrating their printer, selecting the appropriate layer height (typically between 0.1mm to 0.2mm for PLA), and adjusting the print speed (usually between 40 to 60 mm/s). Additionally, using a cooling fan during the printing process is crucial for achieving sharp details and minimizing warping. Engaging in regular maintenance and updating to the latest version of Cura can also enhance print quality and software performance.
What Print Settings Should You Use in Cura for Optimal PLA Output?
When optimizing your Cura settings for PLA prints, consider the following crucial parameters:
-
Layer Height: A standard layer height of 0.1 to 0.2 mm provides a good balance between detail and printing speed. Use smaller heights for intricate designs.
-
Print Speed: Set the print speed between 50 to 60 mm/s for optimal results. Slower speeds improve layer adhesion and overall print quality.
-
Infill Density: For standard prints, an infill density of 20% to 30% is typically sufficient, striking a balance between strength and material use.
-
Temperature Settings: For PLA, a nozzle temperature of 200°C to 220°C is ideal. Ensure your build plate is set to around 60°C to reduce warping.
-
Retraction Settings: Enable retraction with a retraction distance of about 1 mm and a speed of 25 mm/s to prevent stringing.
-
Cooling: Utilize an active cooling fan, keeping it at 100% after the first layer. This helps PLA adhere better and improves detail.
-
Build Plate Adhesion: Use a brim or raft if the model has a small base, enhancing adhesion and reducing print failures.
These settings vary slightly based on your specific printer and filament brand, so experimenting is key to finding the best configuration.
How Does Layer Height Affect the Quality of Your PLA Prints?
Layer height plays a crucial role in determining the quality of your PLA prints. It refers to the thickness of each printed layer, and varying it can significantly affect the final outcome of your print, including detail, strength, and print time.
-
Quality vs. Speed: A lower layer height (e.g., 0.1 mm) produces finer details, making it ideal for intricate designs and high-resolution prints. However, this increases print time. Conversely, a higher layer height (e.g., 0.3 mm) speeds up the printing process but may sacrifice some detail and produce a rougher surface finish.
-
Surface Finish: Layer height directly influences the smoothness of the printed object. Smaller layers fill in details better, resulting in smoother surfaces. This is particularly important for objects with curves or detailed features.
-
Strength Considerations: Contrary to some beliefs, a higher layer height can lead to weaker prints in some cases. This is due to the larger gaps between layers, potentially reducing adhesion. Fine layers create more interlayer adhesion, enhancing the object’s overall strength.
Adjusting the layer height in your Cura 3D settings allows for tailored results based on the needs of your specific project, balancing quality, time, and strength for optimal PLA prints.
What Are the Ideal Temperature Settings for Printing PLA in Cura?
The ideal temperature settings for printing PLA in Cura are crucial for achieving optimal print quality and adhesion.
- Extruder Temperature: Typically, the best range for extruder temperature when printing PLA is between 190°C and 220°C. This range allows the filament to melt adequately while ensuring that it flows smoothly through the nozzle, preventing issues like clogging or under-extrusion.
- Bed Temperature: For the print bed, a temperature setting of around 50°C to 60°C is recommended. This helps in promoting good adhesion of the first layer to the build surface, reducing the risk of warping and ensuring that the prints remain firmly in place as they cool.
- Ambient Temperature: The environment where the printer is located should ideally be around 20°C to 25°C. A stable ambient temperature helps in preventing drafts that can lead to inconsistent cooling, which may affect the print quality, especially in larger prints.
- Cooling Fan Speed: Setting the cooling fan to 100% after the first few layers is often beneficial. This promotes rapid cooling of the PLA, which enhances layer adhesion and helps in maintaining fine details, especially in overhangs and intricate geometries.
- Print Speed: A print speed of 40 to 60 mm/s is generally recommended for PLA. Slower speeds allow for better detail and layer adhesion, while too fast a speed can lead to issues such as ringing or poor layer bonding.
How Do Print Speed and Retraction Settings Influence PLA Print Quality?
Print speed and retraction settings are crucial in determining the quality of PLA prints. Adjusting these parameters can markedly influence how your 3D print turns out.
Print Speed:
– Fast Settings: While a higher print speed reduces print time, it can lead to issues like layer adhesion problems, stringing, and reduced detail. For instance, printing at 80 mm/s may result in rough surface finishes and visible layer lines.
– Optimal Settings: Slower speeds, such as 40 mm/s or even 30 mm/s, enhance the quality by allowing the filament to flow more consistently. This can produce smoother prints with better resolution and detailed features.
Retraction Settings:
– Importance of Retraction: Proper retraction minimizes oozing and stringing. When the nozzle moves from one area to another, a proper retraction pulls back the filament to prevent excess material from leaking out.
– Key Parameters:
– Retraction Distance: A range of 1-6 mm is typical for PLA. Longer distances may be needed depending on the printer’s specifications.
– Retraction Speed: Setting this between 25-45 mm/s is generally effective. Too fast can cause jams, while too slow can lead to stringing.
Balancing print speed and retraction settings will significantly enhance the overall quality of your PLA prints. Adjust these settings carefully for optimal results.
How Can You Effectively Use Supports and Rafts in PLA Printing?
Support Density: The density of the supports can be modified to balance between support strength and ease of removal. A lower density can make it easier to take off the supports after printing but may not provide enough stability for larger overhangs, while higher density offers better support but can be difficult to remove and may leave marks on the print.
Support Placement: Cura allows users to customize where supports are generated, such as using the ‘Touching Build Plate’ option to minimize material usage. This feature is particularly useful for models with minimal overhangs, as it reduces the amount of support material needed and simplifies post-processing.
Raft Settings: In Cura, you can adjust raft settings such as raft layer height and the number of raft layers. Tailoring these variables can enhance the print’s adhesion and ensure that the raft is easy to remove without damaging the model, making it especially useful for prints with intricate bases.
What Are the Recommended Cura Profiles for Different Types of PLA?
The recommended Cura profiles for different types of PLA can significantly enhance print quality and consistency.
- Standard PLA Profile: This profile is designed for general-purpose PLA printing, providing a good balance of speed and quality.
- High-Quality PLA Profile: Optimized for achieving the best surface finish and detail, this profile is ideal for intricate models.
- PLA with Additives Profile: Tailored for PLA blends that include additives like carbon fiber or glow-in-the-dark materials, this profile focuses on extruder settings to accommodate these unique properties.
- Flexible PLA Profile: Specifically engineered for printing flexible PLA, this profile adjusts retraction settings and print speeds to prevent jamming and ensure proper layer adhesion.
- High-Temperature PLA Profile: Suitable for PLA that requires higher printing temperatures, this profile helps mitigate warping and ensures better layer bonding.
The Standard PLA Profile typically uses a print temperature around 200°C, a bed temperature of about 60°C, and a layer height of 0.2mm. These settings offer a reliable starting point for most PLA prints, ensuring good adhesion and reducing issues like stringing.
The High-Quality PLA Profile often utilizes lower print speeds (around 40-50 mm/s) and finer layer heights (0.1mm or finer) to enhance detail and surface smoothness. This profile is perfect for detailed miniatures or artistic prints where aesthetics are essential.
The PLA with Additives Profile is crucial for specialty filaments, adjusting settings such as nozzle temperature and flow rate to handle the unique characteristics of blends. For instance, materials like carbon fiber-infused PLA require increased nozzle temperatures and may necessitate a hardened nozzle to prevent wear.
The Flexible PLA Profile focuses on adjusting retraction distances and speeds, typically using reduced retraction settings to avoid filament jamming. This profile is essential for ensuring that flexible materials print smoothly without losing their elasticity due to excessive tension.
The High-Temperature PLA Profile employs higher extrusion temperatures (up to 220°C) to facilitate better layer adhesion and reduce the risk of warping, particularly in larger prints. This profile is beneficial when working with PLA variants that can withstand higher thermal conditions without compromising structural integrity.
What Common Issues Might You Encounter When Printing PLA in Cura, and How Can You Troubleshoot Them?
- Stringing: Stringing occurs when small strands of plastic are left behind as the print head moves between different areas of the print.
- Warpage: Warpage is the deformation of printed layers, typically occurring at the corners of the print, which can lead to poor adhesion and loss of detail.
- Under-extrusion: Under-extrusion happens when the printer does not supply enough filament during the printing process, resulting in thin or missing layers.
- Over-extrusion: Over-extrusion is the opposite of under-extrusion, where too much filament is deposited, leading to blobs, zits, or excessive material buildup on the print.
- Layer adhesion issues: Poor layer adhesion can cause layers to separate, leading to weak prints that can easily break or crumble.
Stringing can be minimized by adjusting retraction settings, such as increasing the retraction distance or speed, and enabling the “Combing” feature in Cura, which helps keep the nozzle within the printed areas during travel moves.
To combat warpage, ensure a heated bed is used, adjust the bed temperature according to the PLA filament specifications, and consider using a brim or raft for better adhesion to the build surface.
Under-extrusion can be addressed by checking the nozzle for clogs, ensuring the filament diameter is accurately set in Cura, and calibrating the extruder steps per millimeter to ensure proper filament flow.
Over-extrusion may be resolved by reducing the flow rate in Cura, adjusting the filament diameter settings, and ensuring that the filament is not too hot, which can contribute to excess material being extruded.
For layer adhesion issues, try increasing the print temperature, as higher temperatures can improve the bonding between layers, and ensure that the cooling settings are appropriately set to avoid rapid cooling, which can lead to weak adhesion.
What Additional Tips Can Help You Achieve the Best Results with PLA in Cura?
To achieve the best results with PLA in Cura, consider implementing the following tips:
- Optimize Print Speed: Adjusting the print speed can significantly affect the quality of your prints.
- Fine-tune Layer Height: Selecting the appropriate layer height can enhance the detail and finish of your prints.
- Utilize Cooling Settings: Proper cooling is crucial for PLA, as it helps to solidify the filament quickly and reduce stringing.
- Set Proper Extrusion Temperature: Finding the optimal extrusion temperature ensures good layer adhesion and reduces issues like under-extrusion.
- Enable Retraction Settings: Enabling retraction can prevent stringing and oozing during travel moves, leading to cleaner prints.
- Adjust Bed Temperature: Setting the right bed temperature can help with adhesion and prevent warping.
- Use Supports Wisely: If your model requires supports, adjust support settings to ensure they are effective yet easy to remove.
- Calibrate Your E-steps: Correctly calibrating your extruder steps per millimeter ensures accurate filament flow for better print quality.
Optimizing print speed can help reduce print time while maintaining quality. Slower speeds often yield better detail, especially for intricate designs, but you may need to find a balance based on your printer’s capabilities and the specific PLA being used.
Fine-tuning layer height is essential for achieving the desired resolution in your prints. A lower layer height produces higher resolution prints, while a thicker layer height can speed up the process but may sacrifice detail.
Utilizing cooling settings is important for PLA, as it tends to deform if cooled too slowly. Enabling fan settings can help solidify the filament quickly, which is especially important for overhangs and fine features.
Setting the right extrusion temperature is key to ensuring good layer adhesion and preventing defects. Most PLA filaments have a recommended temperature range; experimenting within this range can help you find the sweet spot for your specific filament brand.
Enabling retraction settings is vital to minimizing stringing during travel moves. Proper retraction settings will pull the filament back slightly when the print head moves, reducing oozing and keeping your prints clean.
Adjusting the bed temperature can improve first-layer adhesion, which is crucial for successful prints. PLA typically adheres well to a heated bed set between 50-60°C, helping to prevent warping and ensuring a solid foundation for the rest of the print.
Using supports wisely can enhance the print quality of complex models. Carefully selecting support density and placement can make support removal easier while still providing the necessary structure during printing.
Calibrating your E-steps ensures that your printer extrudes the correct amount of filament, which is critical for achieving consistent print results. Accurate calibration reduces under-extrusion and over-extrusion, leading to better dimensional accuracy in your prints.
Related Post: