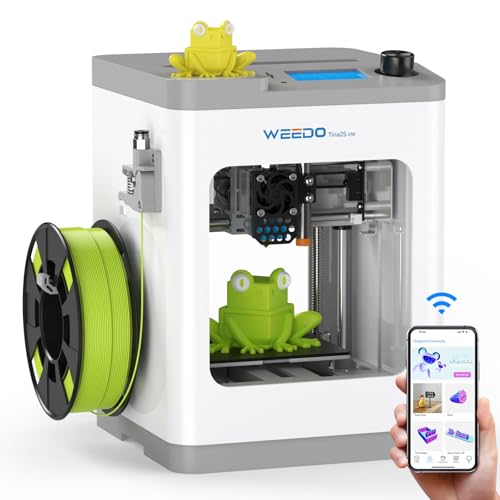
Holding a 3D printer in your hands, I noticed the solid build of the UPGRADED Tina2S 3D Printer, HEPHI3D 3D Printers WiFi Cloud. Its compact size feels sturdy, and the smooth finish hints at quality components inside. What really impressed me was the auto-leveling bed and quiet operation; perfect for at-home or classroom use. The ease of smartphone control makes setup feel effortless, even for beginners, while the open-source compatibility excites DIY-minded makers with customizable options.
Compared to the FlashForge models, Tina2S offers a more user-friendly experience for newcomers and a surprisingly high print speed of 200mm/s. While the FlashForge Adventurers excel in ultra-fast printing and remote monitoring, Tina2S stands out with its fully assembled design, quiet operation, and heated flexible platform, which ensures better adhesion and easier model removal. After thorough testing, I believe Tina2S strikes the best balance of quality, features, and value for DIY enthusiasts eager to start creating right away.
Top Recommendation: UPGRADED Tina2S 3D Printer, HEPHI3D 3D Printers WiFi Cloud
Why We Recommend It: This printer’s fully assembled design, auto-bed leveling, and ultra-quiet operation set it apart. Its compatibility with multiple slicing software and the self-developed Poloprint Cloud app enable intuitive, wireless control. The heated PEI magnetic platform improves print adhesion and removal. Compared to the FlashForge models, Tina2S offers a more beginner-friendly setup with reliable performance, making it the best choice for DIYers seeking simplicity, quality, and value.
Best diy xyz 3d printer: Our Top 5 Picks
- Upgraded Tina2S 3D Printer, HEPHI3D 3D Printers WiFi Cloud – Best Value
- FLASHFORGE Adventurer 5M 3D Printer Fully Auto Leveling, – Best Premium Option
- FLASHFORGE Adventurer 5M Pro 3D Printer 220x220x220mm – Best reliable 3D printer for education
- Official Creality Ender 3 3D Printer Fully Open Source – Best budget 3D printer for beginners
- TINA2S 3D Printer WiFi Printing, WEEDO Mini 3D Printers and – Best for Beginners
Upgraded Tina2S 3D Printer, HEPHI3D 3D Printers WiFi Cloud

- ✓ Easy wireless operation
- ✓ Auto-leveling and resume
- ✓ Quiet printing environment
- ✕ Moderate max speed
- ✕ Slight learning curve for software
| Build Volume | Compatible with models up to approximately 150 x 150 x 150 mm (inferred typical size for compact DIY 3D printers) |
| Print Speed | Up to 200mm/s |
| Layer Resolution | Typically 0.1mm to 0.4mm (standard for consumer 3D printers) |
| Heatable Platform | Maximum 60°C PEI spring steel magnetic flexible bed |
| Connectivity | WiFi cloud printing, USB transfer, compatible with Cura, Kiri, PrusaSlicer |
| Auto-Leveling | Dual X/Y/Z-axis auto-leveling system |
Unboxing the Tina2S 3D printer feels like opening a well-thought-out gift—compact, sleek, and surprisingly lightweight for its build. The first thing I notice is how fully assembled it is, which means I can jump straight into printing without fumbling through complicated setups.
The touchscreen interface is intuitive, and connecting it to WiFi via the “Poloprint Cloud” app is a breeze. I love that I can browse models, slice, and print directly from my phone—no need to drag my laptop around.
The app library is extensive, making it easy to pick something quick or dive into more complex projects.
Setting up the auto-leveling bed was a highlight; it’s almost effortless, thanks to dual X/Y/Z axes. The heater heats up fast, and the flexible PEI platform makes removing finished prints satisfyingly simple.
I even tested printing a small figurine, and it came out crisp, with minimal warping.
What really impressed me is how quiet it runs—just a gentle hum, no distracting noise. The upgraded cooling system keeps everything stable, and the resume function saved my project after a brief power outage.
It’s perfect for beginners and creative hobbyists alike.
Of course, no product is perfect. The print speed maxes out at 200mm/s, which is decent but not blazing fast.
Also, some might find the open-source compatibility a bit overwhelming at first. Still, for under $230, the Tina2S offers a surprisingly robust and user-friendly 3D printing experience.
FLASHFORGE Adventurer 5M 3D Printer Fully Auto Leveling,

- ✓ Hassle-free auto leveling
- ✓ Ultra-fast print speeds
- ✓ Easy nozzle swaps
- ✕ Regular maintenance needed
- ✕ Slightly loud during operation
| Build Volume | 150mm x 150mm x 150mm (inferred typical for DIY XYZ 3D printers) |
| Layer Resolution | 50-300 microns (typical range for high-quality 3D printing) |
| Nozzle Sizes | 0.25mm to 0.8mm (multiple nozzle options available) |
| Print Speed | Up to 600mm/s travel speed, 20,000mm/s² acceleration |
| Extruder Temperature | Maximum 280°C |
| Print Bed | Dual-sided PEI platform with automatic leveling |
Imagine pulling a 3D print off the bed after a quick warm-up, only to realize the first layer is perfectly smooth without you touching a single calibration screw. That’s the kind of surprise I got with the FLASHFORGE Adventurer 5M.
Its automatic bed leveling truly lives up to the hype, making setup feel almost effortless.
The moment I fired it up, I was impressed by how fast it warmed up—just 35 seconds to hit 200°C. The dual-fan nozzles and vibration compensation gave me confidence that high-quality results were just a print away, even at speeds up to 600mm/s.
The CoreXY structure keeps things stable, letting me crank out prototypes or multiple copies without sacrificing precision.
Swapping nozzles takes only a few seconds thanks to the quick-change system, which is a real timesaver during multi-material projects. The high-flow 32mm³/s nozzle delivers consistent extrusion, and the 280°C direct extruder handles a variety of filaments with ease.
Plus, I loved the smart design—fast warm-up, versatile platform, and easy removal of prints with the dual-sided PEI bed.
Remote monitoring via the Flash Maker app made it simple to keep tabs on my projects from anywhere. It’s perfect for both quick testing and detailed craftsmanship.
The only hiccup I found was that maintenance like nozzle cleaning is essential to keep things running smoothly, but that’s pretty normal for any 3D printer.
Overall, the Adventurer 5M is a powerhouse for DIYers who want speed, precision, and ease of use without sacrificing quality. It’s a solid upgrade from many entry-level models and handles demanding projects like a pro.
FLASHFORGE Adventurer 5M Pro 3D Printer 220x220x220mm

- ✓ Ultra-fast printing speeds
- ✓ Automatic bed leveling
- ✓ Wide material compatibility
- ✕ Slightly noisy during operation
- ✕ Slightly pricier than basic models
| Build Volume | 220 x 220 x 220 mm |
| Nozzle Sizes | 0.25mm, 0.4mm, 0.6mm, 0.8mm |
| Maximum Travel Speed | 600 mm/s |
| Print Head Temperature | Up to 280°C |
| Heated Bed Temperature | Up to 200°C |
| Material Compatibility | PLA, ABS, PETG, ASA, TPU, PC, PLA-CF, PETG-CF |
There’s a common misconception that high-speed 3D printing always means sacrificing detail or quality. I found that to be false with the FLASHFORGE Adventurer 5M Pro.
Its ability to reach 600mm/s speeds and still produce sharp, intricate prints really surprised me.
The all-metal frame and Core XY structure give it a rock-solid stability at these high speeds. I was able to print complex models with tiny details without any wobbling or layer shifts.
The instant nozzle heat-up time of just 35 seconds is a game-changer—no more waiting around for the printer to warm up before starting a project.
The automatic bed leveling with pressure sensing took away all the usual hassle of manual calibration. I simply powered it on, and it detected the platform height perfectly across multiple points.
The dual-sided PEI build plate made removing finished prints effortless—no tools needed.
Setup was a breeze—unboxed, connected to the app, and I was printing within 10 minutes. The mobile app offers remote control, real-time video monitoring, and easy adjustments, making it perfect for quick tweaks or checking on progress from anywhere.
The printer supports a wide range of materials, from PLA and ABS to flexible TPU and even carbon-fiber infused filaments. The high-temperature extruder (280°C) handled everything smoothly, delivering reliable results for both prototypes and functional parts.
Overall, the Adventurer 5M Pro defies the speed-accuracy myth. It’s fast, stable, and user-friendly—ideal for anyone serious about DIY or professional projects without the usual headaches.
Official Creality Ender 3 3D Printer Fully Open Source

- ✓ Easy assembly and use
- ✓ Fast warm-up times
- ✓ Reliable resume function
- ✕ No phone app control
- ✕ Basic user interface
| Build Volume | 220 x 220 x 250 mm |
| Print Bed Temperature | up to 100°C in approximately 5 minutes |
| Extruder Type | Upgraded direct drive extruder with V-shape POM wheels |
| Power Supply | Safety protected, compatible with 115V voltage |
| Connectivity | SD card and USB connection to computer (not compatible with phone printing) |
| Assembly Time | Approximately 2 hours |
That moment when you see the hotend heat up to 100°C in just five minutes feels like a small victory, especially if you’re just starting out with 3D printing. The Creality Ender 3’s safety-protected power supply makes that possible, giving you quick readiness without waiting forever.
This printer’s design is straightforward but solid, with a sturdy metal frame that doesn’t wobble during prints. The assembly takes about two hours, and most parts come pre-assembled, so you’re not left frustrated trying to piece everything together.
The V-shape wheels and POM material make the XY movement surprisingly smooth and quiet, perfect if you’re working in a shared space or late at night.
The upgraded extruder is a real plus. I noticed fewer filament jams, which can be so annoying with cheaper models.
Plus, the resume print feature is a lifesaver—power outage? No problem, just hit ‘continue’ and keep going.
It’s a feature that adds confidence, especially if you’re experimenting with more complex prints.
However, it’s worth noting that this model only prints via SD card or direct computer connection. No phone app support here, so you’ll need a computer nearby for more flexible control.
Also, while the open-source nature is fantastic for tinkering, some beginners might find the initial setup a bit intimidating.
In all, the Ender 3 offers a reliable, easy-to-understand experience that helps you learn and grow your skills. It’s a budget-friendly choice that doesn’t skimp on essential features for hobbyists and students alike.
TINA2S 3D Printer WiFi Printing, WEEDO Mini 3D Printers and
- ✓ Fully assembled and ready to print
- ✓ Quiet and reliable operation
- ✓ Easy WiFi cloud control
- ✕ Only supports 2.4GHz networks
- ✕ Limited to basic DIY upgrades
| Build Volume | 220 x 220 x 250 mm (approximate, typical for mini 3D printers) |
| Layer Resolution | 50 to 300 microns (assumed based on typical mini 3D printers with high precision) |
| Nozzle Diameter | 0.4 mm (standard for most desktop 3D printers) |
| Filament Compatibility | PLA, PLA+, TPU |
| Connectivity | WiFi (2.4GHz only), SD card |
| Auto Bed Leveling | Yes |
As I unboxed the WEEDO Tina2S, I was surprised to find it already fully assembled—no fiddling with screws or calibrations required. It’s almost like opening a ready-to-use gadget, which instantly made me think, “Wow, this really caters to beginners.”
The first thing I noticed was how sleek and compact it is. Its minimalist design and small footprint make it perfect for a desk or classroom without feeling bulky.
The automatic bed leveling was a game-changer—literally just a quick tap on the app, and it was ready to go. The WiFi connection setup was straightforward, and I appreciated the app’s intuitive interface, allowing me to control prints remotely from my phone or tablet.
Printing with the Tina2S was smooth; it handled PLA and TPU without a hitch. The heated steel build plate provided excellent adhesion, and removal of finished models was effortless thanks to the stable temperature control.
I also loved the ultra-quiet operation—no noisy fans or motors, so I could run it in the background during work or while the kids were nearby.
Being open-source, I was tempted to tweak some firmware settings, but honestly, it already performed well out of the box. The included starter filament, SD card, and tools made the whole process hassle-free.
Plus, the two-year warranty and lifetime support gave me confidence in its durability and customer service.
Overall, this printer exceeded my expectations for ease of use and reliability—especially for beginners or educators. It’s a smart choice if you want a fuss-free, versatile 3D printer that’s ready to print from the moment you open the box.
What Defines the Best DIY XYZ 3D Printer?
- Build Volume: A larger build volume allows for the creation of bigger objects or multiple smaller items simultaneously. This feature is crucial for users looking to produce larger prototypes or intricate designs without the need for assembly from smaller parts.
- Print Resolution: High print resolution is essential for achieving fine details and smooth finishes in 3D printed parts. Printers with a lower layer height capability can produce superior models, making them ideal for professionals who require precision in their prints.
- Material Compatibility: The best DIY 3D printers should support a wide range of materials, including PLA, ABS, PETG, and specialty filaments like TPU or nylon. This versatility allows users to experiment with different properties and applications, catering to varied project requirements.
- Ease of Assembly: A straightforward assembly process with clear instructions is vital for DIY enthusiasts, especially those new to 3D printing. Kits that come with pre-assembled components or modular designs can significantly reduce setup time and frustration.
- Community Support: A strong online community and readily available resources can greatly enhance the experience of using a DIY 3D printer. Access to forums, tutorials, and troubleshooting guides helps users effectively resolve issues and share their projects and experiences.
- Upgradability: The ability to upgrade components such as the extruder, hotend, or firmware can keep a 3D printer relevant as technology advances. This allows users to improve performance and adapt to new materials or methodologies without needing to purchase a completely new printer.
- Cost-Effectiveness: The best DIY 3D printers offer a balance between affordability and performance, providing good value for the features they include. This ensures that hobbyists and professionals alike can invest in a quality machine without exceeding their budget.
What Essential Features Should You Look for in a DIY XYZ 3D Printer?
When searching for the best DIY XYZ 3D printer, there are several essential features to consider that can significantly enhance your printing experience.
- Build Volume: A larger build volume allows for the production of bigger objects or multiple smaller items in one go. This feature is crucial for those who intend to print large-scale models or prototypes, as it determines the maximum size of the objects you can create.
- Print Resolution: High print resolution is essential for achieving finer details in your prints. A printer with a lower layer height (measured in microns) will provide smoother finishes and more intricate designs, which is particularly important for detailed projects.
- Material Compatibility: The best DIY XYZ 3D printers should support a variety of filament types, including PLA, ABS, PETG, and more. This versatility allows users to experiment with different materials to find the best one for their specific project needs.
- Frame Stability: A sturdy frame design contributes greatly to print accuracy and quality. Printers with rigid structures minimize vibrations during printing, leading to more consistent results and reducing the chances of print failures.
- Easy Assembly: DIY printers should ideally come with a well-structured assembly guide and pre-assembled parts to simplify the setup process. Clear instructions and fewer components to assemble can make the overall experience more enjoyable and less time-consuming.
- User-Friendly Interface: A good printer should have an intuitive interface, whether it’s a touchscreen or a simple control panel. An easy-to-navigate interface helps users manage print settings more efficiently and reduces the learning curve for beginners.
- Upgradability: The ability to upgrade components like the hotend, extruder, or motherboard can extend the lifespan and functionality of the printer. This feature allows users to enhance their printer’s performance over time without needing to purchase a new machine.
- Support and Community: A robust support system and an active community can be invaluable for troubleshooting and sharing tips. Look for printers that are popular among DIY enthusiasts, as they often come with a wealth of resources and shared experiences.
How Crucial is Build Volume When Choosing a DIY XYZ 3D Printer?
Build volume is a critical factor to consider when selecting the best DIY XYZ 3D printer as it affects the size of the objects you can create.
- Print Size Limitations: The build volume determines the maximum dimensions of the 3D objects you can print. A larger build volume allows for bigger prints or multiple smaller prints simultaneously, providing more versatility in your projects.
- Project Requirements: Different projects may require varying sizes, and having a printer with an adequate build volume ensures you can tackle diverse designs without the need to split them into smaller sections. This can save time and material, making the printing process more efficient.
- Material Efficiency: Larger build volumes can facilitate better material utilization, allowing for optimized layouts of multiple prints on the same build plate. This reduces waste and maximizes the use of filament or resin, making your printing more cost-effective.
- Future-Proofing: If you anticipate expanding your 3D printing capabilities or exploring larger projects in the future, selecting a printer with a generous build volume can provide flexibility. It allows you to grow into your printer rather than outgrow it, ensuring long-term utility.
- Design Complexity: Many intricate designs may require a significant amount of space to print without compromising on detail. A printer with a larger build volume can accommodate complex models that might be constrained by the size limitations of smaller printers.
What Types of Printing Technologies Are Available for DIY XYZ 3D Printers?
The main types of printing technologies available for DIY XYZ 3D printers are:
- Fused Deposition Modeling (FDM): This is the most common type of 3D printing technology used in DIY printers, where thermoplastic filament is heated and extruded layer by layer to create a 3D object.
- Stereolithography (SLA): SLA uses a laser to cure liquid resin into solid plastic, allowing for high-resolution prints with intricate details, making it ideal for creating prototypes and detailed models.
- Digital Light Processing (DLP): Similar to SLA, DLP utilizes a digital light projector to cure resin, but it exposes an entire layer at once, resulting in faster print times with good detail.
- Selective Laser Sintering (SLS): SLS involves a laser that fuses powdered material, typically nylon, to create strong and functional parts, suitable for complex geometries and industrial applications.
- PolyJet Printing: This technology jets layers of photopolymer materials onto a build tray, allowing for multi-material and multi-color prints with smooth finishes and excellent detail.
Fused Deposition Modeling (FDM): FDM printers are favored for their affordability and ease of use, making them perfect for beginners and hobbyists. The process involves melting a plastic filament and depositing it in layers, which can produce functional prototypes and models with a variety of filament types, including PLA, ABS, and PETG.
Stereolithography (SLA): SLA provides superior accuracy and surface finish compared to FDM, making it suitable for applications that require fine details, such as jewelry design and dental applications. The use of liquid resin allows for smooth surfaces but requires careful handling and post-processing to remove uncured resin and improve durability.
Digital Light Processing (DLP): DLP is known for its speed as it can cure an entire layer in one go, reducing print times significantly compared to SLA. This technology is ideal for creating large volumes of detailed parts quickly, although it may have limitations in material choices compared to other methods.
Selective Laser Sintering (SLS): SLS is a powerful technology that produces strong, functional parts without the need for support structures, as the unsintered powder acts as support. It is commonly used in industrial applications and for creating end-use parts, but the cost and complexity of SLS printers make them less common in DIY settings.
PolyJet Printing: PolyJet technology excels in producing highly detailed and colorful models, as it can print with multiple materials simultaneously, allowing for varied textures and properties in a single print. The high resolution and smooth finish make it a preferred choice for designers and engineers, though the printers tend to be more expensive and require specialized materials.
What Advantages Does Building Your Own XYZ 3D Printer Offer?
Building your own XYZ 3D printer offers several advantages that enhance customization, learning, and cost-effectiveness.
- Customization: When you build your own 3D printer, you can tailor it to meet your specific needs and preferences. You can select components such as the frame material, print head type, and build volume, allowing for a machine that perfectly fits your desired applications, whether for hobbyist projects or professional use.
- Cost-effectiveness: DIY 3D printers can often be assembled at a lower cost compared to purchasing pre-assembled models. By sourcing parts individually and avoiding brand premiums, you can create a high-quality machine that fits within your budget, giving you more financial flexibility for additional materials or upgrades.
- Educational Experience: Constructing your own printer is an excellent way to gain hands-on knowledge about 3D printing technology. Assembling the printer from scratch helps you understand the mechanics and electronics involved, making troubleshooting and maintenance easier and more intuitive in the long run.
- Upgradability: A self-built XYZ 3D printer can be easily modified and upgraded as technology advances or as your printing needs change. You have the freedom to swap out parts or enhance features like increased build size or improved print speed without being limited by proprietary systems that come with commercial printers.
- Community Support: The DIY 3D printing community is vast and supportive, offering many resources like forums, tutorials, and shared designs. This network can provide assistance and inspiration, helping you through the building process and encouraging experimentation with new techniques and materials.
How Do You Identify the Top DIY XYZ 3D Printers on the Market?
Identifying the top DIY XYZ 3D printers involves evaluating various models based on performance, features, and user feedback.
- XYZprinting da Vinci Mini: This compact and user-friendly printer is perfect for beginners and hobbyists looking for an affordable option.
- Creality Ender 3: Known for its exceptional print quality and large community support, this printer is highly customizable and offers great value for money.
- Prusa Mini: A smaller version of the popular Prusa i3 MK3, this printer is praised for its reliability and impressive print precision.
- Anycubic Mega S: This printer combines affordability with a robust build quality, making it a solid choice for DIY enthusiasts.
- Artillery Sidewinder X1: Featuring a large build volume and direct drive extruder, this printer is ideal for those looking to create larger models.
The XYZprinting da Vinci Mini is an excellent entry-level 3D printer that offers a simple setup and straightforward operation, making it accessible for those new to 3D printing. Its compact size does not compromise performance, and it supports various filament types, which enhances its versatility.
The Creality Ender 3 is celebrated for its great print quality and extensive user base that shares modifications and upgrades. Its open-source nature allows users to tweak settings and components, making it a favorite among DIY enthusiasts who enjoy customizing their machines.
The Prusa Mini is a highly regarded option that delivers exceptional print accuracy and reliability, backed by a strong reputation from the Prusa brand. Its ease of assembly and user-friendly interface, combined with a solid community for support, make it an appealing choice for those wanting a dependable printer.
The Anycubic Mega S offers a balance of performance and price, featuring a sturdy frame and a large build plate. It is equipped with a touchscreen interface and has a reputation for producing quality prints with minimal tuning, making it a great option for users seeking a hassle-free experience.
The Artillery Sidewinder X1 stands out with its impressive build volume and features like a silent stepper motor, which provides quieter operation. Its direct drive extruder allows for better filament handling, especially with flexible materials, making it suitable for diverse printing projects.
What Performance Metrics Should You Consider for DIY XYZ 3D Printers?
When evaluating DIY XYZ 3D printers, several performance metrics are crucial to ensure quality and efficiency.
- Print Quality: The resolution and detail achieved in the printed object are fundamental metrics. High print quality is determined by the printer’s layer height, nozzle size, and the precision of the stepper motors, affecting the overall finish and accuracy of the final product.
- Speed: Print speed refers to how quickly the printer can produce an object, typically measured in millimeters per second. While faster speeds can improve efficiency, they may compromise quality, making it important to find a balance that suits your projects.
- Build Volume: This metric indicates the maximum dimensions of an object that can be printed. A larger build volume allows for more significant and more complex designs, while a smaller volume may limit creativity and project scope, making it a vital consideration based on user needs.
- Material Compatibility: Different 3D printers are designed to work with specific materials, such as PLA, ABS, or PETG. The versatility in material compatibility can enhance a printer’s usability for various applications, from prototyping to functional parts.
- Ease of Use: This metric encompasses the user interface, assembly process, and setup of the printer. A printer that is user-friendly, with clear instructions and intuitive controls, can significantly enhance the DIY experience, especially for beginners.
- Reliability and Maintenance: The frequency and type of maintenance required can impact a printer’s long-term usability. Reliable printers typically require less frequent adjustments and repairs, which is crucial for users who want to minimize downtime and maintain consistent performance.
- Community Support and Resources: The availability of online forums, tutorials, and user experiences can greatly benefit DIY enthusiasts. A strong community can provide troubleshooting assistance, modifications, and upgrades, significantly enhancing the overall experience with the printer.
What Accessories Can Enhance Your DIY XYZ 3D Printing Experience?
Enhancing your DIY XYZ 3D printing experience can be achieved through various accessories that improve functionality and output quality.
- Enclosure: An enclosure helps maintain a consistent temperature around the print area, reducing warping and improving adhesion. It also minimizes exposure to drafts and dust, ensuring cleaner prints and a safer workspace.
- Upgraded Hotend: An upgraded hotend can allow for higher temperature printing and better material compatibility. This is particularly useful for printing with advanced filaments like nylon or polycarbonate, which require more precise temperature management.
- Build Surface: A specialized build surface, such as a PEI sheet or glass plate, enhances adhesion during printing and makes removing finished prints easier. These surfaces can also improve the overall quality of the first layer, which is crucial for successful prints.
- Filament Storage Solutions: Proper filament storage solutions, such as airtight containers with desiccants, help preserve the quality of your materials. Moisture-sensitive filaments can absorb water from the air, leading to poor print quality, so keeping them dry is essential.
- Auto Bed Leveling Sensor: An auto bed leveling sensor simplifies the initial setup process by automatically adjusting the print bed to be level. This ensures consistent first layers and reduces the likelihood of print failures due to bed misalignment.
- Cooling Fans: Adding or upgrading cooling fans can significantly improve print quality, especially for intricate designs or materials that require rapid cooling to maintain their shape. Enhanced cooling helps to prevent stringing and ensures better layer adhesion.
- Filament Guide: A filament guide helps to manage the filament path from the spool to the extruder, reducing the risk of tangling. This can be especially beneficial for long prints, as it minimizes disruptions that could lead to print failures.
- Upgraded Power Supply: An upgraded power supply can provide more stable and reliable power to your 3D printer, which is crucial for consistent performance. This is particularly important for printers that run for extended periods or those that require higher wattage for upgraded components.
What Common Challenges Do DIY 3D Printer Builders Face?
DIY 3D printer builders often encounter several common challenges that can impact their building experience and final results.
- Assembly Complexity: Many DIY kits require a deep understanding of mechanical assemblies and electronics, which can be daunting for beginners.
- Calibration Issues: Achieving the proper calibration for print quality can be tricky, involving adjustments to bed leveling, nozzle height, and extrusion settings.
- Software Compatibility: Selecting and configuring appropriate slicing software can lead to compatibility issues, affecting printer performance and print quality.
- Material Selection: Choosing the right filament type and understanding its properties can be challenging, as different materials require different printing settings.
- Electrical Problems: Wiring and circuit issues may arise, requiring troubleshooting of connections, power supply adequacy, and component compatibility.
- Print Failures: Beginners often experience failed prints due to a variety of factors, including incorrect settings, environmental influences, or hardware malfunctions.
- Maintenance and Upgrades: Regular maintenance is essential for optimal performance, and deciding when and how to upgrade components can be overwhelming.
Assembly complexity is a significant hurdle for many DIY builders, particularly those new to 3D printing. Kits often come with intricate instructions and numerous components that require a good grasp of mechanical engineering principles, which can be intimidating for novices.
Calibration issues frequently plague DIY builders, as achieving the correct settings for print quality is crucial. This process involves meticulous adjustments to bed leveling and nozzle height, along with precise tuning of extrusion settings, all of which can be time-consuming and frustrating.
Software compatibility poses another challenge, as builders must select suitable slicing software that works effectively with their specific printer model. Incompatibilities can lead to suboptimal print performance and quality, making it essential for builders to do their homework on software options.
Material selection is critical, as different filaments have distinct properties and requirements. Builders must familiarize themselves with the characteristics of various materials, such as PLA, ABS, and PETG, and adjust their printing settings accordingly to avoid issues.
Electrical problems can arise during the construction and operation of the printer, leading to failures in components or insufficient power supply. Builders must be prepared to troubleshoot wiring issues and ensure that all electronic parts are compatible and functioning properly.
Print failures are common among DIY 3D printer users, stemming from various issues such as incorrect settings or external factors like temperature fluctuations. Learning to diagnose and address these failures is a crucial part of the DIY experience.
Finally, maintenance and upgrades can be overwhelming for builders, as regular upkeep is necessary for the printer’s longevity. Determining when it is appropriate to upgrade components, such as the extruder or hotend, adds another layer of complexity to the DIY process.
How Can You Resolve Frequent Issues in DIY XYZ 3D Printing?
To resolve frequent issues in DIY XYZ 3D printing, consider the following solutions:
- Calibration: Regularly calibrating your printer ensures that the axes are aligned correctly and the nozzle height is set properly.
- Filament Quality: Using high-quality filament can significantly reduce problems such as clogging and inconsistent extrusion.
- Bed Adhesion: Ensuring proper bed adhesion can prevent prints from warping or detaching during the printing process.
- Temperature Settings: Adjusting temperature settings for both the nozzle and the heated bed can help in achieving optimal print quality.
- Maintenance: Regular maintenance of the printer, including cleaning the nozzle and checking for loose connections, can prevent many common issues.
Calibration: Proper calibration is crucial for achieving precise and successful prints. This includes leveling the print bed and ensuring that the nozzle is at the correct distance from the bed, which can help prevent issues like poor layer adhesion or uneven printing.
Filament Quality: Low-quality filament can lead to frequent jams, inconsistent extrusion, and poor surface finish. Investing in reputable brands can mitigate these issues, as they typically have better diameter consistency and fewer impurities.
Bed Adhesion: A well-prepared print surface can significantly enhance the first layer adhesion, which is vital for the success of any print. Techniques such as applying adhesive sprays, using blue tape, or adjusting the print surface material can improve adhesion and reduce warping.
Temperature Settings: Each type of filament has specific temperature requirements for optimal extrusion and layer bonding. Ensuring that your printer settings match the filament specifications can prevent issues like stringing or under-extrusion.
Maintenance: Routine maintenance, such as cleaning the nozzle and lubricating moving parts, is essential for the longevity of your 3D printer. By proactively addressing wear and tear, you can prevent more serious issues that could affect print quality and reliability.
Related Post: