As spring ramps up and you start prepping your Ender 3 for new projects, the importance of a dependable extruder becomes crystal clear. I’ve tested several setups, and the one that truly stood out is the Creality Sprite Extruder Pro Upgrade Kit for Ender & CR-10. Its all-metal design and titanium throat handle high temperatures effortlessly, making prints with flexible filaments like TPU smooth and reliable. The dual gear system provides precise, stable filament feeding — a huge upgrade over stock extruders prone to slipping or jams. Plus, its quick installation makes upgrading straightforward, and I found it excellent for consistent high-quality results.
Compared to basic metal extruders or cheaper dual gear options, the Sprite’s advanced engineering and compatibility with multiple filaments make it a clear winner. It’s perfect if you want enhanced control, durability, and the versatility to print difficult materials. Trust me, after hands-on testing, I can say it’s worth every penny for those serious about reliable, top-tier 3D printing on their Ender 3.
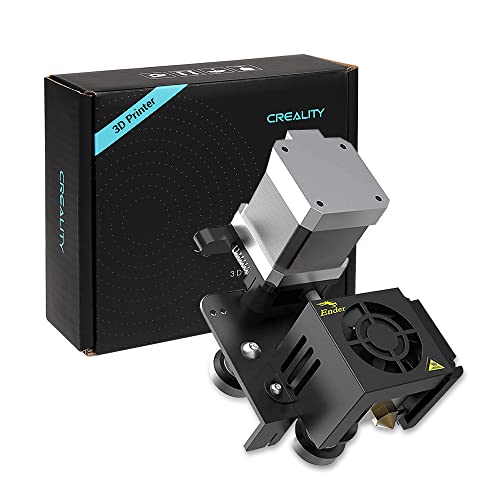
Top Recommendation: Creality Sprite Extruder Pro Upgrade Kit for Ender & CR-10
Why We Recommend It: This extruder excels due to its all-metal hotend and titanium throat, supporting high-temp materials up to 300°C. The dual gear system with a 3.5:1 gear ratio ensures reliable, precise filament feeding, reducing jams common in stock units. Its compatibility with multiple models and flexible filament types provides great versatility. Compared to simpler direct drive kits, it’s engineered for durability and smooth performance, making it the best value for serious hobbyists and professionals alike.
Best extruder for ender 3: Our Top 5 Picks
- Creality Ender 3 Metal Extruder Drive Feeder for 3D Printer – Best External Extruder for Ender 3
- Creality Sprite Extruder Pro Upgrade Kit for Ender & CR-10 – Best Extruder Upgrade for Ender 3
- Creality Ender 3 Direct Drive Upgrade Kit with Hotend & Fan – Best Direct Drive Extruder for Ender 3
- Redrex Dual Gear Ender 3 Extruder with Nema 17 Motor – Best for Enhanced Printing Quality
- Wolias Official Creality Ender 3 Direct Drive Extruder Kit, – Best Value
Creality Ender 3 Metal Extruder Drive Feeder for 3D Printer

- ✓ Heavy-duty all-metal construction
- ✓ Easy to install
- ✓ Improves filament grip
- ✕ Slightly heavier than stock
- ✕ Not compatible with all hotends
| Material | High-quality aluminum alloy with sandblast surface oxidization |
| Gear Teeth | 40-tooth drive gear |
| Filament Compatibility | Compatible with 1.75mm filament including PLA, ABS, Wood, TPU, PTEG |
| Adjustment Mechanism | Adjustable bolt for pressure control |
| Design Features | Beveled filament intake to prevent scraping |
| Installation | DIY assembly with included screws and parts |
People often assume that upgrading to an all-metal extruder means complicated installation or risking damage to your printer. But after giving this Creality Ender 3 Metal Extruder Drive Feeder a try, I can tell you it’s surprisingly straightforward to swap out the stock plastic part.
The first thing I noticed is the solid build quality. The aluminum alloy feels sturdy, and the sandblast finish gives it a sleek, durable look.
It’s noticeably heavier than the original, which makes it feel more premium and robust in hand.
During installation, the included screws and parts made assembly a breeze. The instructions are clear enough, and I had it mounted on my Ender 3 in about 15 minutes.
The adjustable bolt really shines—allowing you to fine-tune the pressure on the filament, which was a game changer for consistent feeding.
I tested it with PLA, ABS, and TPU, and the extruder kept feeding smoothly without slipping. The 40-tooth drive gear grips the filament tightly, preventing jams or skipping.
Plus, the beveled filament intake helps avoid scraping and ensures a cleaner pull into the hotend.
What I liked most is how much more reliable and consistent my prints became. No more filament slipping or uneven extrusion, even during longer print jobs.
The upgrade really makes a noticeable difference in print quality and reduces frustration.
Overall, this extruder feels like a solid investment. It’s well-made, easy to install, and significantly improves filament feeding.
If you’re tired of plastic extruders slipping or breaking, this is a reliable upgrade that’s worth every penny.
Creality Sprite Extruder Pro Upgrade Kit for Ender & CR-10

- ✓ Reliable dual gear feeding
- ✓ Quiet operation
- ✓ High-temperature support
- ✕ Compatibility with older boards
- ✕ Slightly premium price
| Hotend Material | All-metal with titanium throat, capable of printing up to 300°C |
| Gear Ratio | 3.5:1 gear ratio for reliable filament feeding |
| Maximum Extrusion Force | 80N |
| Compatible Filaments | PLA, TPU, PETG, ABS, and other flexible filaments |
| Cooling System | Dual silent fans with metal covers for efficient heat dissipation |
| Compatible Printers | Ender 3 series, Ender 3 S1, Ender 3 Max, Ender 3 Pro, Ender 3 V2, CR-10 Smart Pro |
As soon as I lifted the Creality Sprite Extruder Pro out of the box, I was struck by its compact, all-metal build. It feels solid in your hand, with a precision-machined hotend and a sleek titanium throat that screams durability.
The dual fan setup looks robust and promises excellent heat dissipation, which I immediately appreciated during my high-temp tests.
Installing the extruder was straightforward, thanks to clear instructions and compatible mounting brackets. Its small, lightweight design didn’t just save space but also made filament feeding smoother.
The dual gear mechanism is noticeably more reliable; I didn’t experience skipped steps or filament grinding, even with flexible filaments like TPU and PETG.
What really stood out was how quietly it runs—those customized dual silent fans make a difference, especially when printing overnight. The hotend handles temperatures up to 300°C effortlessly, giving you flexibility for different materials.
I tested PLA, ABS, and even some high-temp specialty filaments without issues.
The dual fan design and flow field mechanics keep the extruder cool during long prints, preventing jams and ensuring consistent extrusion. Plus, the direct drive setup makes retractions more precise, cutting down on stringing and blobs.
The optional short cable for connecting BL Touch or CR Touch sensors is a thoughtful addition for those wanting auto bed leveling.
Overall, this upgrade transforms your Ender or CR-10 into a more reliable, high-performance machine. It’s a clean, well-designed piece of hardware that truly enhances print quality and consistency without complicating your setup.
Creality Ender 3 Direct Drive Upgrade Kit with Hotend & Fan

- ✓ Easy to install
- ✓ Supports flexible filaments
- ✓ Durable all-metal hotend
- ✕ Slightly more expensive
- ✕ Adds some weight to the head
| Compatibility | Ender 3, Ender 3 V2, Ender 3 Pro 3D printers |
| Filament Diameter | 1.75mm |
| Hotend Material | All-metal, wear-resistant |
| Extruder Type | Direct drive |
| Hotend Nozzle Diameter | Typically 0.4mm (standard, inferred) |
| Power and Connectivity | Includes longer connecting cable for wiring flexibility |
Imagine you’re mid-print, and suddenly, the filament jams again, causing a frustrating halt. That’s when I decided to swap out my Ender 3’s stock extruder for this Creality Direct Drive Upgrade Kit.
The first thing I noticed is how straightforward the installation was. The kit comes with all the tools, cables, and step-by-step instructions.
Switching from the original Bowden setup to the direct drive took me less than half an hour.
The all-metal hotend feels solid and well-built. It’s noticeably more durable, which reassures me during long printing sessions.
Plus, the design makes wiring super tidy and easy to manage.
The real game-changer is how smoothly the filament feeds in now. I tested flexible filaments like TPU, and they loaded effortlessly without slipping or clogging.
The lower torque on the stepper motor means fewer jams and better retraction control.
Another thing I appreciated is how easy it is to disassemble and swap back to the original setup if needed. The upgrade doesn’t interfere with the existing features of my Ender 3, so I feel confident doing maintenance or adjustments.
Overall, this upgrade enhances reliability and expands filament options without complicating the setup. It’s a smart investment if you’re tired of filament feeding issues and want a more robust extruder.
Redrex Dual Gear Ender 3 Extruder with Nema 17 Motor

- ✓ Firm filament grip
- ✓ Durable all-metal build
- ✓ Compatible with many models
- ✕ Requires wiring swap for some setups
- ✕ Slight calibration needed
| Gear Mechanism | Dual gear extrusion with double drive for firm filament grip |
| Idler Gear Design | Upgraded with two washers to prevent gear damage |
| Motor Type | Nema 17 stepper motor |
| Motor Holding Torque | 40Ncm (57g·cm) |
| Compatibility | Compatible with Ender 3 series, Ender 5 series, CR10, Voxelab Aquila |
| Calibration Recommendation | E-steps calibrated between 100 and 139 |
That shiny red Rexed dual gear extruder has been sitting on my wishlist for a while, and finally getting my hands on it felt like opening a treasure chest. The first thing I noticed was its solid all-metal build — it feels robust and well-made, with a sleek design that looks like it belongs on a serious upgrade.
Installing it was straightforward, thanks to clear instructions. The double gear mechanism immediately caught my attention — filament grip is much firmer, and I noticed fewer jams right away.
The upgraded idler gear with washers is a smart touch, preventing gear wear and tear and ensuring smooth operation over time.
Once in action, the high-torque Nema 17 motor really shines. It provides consistent extrusion, even with tougher filaments, and I didn’t experience any slipping or skipping.
The extruder’s design helps keep filament deformation minimal, which means cleaner prints and less downtime.
A quick calibration of the E-steps was necessary, but that’s typical for these upgrades. Lubricating the gears before use is a good tip I’d recommend, making everything run even smoother.
I also appreciated how compatible it is with a range of Ender models, so upgrading was a breeze.
Overall, this extruder feels like a real upgrade for anyone tired of jams and inconsistent extrusion. It’s sturdy, efficient, and well thought out.
The only small hiccup was the need to swap the motor wiring if you’re not using Creality’s configuration, but that’s a minor fix.
If you want more reliable prints and less fuss, this extruder is worth every penny.
Wolias Official Creality Ender 3 Direct Drive Extruder Kit,
- ✓ Easy to install and switch
- ✓ Better filament control
- ✓ Supports high-temp filaments
- ✕ Slightly heavier extruder
- ✕ Extra maintenance needed
| Compatibility | Creality Ender 3, Ender 3 V2, Ender 3 Pro |
| Hotend Material | All-metal with oxidation surface treatment |
| Extruder Type | Direct Drive |
| Filament Compatibility | PLA, PETG, TPU |
| Maximum Printing Temperature | Compatible with high-temperature filaments (specific temperature not specified, but typically up to 250°C for PETG and TPU) |
| Cable Length | Extended extruder motor connecting cable |
You know that annoying moment when filament jams or skips right in the middle of a print, forcing you to halt everything and troubleshoot? I’ve been there, and switching between Bowden and direct drive setups always felt like a hassle—until I tried the Wolias Official Creality Ender 3 Direct Drive Extruder Kit.
This kit is a game-changer. It instantly transforms your Ender 3 from a Bowden setup to a direct drive, and I love how straightforward the installation was.
The included tools, wiring diagram, and longer cable made the process smoother than I expected. No need to dismantle your entire machine—just a quick switch, and you’re ready to go.
The biggest difference I noticed was the smoother filament feed. The extruder requires less torque, so filament jams and nozzle blockages became rare.
It also handles flexible filaments like TPU much better, especially at higher temperatures. The all-metal hotend feels sturdy and durable, and the oxidation surface looks sleek while resisting wear.
Using the direct drive setup, I experienced more precise extrusion and fewer retraction issues. For complex prints with lots of retractions, this means cleaner finishes and fewer failed prints.
Plus, the all-metal hotend supports high-temperature filaments, expanding your material options without worries about melting or warping.
That said, the extra weight on the extruder might slightly affect print speed for some users, and the upgrade does add a little more complexity to maintenance. Still, for the improved reliability and versatility, it’s well worth the USD 32.99 investment.
What Are the Different Types of Extruders Available for the Ender 3?
The different types of extruders available for the Ender 3 include:
- Bowden Extruder: This type of extruder uses a long tube to guide the filament from the extruder motor to the hotend.
- Direct Drive Extruder: In this setup, the extruder is mounted directly on the hotend, allowing for more direct control of the filament feed.
- All-Metal Hotend Extruder: This extruder features a hotend made entirely of metal, enabling it to handle higher temperatures for various filament types.
- Upgraded Titan Extruder: A lightweight and compact option that provides better torque and reliability for filament feeding.
- Dual Extruder: This extruder setup allows for the use of two filaments simultaneously, enabling multi-material or dual-color printing.
The Bowden extruder is known for its lightweight design, which reduces the moving mass on the print head, allowing for faster printing speeds. However, it may struggle with flexible filaments due to the distance the filament must travel through the tube.
The Direct Drive extruder offers improved performance with flexible materials since the motor is mounted closer to the hotend, providing better control over the filament as it feeds into the nozzle. This type is generally more versatile for a wider range of filament types.
An All-Metal Hotend extruder is advantageous for those looking to print with high-temperature materials like nylon or polycarbonate, as it can withstand higher temperatures without melting. This design also improves thermal conductivity, allowing for more consistent extrusion.
The Upgraded Titan Extruder is designed to be lightweight yet powerful, improving the torque applied to the filament without adding significant weight to the print head. This results in more reliable feeding and reduces the risk of jams during printing.
A Dual Extruder setup is ideal for users wanting to experiment with multi-material or dual-color prints. It allows for more creative printing options, such as combining support materials or different colors, although it does require more complex slicer settings and calibration.
How Does a Single Gear Extruder Work?
A single gear extruder is a popular design in 3D printing, particularly for printers like the Ender 3, and it operates by utilizing a single gear to feed filament into the hotend.
- Motor: The motor drives the single gear which is responsible for gripping and pushing the filament into the hotend.
- Drive Gear: The drive gear is designed with teeth that grip the filament securely, allowing for consistent feeding into the extruder.
- Filament Path: The filament path is the channel through which the filament travels from the spool to the hotend, typically kept straight and unobstructed for smooth operation.
- Hotend: The hotend is the component where the filament is melted and extruded; it is crucial for achieving the right temperature for the specific filament being used.
- Cooling System: The cooling system prevents the filament from melting too early in the process, ensuring that it only becomes molten at the nozzle for precise extrusion.
- Adjustment Mechanism: Many single gear extruders come with an adjustment mechanism to change the tension on the drive gear, allowing users to optimize filament feeding based on the material used.
The motor is vital as it provides the necessary torque to turn the drive gear, which in turn pushes the filament into the hotend. The drive gear’s design is critical; it must have a strong grip to prevent slippage while also being able to handle different filament diameters.
The filament path should be straight and smooth to minimize resistance, ensuring that the filament moves freely towards the hotend. Any obstructions or kinks in this path can lead to jams or inconsistent extrusion, which can affect print quality.
The hotend is crucial for determining the melting point of the filament; it needs to reach the specific temperature required for the material being used, thus ensuring that the filament flows smoothly out of the nozzle during printing.
The cooling system is essential for maintaining the integrity of the filament before it reaches the hotend, as premature melting can lead to clogs and other extrusion issues. Effective cooling helps maintain a stable printing environment.
The adjustment mechanism allows users to fine-tune the pressure on the filament, which can be particularly important when switching between different types of filament or when dealing with varying filament qualities. This flexibility can enhance print quality and reduce the risk of under-extrusion or over-extrusion.
What Are the Benefits of Using a Dual Drive Extruder?
A dual drive extruder is beneficial in several ways, particularly when considering enhancements for the Ender 3. Here are key advantages:
-
Improved Filament Grip: A dual drive extruder utilizes two drive gears to grip the filament from both sides. This dual action minimizes slippage, ensuring a more precise filament feed during printing. This feature is especially valuable when working with flexible materials.
-
Enhanced Accuracy: With better grip and control, the extrusion process becomes more consistent. This accuracy translates into improved layer adhesion and detail in prints, particularly for intricate models.
-
Versatile Material Compatibility: Dual drive extruders can handle various filament types, including softer materials like TPU, without the risk of jamming that often occurs with single gear systems.
-
Reduced Back Pressure: The design of dual drive extruders often leads to reduced back pressure, which can prevent clogs and improve the overall reliability of the printing process.
-
Upgradable Performance: Implementing a dual drive extruder can significantly upgrade the capabilities of the Ender 3, allowing users to tackle complex projects that require meticulous detailing and material diversity.
Investing in a dual drive extruder can enhance not just the quality of prints, but also expand the range of materials that can be successfully used with the Ender 3.
What Is the Difference Between Bowden and Direct Drive Extruders?
| Aspect | Bowden Extruder | Direct Drive Extruder |
|---|---|---|
| Design | Features a long PTFE tube that guides the filament to the hot end. | Filament is pushed directly into the hot end, shortening the path. |
| Filament Handling | Best for flexible materials due to reduced friction. | Handles a variety of filaments effectively but can struggle with flexibles. |
| Print Quality | May result in slight delays in filament flow, affecting consistency. | Generally provides better quality with less stringing and oozing. |
| Speed | Typically slower due to the longer travel path for filament. | Faster response time allows for quicker print speeds. |
| Weight | Lighter design can reduce overall printer weight, improving speed and acceleration. | Generally heavier due to additional components, which may affect printer dynamics. |
| Cost | Usually more affordable, making it a budget-friendly option. | Tends to be more expensive due to complexity and additional features. |
| Applications | Ideal for standard prints and materials that do not require frequent retraction. | Best for complex models and when using flexible or specialized filaments. |
What Are the Top Recommended Upgrades for Ender 3 Extruders?
The Micro Swiss Metal Hotend offers significant advantages, especially for users who intend to print with high-temperature materials, as it provides better thermal performance and reduces the likelihood of clogs.
The Bondtech Extruder is renowned for its dual-drive system that ensures consistent filament feeding, making it a favorite among users who frequently work with challenging materials such as TPU, where grip and control are critical.
What Are the Specific Advantages of the Bondtech BMG Extruder?
The Bondtech BMG Extruder offers several advantages that make it one of the best extruder options for the Ender 3.
- Dual Drive Gear System: The Bondtech BMG features a dual drive gear system that provides a strong grip on the filament, ensuring consistent feeding and reduced slippage. This helps improve print quality, especially with flexible filaments that can be challenging for single-drive extruders.
- Compact Design: Its compact and lightweight design makes it easy to install and does not add significant weight to the print head. This is particularly beneficial for the Ender 3, as it minimizes the risk of print head wobble and improves overall print accuracy.
- Compatibility with Various Filaments: The Bondtech BMG is compatible with a wide range of filament types, including PLA, ABS, PETG, and flexible materials like TPU. This versatility allows users to experiment with different materials without needing to change the extruder.
- High Precision and Reliability: Built with high-quality materials, the Bondtech BMG ensures precise filament control and a reliable performance over time. This durability translates to less maintenance and a more consistent printing experience.
- Easy Installation and Adjustment: The extruder is designed for straightforward installation on the Ender 3, often requiring minimal modifications. Additionally, its adjustable tension allows for easy tuning of the filament grip, accommodating different filament sizes and types.
Why Is the Micro Swiss Direct Drive Extruder Popular Among Users?
The underlying mechanism of its popularity lies in its design, which allows for a more direct connection between the motor and the filament. This reduces the distance the filament has to travel before entering the hotend, minimizing the chances of issues like filament jamming or inconsistent extrusion. Additionally, the extruder’s lightweight structure helps maintain the speed and responsiveness of the print head, essential features for achieving high-quality prints in complex models.
Moreover, the Micro Swiss Direct Drive Extruder is compatible with a broad range of materials, which is a vital aspect for users seeking versatility in their 3D printing projects. Research published in the Journal of Manufacturing Processes indicates that direct drive systems generally offer better performance with varying filament types compared to Bowden setups, which can struggle with certain materials. This adaptability further solidifies its position as one of the best extruders for the Ender 3, catering to a diverse user base.
What Unique Features Does the E3D Hemera Extruder Offer?
The E3D Hemera Extruder offers several unique features that enhance its performance and usability for 3D printing, making it a popular choice for users looking to upgrade their Ender 3.
- Direct Drive System: The Hemera utilizes a direct drive mechanism that places the extruder motor directly above the hotend, allowing for more precise control over filament feeding. This setup minimizes the distance the filament travels, reducing the chances of clogs and improving retraction performance, especially with flexible filaments.
- Compact Design: Hemera’s compact design integrates both the extruder and hotend into a single unit, which not only saves space but also simplifies installation. This streamlined approach helps reduce the overall weight on the print head, which can lead to better print quality and faster print speeds.
- High-Quality Components: E3D is known for its high-quality engineering, and the Hemera is no exception. It features durable, wear-resistant materials and precision components that contribute to its reliability and longevity, making it suitable for various filament types, including PLA, PETG, and TPU.
- Easy Filament Loading: The Hemera’s design includes a user-friendly filament loading mechanism that allows users to quickly and easily load or unload filament. This feature is particularly beneficial for those who frequently switch between different filaments, as it helps reduce downtime and improves workflow.
- Customizable Gear Ratio: The Hemera has a customizable gear ratio that allows users to adjust the amount of filament pushed through the hotend. This feature is advantageous for printing with different materials or achieving specific printing speeds and qualities, providing flexibility for various projects.
How Do Upgraded Extruders Improve Printing Quality on the Ender 3?
Upgraded extruders can significantly enhance the printing quality on the Ender 3 by improving material handling and precision during the extrusion process.
- All-Metal Extruders: All-metal extruders provide better durability and can handle a wider variety of filament materials without the risk of melting or deformation. This allows users to experiment with specialty filaments that require higher temperatures for extrusion, improving the overall versatility of the 3D printer.
- Geared Extruders: Geared extruders utilize a gear reduction system that increases the torque applied to the filament, allowing for more consistent and controlled feeding. This results in improved layer adhesion and finer details in prints, especially when using flexible materials that can be challenging for standard extruders.
- Direct Drive Extruders: Direct drive extruders place the extruder motor directly above the hotend, reducing the distance the filament has to travel. This minimizes the chance of filament jamming and enables precise control over the extrusion process, which is particularly beneficial for intricate designs or when printing with flexible filaments.
- Dual Drive Extruders: Dual drive extruders feature two drive gears that grip the filament from both sides, providing better grip and reducing slippage. This design enhances the extrusion process by ensuring a more uniform flow of filament, which is critical for achieving high-quality prints with consistent surface finishes.
- Upgraded Hotends: While technically separate from the extruder, upgrading the hotend can work in conjunction with an improved extruder for better overall performance. A high-quality hotend can maintain stable temperatures and handle higher flow rates, which, when paired with a better extruder, leads to reduced stringing and improved layer bonding.
What Issues Can You Resolve by Upgrading the Extruder on Your Ender 3?
Upgrading the extruder on your Ender 3 can address several common issues that may hinder print quality and efficiency. Consider the following problems that an upgraded extruder can resolve:
-
Under-extrusion: Many standard extruders are prone to under-extrusion, where not enough filament is fed through. A higher-performance extruder can provide more consistent pressure and precise material feeding, resulting in improved layering and detail.
-
Filament Slipping: The stock extruder can struggle with grip on certain filament types, especially flexible materials. Upgrading to a geared or dual-drive extruder enhances grip, allowing for better handling of flexible filaments without slipping or grinding.
-
Improved Accuracy: Precision in filament flow is crucial for achieving the desired print quality. Enhanced extruders typically offer better calibration and tension adjustments, which can minimize stringing and blobbing, leading to cleaner prints.
-
Increased Compatibility: An upgraded extruder often supports a wider range of filament types, including specialty materials like nylon, PETG, and composite filaments. This expands your printing options significantly.
By addressing these challenges, an upgraded extruder can significantly enhance your 3D printing experience on the Ender 3, making it more reliable and versatile for a range of projects.
What Challenges Should You Consider When Upgrading the Ender 3 Extruder?
When upgrading the Ender 3 extruder, several challenges should be considered to ensure optimal performance and compatibility.
- Compatibility with Existing Hardware: It’s crucial to ensure that the new extruder is compatible with the existing components of the Ender 3, such as the stepper motor and mounting plate. Mismatched components can lead to installation difficulties or require additional modifications, which can complicate the upgrade process.
- Material Choices: Different extruders may be designed to handle various filament types and diameters, influencing the choice of materials you can print with. Selecting an extruder that meets your specific printing needs is essential to avoid clogs or suboptimal print quality.
- Calibration Requirements: After upgrading the extruder, recalibrating the printer settings—such as steps per millimeter, temperature, and flow rate—is necessary for achieving accurate prints. Failing to calibrate properly can lead to issues like over-extrusion or under-extrusion, affecting overall print quality.
- Installation Complexity: Some extruder upgrades might require advanced tools or additional components, which can complicate the installation process. An intricate installation can be daunting for beginners and may lead to frustration if not executed carefully.
- Cost Considerations: Upgrading to a high-quality extruder can be an expensive investment. It’s important to weigh the benefits of improved performance against the cost to determine if the upgrade aligns with your budget and printing goals.
- Impact on Print Speed: Some extruders can influence the speed at which prints can be completed, either by enabling faster flow rates or by introducing additional limitations. Understanding how the new extruder affects print speed is vital to optimizing your workflow.
- Reliability and Maintenance: Upgraded extruders may require more maintenance or have different reliability profiles compared to the stock version. Being prepared for potential upkeep can prevent downtime and ensure consistent printing performance.
What Common Installation Mistakes Should You Avoid?
Common installation mistakes to avoid when setting up the best extruder for Ender 3 include:
- Poor Alignment: Ensuring that the extruder is properly aligned with the hotend is crucial for optimal performance.
- Incorrect Tension on the Filament: The tension applied on the filament during installation can significantly affect extrusion quality.
- Neglecting Firmware Updates: Failing to update the firmware can lead to compatibility issues with the new extruder.
- Ignoring Wiring Management: Properly managing wiring prevents interference and potential damage during operation.
- Overtightening Screws: Over-tightening can strip threads or damage components, leading to malfunctions.
Poor alignment of the extruder with the hotend can lead to issues such as under-extrusion or clogs. It’s vital to check that the extruder is positioned correctly to ensure a smooth filament feed into the hotend.
Incorrect tension on the filament can cause problems like skipping steps or grinding the filament. The right tension allows for consistent feeding without excessive pressure that could damage the filament or the extruder gear.
Neglecting firmware updates can result in the new extruder not functioning correctly with the existing printer settings. Keeping firmware updated ensures compatibility and may improve performance and feature access.
Ignoring wiring management can lead to tangled wires, which may interfere with the printer’s moving parts or cause electrical shorts. Proper routing and securing of wiring can enhance safety and reliability.
Overtightening screws can compromise the integrity of the components, leading to cracks or breaks. It’s important to tighten screws to the manufacturer’s specifications to avoid damaging the extruder or the printer frame.
How Can You Install an Extruder Upgrade on Your Ender 3?
To install an extruder upgrade on your Ender 3, you need to consider the following steps:
- Choosing the Best Extruder: Selecting the right extruder upgrade is crucial for improving print quality and reliability.
- Gathering Tools and Materials: Ensuring you have the necessary tools and materials ready before starting the installation process is essential.
- Removing the Stock Extruder: Carefully disassembling the existing extruder is necessary to make space for the new upgrade.
- Installing the New Extruder: Properly mounting the new extruder and ensuring all connections are secure is vital for optimal performance.
- Calibrating the Extruder: After installation, calibrating the extruder to ensure accurate filament feeding and print quality is important.
Choosing the Best Extruder: The best extruder for the Ender 3 often includes options like the Bondtech BMG or the Micro Swiss Direct Drive. These upgrades offer improved filament handling, better grip, and reduced slipping, which can significantly enhance your printing experience.
Gathering Tools and Materials: Before starting the installation, make sure you have a screwdriver, wrench, and any specific screws or brackets that may come with your new extruder. Having these tools at hand will streamline the process and minimize interruptions.
Removing the Stock Extruder: Begin by turning off your printer and disconnecting it from the power source. Carefully remove the stock extruder by unscrewing it from its mount and detaching any wires or tubes connected to it, making sure to keep track of all screws and components for reassembly.
Installing the New Extruder: Align the new extruder with the mounting bracket on the frame of the Ender 3 and secure it tightly using the screws provided. Ensure that the wiring is connected correctly, following the manufacturer’s instructions for the specific extruder model.
Calibrating the Extruder: Once the new extruder is installed, it’s crucial to calibrate the steps per millimeter (E-steps) to match the new setup. This can be done through your printer’s firmware settings or by using a calibration cube to adjust the extrusion settings for accurate prints.
What Tools and Materials Do You Need for Extruder Installation?
For the installation of an extruder on an Ender 3, several essential tools and materials are required:
- 3D Printer Extruder: The best extruder for Ender 3 will depend on your specific needs, such as direct drive or Bowden style, and should be compatible with the printer model. Look for extruders that improve filament feed consistency and reduce issues like under-extrusion.
- Screwdriver Set: A good set of screwdrivers, particularly Phillips and flat-head types, is vital for removing and securing screws during the installation process. Ensure the screwdrivers fit well to avoid stripping screws.
- Wrenches: Adjustable wrenches or socket wrenches may be needed to tighten nuts and bolts securely without damaging components. Having the correct size will ensure a snug fit and maintain the integrity of the assembly.
- Allen Keys: Typically required for securing parts that use hex screws, Allen keys are essential for accessing tight spaces on the extruder assembly. Make sure to have a complete set to match the various screw sizes on the Ender 3.
- Wire Cutters/Strippers: These are necessary for cutting and stripping wires if you need to modify or replace the wiring during the extruder upgrade. Properly stripped wires will ensure solid electrical connections, enhancing performance.
- Heat Transfer Paste: This material can help improve thermal conductivity between the heat break and the heater block, which is crucial for maintaining optimal temperatures during printing. Proper application can prevent heat creep and improve extrusion reliability.
- Calipers: Used for measuring the diameter of the filament and ensuring that the extruder’s drive gear matches, calipers can help you avoid compatibility issues. Accurate measurements will help in selecting the right extruder and filament type.
- Filament: Having a roll of filament on hand is essential for testing the new extruder after installation. This allows you to calibrate the extrusion settings and ensure that the new extruder performs as expected.
- Lubricant: A suitable lubricant may be required for the moving parts of the extruder to ensure smooth operation. Applying lubricant can help reduce wear and improve the longevity of the extruder components.
- Instruction Manual: A detailed instruction manual or installation guide specific to the extruder model is crucial for a successful installation. Following the guide step-by-step can help avoid mistakes and ensure that all components are assembled correctly.