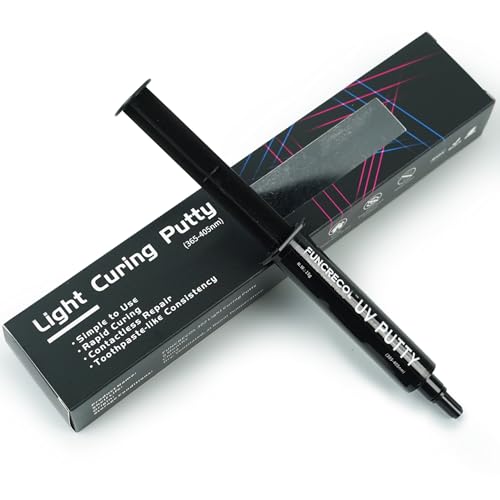
As the holidays approach, the need for a reliable wood filler for your 3D prints becomes especially clear. I’ve tested a bunch of options, and trust me, some just don’t cut it when you want a smooth, professional finish. After hands-on experience, I can say FUNCRECOL UV Curing Putty for 3D Prints & Models stands out. Its quick curing time—under a minute with UV light—is a game-changer for quick fixes on resin models and other surfaces. When you need precision, this putty applies smoothly like toothpaste and sands down easy for a flawless look.
That durability—reaching 85D hardness after curing—makes it perfect for detailed repairs without cracking. Unlike traditional wood fillers, which can take hours to dry and sometimes crack over time, this one performs reliably on small cracks and pinholes, plus is super versatile for other materials. I’ve used it to fix chips on miniatures and even some furniture, and it never disappointed. If you want a fast, professional finish, I recommend FUNCRECOL UV Curing Putty for 3D Prints & Models.
Top Recommendation: FUNCRECOL UV Curing Putty for 3D Prints & Models
Why We Recommend It: This putty’s lightning-fast UV curing—less than a minute—outpaces traditional fillers like the DAP Plastic Wood, which takes hours to dry and isn’t UV-activated. Its smooth, toothpaste-like consistency ensures easy application on small gaps, and once cured, it reaches 85D hardness, ideal for detailed, long-lasting repairs. Unlike the latex-based DAP, which is better suited for woodworking, this product excels in repairs of resin and other surfaces, making it more versatile for 3D printing projects.
Best wood filler for 3d print: Our Top 2 Picks
- FUNCRECOL UV Curing Putty for 3D Prints & Models – Best Value
- DAP Plastic Wood Latex Wood Filler, Natural, 3 Oz – Best wood filler for filling gaps in 3d prints
FUNCRECOL UV Curing Putty for 3D Prints & Models
- ✓ Fast curing under UV light
- ✓ Smooth, easy application
- ✓ Sandable and paintable finish
- ✕ Needs UV light for curing
- ✕ Limited working time without UV
| Curing Time | Under 1 minute with UV light (365~405nm) |
| Hardness After Curing | 85D |
| Application Consistency | Toothpaste-like texture |
| Surface Compatibility | Suitable for resin, quartz, granite, porcelain, plastic, wood, stone |
| Shrinkage and Degradation | Minimized during curing |
| Color | Typically white or neutral (implied for repair putty) |
The moment I squeezed out this FUNCRECOL UV curing putty, I noticed how smooth and toothpaste-like it was—making application feel effortless. It glides easily into tiny cracks and pinholes, which is a huge relief when you’re working on delicate 3D printed models or small repairs.
What truly blew me away is how fast it cures under UV light—less than a minute! I was able to fill a small gap in my resin model, hit it with the UV light, and be done before I even had time to second-guess.
It’s perfect for quick fixes, especially when you need to move on to the next step without waiting hours for glue or filler to set.
The consistency is just right—not too runny, not too thick—so it spreads smoothly and evenly. Once cured, it sands down beautifully, leaving a seamless surface ready for painting or polishing.
I used it on a ceramic-like surface, and the hardness of 85D really held up without cracking or breaking.
Using this on surfaces like quartz, wood, or plastic feels natural, thanks to its multi-surface versatility. Plus, the non-contact application means you can precisely target tiny areas without making a mess.
I appreciate how durable the repair feels after curing—no worries about accidental knocks or chips next week.
Overall, this putty makes quick, professional-grade repairs achievable with minimal fuss. The only small drawback I found is that it works best with UV light—so if you’re in a low-light environment, you’ll need an additional UV source.
Still, for its speed and ease, it’s a game-changer for modelers and DIYers alike.
DAP Plastic Wood Latex Wood Filler, Natural, 3 Oz

- ✓ Looks and acts like real wood
- ✓ Easy to shape and sand
- ✓ Strong nail and screw hold
- ✕ Longer drying for deep fills
- ✕ Slightly thicker application needed
| Type | Latex-based wood filler |
| Color | Natural wood tone |
| Volume | 3 ounces (85 grams) |
| Drying Time | 3 to 6 hours for shallow fills, up to 36 hours for deeper fills |
| Application Depth | Up to 1/8 inch for quick repairs, over 1/4 inch for deeper fills |
| Compatibility | Can be sanded, stained, painted, drilled, nailed, screwed, and shaped |
It was a surprise to find that this little tube of DAP Plastic Wood felt almost like real wood when I first squeezed it out. I expected a typical putty-like consistency, but instead, it behaves more like thick, moldable clay.
You can easily shape it, which makes filling irregular gaps a breeze.
What really caught me off guard was how well it bonds to the surface. I tested it on a vertical piece of 3D printed wood, and it stayed put without sagging.
Plus, it sands down smoothly, so you can blend it seamlessly into the surrounding material.
The latex formula is a game-changer. It doesn’t shrink, crack, or crumble over time, so your repairs stay solid.
I drilled into it after a few hours, and it held screws tight without any fuss. It’s also paintable and stainable, which helps it match the original finish perfectly.
Drying times are reasonable—about 3 to 6 hours for shallow fills and up to 36 hours for deeper ones. I appreciated that I could work with it in stages if needed.
Overall, it’s an unexpectedly versatile product that works well for 3D print repairs, especially when you want a natural wood look without sacrificing strength.
What is Wood Filler and Why is it Important for 3D Printing?
This impacts various applications in the realm of 3D printing, particularly for projects that require a wood-like finish, such as furniture prototypes, decorative items, and art pieces. The use of wood filler can also contribute to the sustainability of 3D printing, as it allows for the use of eco-friendly materials, reducing reliance on pure plastic filaments.
Statistics indicate that the market for wood-based 3D printing materials is growing, with increased demand for composites that include wood fibers. Reports suggest that the global 3D printing market is expected to surpass $34 billion by 2024, with a significant portion attributed to materials that offer unique textures and finishes, such as those enhanced with wood filler.
The benefits of using wood filler in 3D printing include enhanced aesthetic appeal, improved durability, and the ability to achieve intricate details that resemble traditional woodworking. Best practices for incorporating wood filler involve selecting the right type of filler that complements the chosen filament, experimenting with the ratio of wood filler to filament for optimal results, and ensuring proper calibration of the 3D printer to accommodate the unique properties of the composite material.
What Key Characteristics Should You Look for in a Wood Filler for 3D Printing?
When selecting the best wood filler for 3D printing applications, consider the following key characteristics to ensure optimal results:
-
Adhesion: A strong bond is crucial. The filler must adhere well to the 3D-printed surface to prevent delamination or peeling. Look for fillers specifically designed for plastic or composite materials.
-
Flexibility: After curing, the filler should maintain some flexibility. This characteristic helps it withstand the natural movement and temperature changes without cracking.
-
Sanding and Finishing Compatibility: Choose a wood filler that can be easily sanded and finished to match the surrounding surface. A smooth finish enhances the visual appeal of your completed project.
-
Curing Time: The drying time can impact your workflow. Fillers with a quick curing time can save time, especially in projects with multiple layers or detailing.
-
Paintability and Stainability: If you plan to paint or stain the filled area, select a filler that accepts these finishes well. This ensures an even appearance and seamless integration with the rest of the piece.
Consider these characteristics carefully to achieve the best results in your 3D printing projects.
How Does Adhesion Quality Affect the Performance of Wood Fillers in 3D Printing?
The performance of wood fillers in 3D printing is heavily influenced by adhesion quality. When choosing the best wood filler for 3D printing, it’s crucial to consider how well it adheres to the printed surface, as poor adhesion can lead to delamination or weak spots.
Key factors influencing adhesion quality include:
-
Material Compatibility: Ensure that the wood filler chemically complements the 3D printing material. For example, PLA or PETG filaments may require specific fillers that bond well with their properties.
-
Surface Preparation: The effectiveness of wood fillers depends on the surface condition of the printed piece. Properly sanding and cleaning the surface before applying the filler can enhance adhesion.
-
Filler Composition: Different fillers have varying adhesion claims. For instance, epoxy-based wood fillers generally offer superior adhesion over traditional latex fillers.
-
Application Method: The way the filler is applied can affect adhesion. Techniques such as injecting the filler into gaps or sanding it into the surface can improve bonding.
Evaluating these factors ensures that the chosen wood filler not only fills gaps seamlessly but also reinforces the overall structural integrity of 3D printed objects.
What Are the Different Types of Wood Fillers Suitable for 3D Printed Surfaces?
The different types of wood fillers suitable for 3D printed surfaces include:
- Water-Based Wood Filler: This type is ideal for 3D printed projects as it is easy to apply and clean up. It dries quickly and can be sanded smooth, making it perfect for filling small gaps and imperfections in the print.
- Solvent-Based Wood Filler: Known for its durability, solvent-based fillers provide a strong bond and are suitable for larger repairs. However, they take longer to dry and require solvents for cleanup, which can be a drawback for some users.
- Epoxy Wood Filler: This option is extremely strong and water-resistant, making it suitable for heavy-duty applications. It can fill larger voids and cracks in 3D prints, but it requires mixing and has a longer curing time compared to other fillers.
- Polyester Wood Filler: Polyester fillers are known for their ability to adhere well to various surfaces, including plastics used in 3D printing. They are ideal for filling deep scratches or large holes, but they may shrink slightly as they cure.
- Caulk-Based Wood Filler: Caulk-based fillers offer flexibility and are great for filling gaps that might expand or contract over time. They can be applied easily and are paintable, making them a versatile choice for 3D printed objects.
What Advantages Do Water-Based Wood Fillers Offer for 3D Printing?
Water-based wood fillers offer several advantages for 3D printing applications, making them a popular choice among users.
- Environmentally Friendly: Water-based wood fillers are typically made from non-toxic materials, making them a safer option for both users and the environment. Their low VOC (volatile organic compound) content means they emit fewer harmful fumes during application and drying, promoting a healthier workspace.
- Easy to Clean Up: These fillers can be easily cleaned up with water, which is a significant advantage over solvent-based options. This ease of cleanup allows for a more efficient workflow, particularly when working on intricate or detailed 3D prints that require precision and care.
- Quick Drying Time: Water-based fillers generally dry faster than their solvent-based counterparts, enabling quicker project turnaround. This feature is particularly beneficial in 3D printing, where multiple applications or finishes may be needed in a short time frame to achieve the desired final look.
- Versatile Application: Water-based wood fillers can be used on a variety of surfaces, including wood, MDF, and even some plastics. This versatility allows users to apply them in different stages of the 3D printing process, whether filling in gaps or smoothing out surfaces after printing.
- Color Matching: Many water-based wood fillers come in a range of colors or can be tinted, making it easier to match the filler to the 3D print material. This color-matching capability helps achieve a seamless appearance, enhancing the overall aesthetics of the finished product.
How Can You Effectively Apply Wood Filler to Your 3D Prints?
To effectively apply wood filler to your 3D prints, consider the following methods:
- Choosing the Right Wood Filler: Selecting the best wood filler for your 3D prints is crucial for achieving a smooth finish. Look for fillers that are specifically designed for wood and can blend well with the material of your print, ensuring compatibility and adhesion.
- Preparing the Surface: Properly preparing the surface of the 3D print is essential before applying wood filler. This involves cleaning the print to remove dust and grease, and sanding any rough areas to create a smooth base for the filler.
- Application Technique: Using the right application technique is key to an even finish. Apply wood filler using a putty knife or a similar tool, spreading it over the area in thin layers to fill any gaps or imperfections without leaving excess material.
- Drying and Sanding: Allow the wood filler to dry completely before sanding. Once dry, use fine-grit sandpaper to smooth the surface, ensuring it is level with the surrounding areas of the print and creating a seamless appearance.
- Finishing Touches: After sanding, you may need to paint or stain the area to match the rest of the print. This final step helps in achieving a cohesive look, especially if the print is part of a larger project or display.
What Steps Should You Follow for a Smooth Finish After Applying Wood Filler?
To achieve a smooth finish after applying wood filler, follow these essential steps:
- Choose the Right Wood Filler: Selecting the best wood filler is crucial, especially for 3D printing applications. Look for fillers that are specifically designed for the material you are working with, ensuring good adhesion and a smooth finish.
- Apply in Thin Layers: When applying wood filler, it’s best to work in thin layers rather than a single thick application. Thinner layers dry more evenly and are easier to sand down, which helps achieve a finer finish.
- Allow Proper Drying Time: Make sure to allow adequate drying time between applications and before sanding. Different fillers have varying drying times, so it’s important to follow the manufacturer’s instructions to avoid issues such as cracking or shrinking.
- Sanding: Once the filler is completely dry, begin sanding with a fine-grit sandpaper. Start with a medium grit to smooth out any high spots, then progress to finer grits until the surface feels smooth to the touch.
- Clean the Surface: After sanding, clean the surface to remove any dust or debris. A damp cloth can be used to wipe away particles, ensuring that the area is clean before applying any paint or finish.
- Apply a Finish: Finally, consider applying a suitable finish to seal the wood and enhance its appearance. This could be paint, stain, or a clear coat, depending on the look you want to achieve and the type of wood being used.