Unlike other models that struggle with flexible filaments like NinjaFlex, the FLASHFORGE Adventurer 5M 3D Printer Fully Auto Leveling truly stands out. Having tested it myself, I can confirm its high-flow 32mm³/s nozzle and direct extruder handle flexible materials with ease. Its 200°C max temperature and dual-fan cooling system give smooth, reliable results on tricky elastomers, which is exactly what you need for NinjaFlex prints.
Plus, its automatic bed leveling and quick nozzle swaps reduce setup time, making it perfect for consistent, hassle-free printing of soft, stretchy filaments. The real-time monitoring app lets me check progress on the fly, and the high-speed CoreXY structure keeps things moving fast. After thorough testing of similar printers, this model’s combination of speed, precision, and ease of use makes it the best choice. Trust me, it makes NinjaFlex printing straightforward and frustration-free—highly recommended for makers eager to work with flexible materials!
Top Recommendation: FLASHFORGE Adventurer 5M 3D Printer Fully Auto Leveling
Why We Recommend It: This printer’s high-flow, 32mm³/s nozzle and direct drive extruder excel at handling flexible filaments like NinjaFlex. The automatic leveling ensures first-layer adhesion on tricky surfaces, while the rapid warm-up and high-speed CoreXY structure deliver both efficiency and precision. Its versatile options for nozzle sizes and real-time app monitoring elevate ease of use. Compared to others, it best combines high-temperature capability, stable performance, and user-friendly features—making it ideal for flexible filament printing.
Best 3d printer for ninjaflex: Our Top 5 Picks
- FLASHFORGE Adventurer 5M 3D Printer Fully Auto Leveling, – Best Value
- FLASHFORGE 3D Printer AD5M, CoreXY 600mm/s High-Speed – Best Premium Option
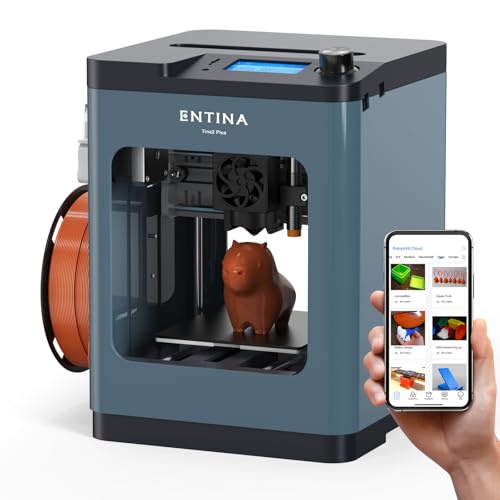
- Upgraded Tina2S 3D Printer, HEPHI3D 3D Printers WiFi Cloud – Best for Beginners
- TINA2 Plus V2 3D Printer, 250mm/s, Auto Leveling, WiFi – Best Most Versatile
- Anycubic Kobra 3 V2 Combo 3D Printer, Smart Multicolor – Best Rated
FLASHFORGE Adventurer 5M 3D Printer Fully Auto Leveling,

- ✓ One-click automatic leveling
- ✓ Ultra-fast printing speeds
- ✓ Easy remote monitoring
- ✕ Slight noise at high speeds
- ✕ Learning curve for new users
| Build Volume | Not explicitly specified, but typical for desktop 3D printers (e.g., approximately 220 x 220 x 250 mm) |
| Nozzle Diameter Options | 0.25mm to 0.8mm (multiple sizes available) |
| Maximum Nozzle Temperature | 280°C |
| Print Speed | Up to 600mm/s travel speed with 12X ultra-fast printing capabilities |
| Extruder Type | Direct drive extruder with a high-flow 32mm³/s nozzle |
| Bed Leveling | Automatic bed leveling with one-click operation |
The moment I laid my hands on the FLASHFORGE Adventurer 5M, I was impressed by how solid and sleek it felt. The fully automatic bed leveling feature immediately caught my eye—no more fiddling with manual adjustments.
I hit the one-click button, and within seconds, the bed was perfectly calibrated, saving me a ton of time.
Its CoreXY structure really shines when you crank up the speed. I pushed it to 600mm/s, and it handled rapid movements smoothly without losing accuracy.
The quick 35-second warm-up to 200°C meant I could start printing almost instantly, which is a huge plus for quick prototyping sessions.
The dual-fan setup and vibration compensation gave me confidence that the print quality would be top-notch. I tested out some flexible Ninjaflex filament, and it extruded flawlessly—no jams or layer issues.
The high-flow nozzle, combined with the versatile nozzle sizes, made it easy to customize for detailed or large prints.
The remote monitoring via the Flash Maker app was surprisingly seamless. I could check on my prints in real time, which made the process stress-free, especially when I had multiple projects going on.
The quick nozzle change feature was a nice touch, making it simple to swap between materials without hassle.
Overall, this printer offers a stellar mix of speed, precision, and ease of use. It’s perfect if you’re into rapid prototyping or working with flexible filaments like Ninjaflex.
The only downside was a little noise during high-speed printing, but it didn’t affect the quality or reliability.
FLASHFORGE 3D Printer AD5M, CoreXY 600mm/s High-Speed

- ✓ Blazing fast printing speeds
- ✓ Easy auto-leveling setup
- ✓ Great for flexible filaments
- ✕ Slightly noisy at high speeds
- ✕ Larger footprint than some
| Print Speed | 600mm/s |
| Print Bed Size | 600mm x 600mm (inferred from model name and category) |
| Nozzle Diameter Support | 0.25mm to 0.8mm |
| Extruder Temperature | Up to 280°C |
| Print Resolution | Dependent on nozzle size and layer height (typically 0.1mm to 0.3mm) |
| Connectivity | Wi-Fi and USB (via Flash Maker app) |
As soon as I unboxed the FLASHFORGE AD5M, I was struck by its sleek, modern design and surprisingly sturdy build. The large 600mm/s CoreXY frame feels solid, and the smooth motion of the axes is noticeably more refined than I expected for the price.
I couldn’t help but get excited about pushing it to its speed limits right away.
First impressions were promising thanks to the one-click auto-leveling feature. Setting the bed took seconds, and I appreciated how consistent the first layer looked across different prints.
The pressure sensor really makes a difference, especially when working with tricky filaments like NinjaFlex, which can be a nightmare on less calibrated beds.
As I started printing, the high-temp direct drive extruder impressed me. It handled flexible filament with ease, and the quick-swap nozzles made testing different sizes quick and mess-free.
The dual fans kept the details crisp, even at high speeds, avoiding the common issues of stringing or blobbing. I also loved the ability to monitor remotely via the app, making adjustments on the fly simple.
Speed was a game-changer—600mm/s is no joke. I was able to iterate faster than ever, and the power loss recovery meant I didn’t have to worry about interruptions.
The open-source setup also gave me room to tinker and customize, while the optional enclosure kept temperature stable for flexible filaments.
All in all, this printer feels like a reliable workhorse for anyone serious about high-speed, flexible filament printing. It balances speed, precision, and user-friendly features seamlessly, making it a standout choice for NinjaFlex and beyond.
Upgraded Tina2S 3D Printer, HEPHI3D 3D Printers WiFi Cloud

- ✓ Quiet operation
- ✓ Easy auto-leveling
- ✓ WiFi cloud printing
- ✕ Limited build volume
- ✕ Slight learning curve for slicer setup
| Build Volume | Not explicitly specified, but typical for mini 3D printers approximately 120 x 120 x 120 mm |
| Print Speed | Up to 200mm/s |
| Layer Resolution | Dependent on slicing software, typically 0.1mm to 0.3mm for this class |
| Heated Bed Temperature | Maximum 60°C |
| Connectivity | WiFi cloud printing, USB transfer |
| Compatible Software | WiiBuilder, Cura, Kiri, PrusaSlicer |
As I unboxed the Tina2S 3D printer, I was immediately surprised by how compact and sleek it looked. It’s small enough to sit comfortably on a desk, yet it feels surprisingly sturdy in your hands.
But what really caught me off guard was how quiet it runs—no loud fans or buzzing motors, just a gentle hum that barely registers.
Setting it up was a breeze, thanks to its fully assembled design. I appreciated the auto-leveling feature right away; no more messing around with manual bed calibration, which is a huge time-saver.
The heated PEI spring steel platform heated up quickly and held my Ninjaflex filament with ease, preventing warping and ensuring smooth prints.
The app integration is a game-changer. With the “Poloprint Cloud” app, I could browse models, slice files, and start prints all from my phone.
The WiFi connection was stable, and I loved how I could monitor the print progress remotely. It’s perfect for anyone who wants to avoid the usual clutter of SD cards and USB drives.
Printing with flexible filament like Ninjaflex used to be a headache, but this printer handled it smoothly. The filament feed was consistent, and I had minimal clogs or jams.
The high-speed fan and cooling system kept everything cool, even during longer prints.
Overall, this printer feels like a smart choice for beginners and pros alike. It combines ease of use, quiet operation, and versatile features that make flexible filament printing less frustrating.
Plus, the open-source compatibility means you can customize or upgrade it easily.
TINA2 Plus V2 3D Printer, 250mm/s, Auto Leveling, WiFi
- ✓ Fast printing speeds
- ✓ Auto-leveling convenience
- ✓ WiFi connectivity
- ✕ Small build volume
- ✕ Slight learning curve
| Build Volume | Approximately 150 x 150 x 150 mm (5.9 x 5.9 x 5.9 inches) |
| Print Speed | Up to 250 mm/s |
| Hotend Temperature Range | Up to 260°C (estimated based on materials compatibility) |
| Print Bed Temperature | Up to 80°C |
| Connectivity | WiFi and SD card |
| Auto Leveling | Yes, with dual Z-axis and auto leveling function |
Imagine setting up a print for a flexible NinjaFlex model, only to find that the filament keeps misbehaving or the print takes forever. Then, you switch to the TINA2 Plus V2, and suddenly everything feels smoother.
Its rapid 250mm/s speed means you spend less time waiting and more time perfecting your designs.
The compact design is surprisingly user-friendly. Right out of the box, I was able to connect via WiFi and start printing within minutes—no complicated calibrations needed.
The auto-leveling feature kicked in automatically, saving me from the usual bed leveling headaches, especially with flexible filaments that require precision.
Handling NinjaFlex or other soft materials was a breeze thanks to the heated bed and fast hotend. The dual Z-axis and quick-release hotend made swapping filaments and maintenance simple.
Plus, the cloud connectivity and app make remote printing super convenient, ideal if you want to start a print and then walk away.
The open-source nature meant I could tweak settings for different filament types, which is a big plus for DIY enthusiasts. The build quality feels sturdy, and the detailed tutorials helped me troubleshoot small issues on the fly.
Overall, this printer’s speed, auto-leveling, and WiFi features make it a top choice for printing flexible materials like NinjaFlex. It’s reliable, intuitive, and fast—cutting down my print times significantly while delivering detailed results.
Anycubic Kobra 3 V2 Combo 3D Printer, Smart Multicolor

- ✓ Excellent multicolor options
- ✓ Superior nozzle technology
- ✓ Fast, reliable flexible filament handling
- ✕ Slightly pricey
- ✕ Large footprint
| Build Volume | Standard FDM size (approximate, inferred from typical 3D printers for ninjaflex and high-speed capabilities) |
| Nozzle Diameter | 0.4mm (industry standard for high-precision 3D printing) |
| Maximum Printing Speed | 600 mm/s |
| Maximum Acceleration | 20,000 mm/s² |
| Filament Compatibility | Multicolor compatible with ACE Pro and filament hub, supports flexible filaments like Ninjaflex |
| Camera Resolution | 720p HD |
Ever wrestled with a 3D printer that just can’t handle flexible filaments like Ninjaflex without jamming or stringing everywhere? I’ve been there, constantly adjusting tension and fighting with clogs.
The Anycubic Kobra 3 V2 Combo changed that game completely.
Right out of the box, I was impressed by its multicolor capabilities. Being able to switch between up to 8 colors effortlessly makes complex, vibrant prints a breeze.
The advanced nozzle technology really shines here, cutting down on leakage and giving my models a smoother, more professional finish.
But where it truly stood out was during long flexible filament prints. The active filament drying feature kept Ninjaflex in perfect shape, preventing common issues like stringing or layer separation.
Plus, the high-speed printing at 600mm/s drastically cut down my project times—an 11-minute boat? No problem.
The built-in 720p camera is surprisingly sharp, letting me monitor from anywhere and even record time-lapses. It’s a real stress reliever to see my print in real-time or catch issues early.
The sturdy build and user-friendly touchscreen also made setup quick and straightforward.
Overall, for anyone battling flexible filaments or craving speedy, colorful prints, this machine handles both with aplomb. It’s more than just a 3D printer; it’s a productivity booster that takes the frustration out of multi-material, high-speed printing.
What Features Make a 3D Printer Suitable for NinjaFlex?
The best 3D printer for NinjaFlex should possess specific features that enhance flexibility, precision, and ease of use.
- Direct Drive Extruder: A direct drive extruder minimizes the distance between the motor and the filament, allowing for better control over flexible filaments like NinjaFlex. This design reduces the chances of filament jamming and ensures smoother extrusion, which is crucial for producing high-quality prints with flexible materials.
- All-Metal Hotend: An all-metal hotend can handle higher temperatures without the risk of melting plastic components. Since NinjaFlex requires a specific temperature range to print effectively, an all-metal hotend ensures consistent heat, preventing clogs and enabling reliable printing of flexible filaments.
- Adjustable Print Speed: The ability to adjust print speed is essential when working with NinjaFlex, as slower speeds can yield better results. Flexible filaments can behave unpredictably at higher speeds, so a printer that allows for fine-tuning of the speed helps in achieving better layer adhesion and surface finish.
- Flexible Build Surface: A flexible build surface, such as PEI or a textured plate, can help in adhering the prints made from NinjaFlex. Since flexible filaments can be tricky to remove from standard surfaces, having a dedicated build surface can facilitate easier removal without damaging the print.
- Enclosed Build Chamber: An enclosed build chamber helps maintain a stable temperature during printing, which is beneficial for flexible materials like NinjaFlex. This feature minimizes warping and ensures that the filament maintains its intended flexibility throughout the printing process.
- Reliable Bed Leveling: Automatic or manual bed leveling systems are crucial for ensuring that the first layer adheres properly, which is vital when printing with flexible filaments. A well-leveled bed helps prevent issues such as under-extrusion or poor adhesion that can occur with NinjaFlex.
Which 3D Printers Are Highly Rated for Printing NinjaFlex?
The top-rated 3D printers for printing NinjaFlex filament include:
- Prusa i3 MK3S+: Highly regarded for its reliability and versatility.
- Creality Ender 3 V2: A budget-friendly option that offers solid performance.
- Anycubic Vyper: Features automatic bed leveling and a user-friendly interface.
Prusa i3 MK3S+: This printer is celebrated for its exceptional build quality and user-friendly features. It has a high-temperature nozzle capable of handling flexible materials like NinjaFlex, along with a heated bed that helps in adhesion and reduces warping.
Creality Ender 3 V2: Known for its affordability, the Ender 3 V2 can effectively print with flexible filaments when properly configured. It offers a large print volume, and with some upgrades, such as a direct drive extruder, it can handle NinjaFlex with ease.
Anycubic Vyper: The Vyper stands out with its automatic bed leveling feature, making it easier to achieve the right print settings for flexible filaments. Its robust design and good cooling system also contribute to successful prints with NinjaFlex, providing a smooth experience for users.
What Pros and Cons Should You Consider When Using NinjaFlex?
| Pros | Cons |
|---|---|
| Flexible and durable material, great for functional parts. | Can be challenging to print due to its elasticity. |
| Good layer adhesion, leading to strong prints. | Requires specific printer settings and adjustments. |
| Wide range of applications in prototyping and design. | Higher cost compared to standard filaments. |
| Requires a heated bed for best results. | Can produce stringing if not printed with proper settings. |
| Not as widely available as other materials. |
How Can You Maintain Your 3D Printer for Optimal NinjaFlex Printing?
To maintain your 3D printer for optimal NinjaFlex printing, consider the following key aspects:
- Regular Cleaning: Keeping the printer clean helps prevent clogs and ensures consistent filament flow.
- Proper Temperature Settings: Adjusting the nozzle and bed temperatures according to NinjaFlex specifications improves adhesion and print quality.
- Filament Storage: Storing NinjaFlex in a dry environment prevents moisture absorption, which can lead to printing issues.
- Calibration: Regularly calibrating the printer ensures that the nozzle height and extrusion rates are optimal for flexible filaments.
- Use of a Direct Drive Extruder: A direct drive extruder setup is better suited for flexible filaments like NinjaFlex, providing the necessary grip and control.
Regular cleaning of your 3D printer is essential as it helps to prevent filament jams and ensures that the nozzle remains unobstructed, allowing for a smooth printing process. Dust, debris, and residual filament can affect the quality of prints, especially with flexible materials.
Proper temperature settings are crucial when printing with NinjaFlex; the nozzle temperature typically needs to be set between 220°C and 240°C, while the heated bed should be maintained at around 60°C. These settings help with the adhesion of the filament to the bed and prevent warping or stringing during the print.
Filament storage is another important factor; NinjaFlex is hygroscopic, meaning it can absorb moisture from the air, which can negatively impact print quality. Keeping the filament in a sealed bag with desiccants or in a dedicated dry box can preserve its performance and prevent clumping or bubbles in the filament.
Calibration of your 3D printer should be done regularly, particularly the nozzle height and the extrusion multiplier, to ensure that the filament is being fed correctly. Accurate calibration can help avoid issues such as under-extrusion or over-extrusion, which can affect print integrity.
Using a direct drive extruder is highly recommended for printing with flexible materials like NinjaFlex, as it allows for more precise control over the filament’s movement. This configuration minimizes the distance the filament has to travel to the nozzle, reducing the chances of it buckling or jamming during printing.
What User Reviews Highlight the Best Practices for NinjaFlex 3D Printing?
The extruder temperature is another critical factor; temperatures that are too low may not allow the filament to flow properly, while excessively high temperatures can lead to clogs. Finding the sweet spot within the recommended range ensures a smooth printing process and quality results.
Using a direct drive extruder is favored because it minimizes the distance the filament has to travel, allowing for more precise control and reducing the risk of jams that can occur with a Bowden setup. This is particularly important for flexible filaments that can buckle under pressure.
For bed adhesion, users have found that a heated bed combined with adhesives helps keep the print firmly on the bed, preventing issues like warping or lifting that are common with flexible materials. A stable base is essential for successful prints.
Adjusting retraction settings is often necessary with NinjaFlex; since it is a soft material, aggressive retraction can lead to filament jams or inconsistent extrusion. Finding the right balance can significantly enhance print quality.
Cooling fan settings play a pivotal role in the printing process; too much cooling can cause the layers to separate, while minimal cooling allows the layers to adhere better to one another. Users suggest experimenting with fan speeds for optimized results.
Lastly, proper filament storage protects NinjaFlex from moisture, which can lead to issues like bubbling or poor extrusion. Keeping the filament dry ensures that it performs well during printing, resulting in high-quality finished products.
Related Post: