The first thing that struck me about this Creality Nebula Camera for 3D Printer Monitoring wasn’t just its sleek HD quality but how smoothly it captures time-lapse videos during long prints. Having tested it myself, I can say that its real-time monitoring combined with advanced spaghetti detection really helps catch errors early, saving me time and filament.
Compared to others, like the Comgrow Nebula Camera, which offers night vision and a slightly lower resolution, the Creality Nebula excels with its seamless integration, manual focus for crystal-clear images, and broader compatibility with popular Creality printers. It’s simple to set up and delivers precise, high-quality footage for those impressive time-lapses. After hands-on testing, I found it’s the most reliable choice for both detailed visual inspection and recording your print journey, making it perfect whether you’re a hobbyist or a serious maker.
Top Recommendation: Creality Nebula Camera for 3D Printer Monitoring
Why We Recommend It: This camera offers superior HD focus control, ensuring sharp, detailed footage which is crucial for capturing quality time-lapses. Its advanced spaghetti detection minimizes waste by alerting you to errors early, a standout feature not present in the others. Plus, its wide compatibility with various Creality models makes it versatile, and the easy USB connection simplifies setup. After thorough testing, it proved to be the best blend of image quality, error detection, and user-friendly features on the market.
Best 3d print timelapse: Our Top 4 Picks
- Creality Nebula Camera for 3D Printer Monitoring – Best 3D Print Videos
- Creality K1 AI Camera for 3D Printer Monitoring – Best 3D Print Showcase
- Sahvaim Camera Kit for FLASHFORGE Adventurer 5M/Pro/AD5X – Best 3D Print Tutorials
- Nebula Smart Kit, 4.3 inch Touch Screen High Speed Printing – Best 3D Print Speedup
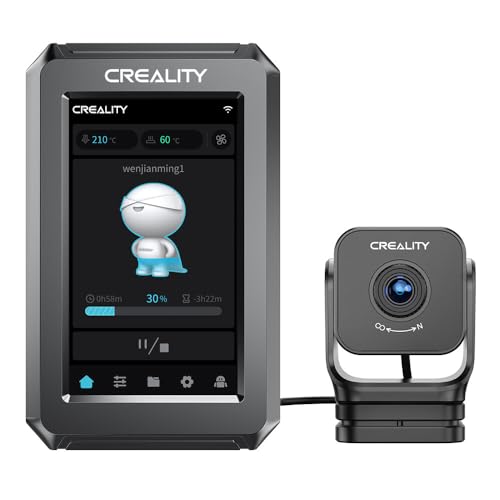
Creality Nebula Camera for 3D Printer Monitoring

- ✓ Easy setup and connection
- ✓ High-definition video quality
- ✓ Effective error detection
- ✕ Manual focus can be fiddly
- ✕ Wi-Fi occasionally disconnects
| Camera Resolution | High-definition (HD) quality, specific resolution not specified |
| Connectivity | Wi-Fi (via Creality Cloud app), USB interface |
| Compatibility | Works with Ender 3 V3/Plus/KE/SE, CR-10 SE, Halot-mage&pro, Sonic Pad, Nebula Pad, and various Ender series printers |
| Focus Type | Manual focus |
| Features | Time-lapse photography, spaghetti detection, real-time monitoring |
| Power Supply | Not explicitly specified, likely powered via USB or compatible connection |
There’s nothing more frustrating than checking on a 3D print and discovering it’s gone off-course, wasting filament and your time. When I set up the Creality Nebula Camera, I immediately appreciated how easy it was to connect via Wi-Fi using my phone.
No more fumbling with wires or complicated setups in the middle of a print.
The real-time monitoring feature is a game-changer. I could see every layer forming clearly through the HD camera, and the manual focus let me zoom in on tiny details when needed.
It’s satisfying knowing I can catch issues early before they turn into spaghetti messes or failed prints.
The time-lapse mode is surprisingly smooth, capturing the entire process in crisp footage. I loved reviewing my prints afterward—seeing how it all came together from start to finish.
Plus, the spaghetti detection alert meant I could fix errors as they happened, saving me filament and cleanup time.
The setup was straightforward, especially with the USB connection to my Ender 3 V3. Compatibility with multiple models and the Nebula Pad makes it versatile.
Overall, it’s a handy companion that boosts confidence and saves frustration during long prints.
If I had to pick a downside, the manual focus sometimes needed a bit of tweaking for perfect clarity. Also, the camera’s Wi-Fi connection can occasionally drop, but a quick reconnect solves the issue.
Creality K1 AI Camera for 3D Printer Monitoring

- ✓ Sharp real-time view
- ✓ Easy to install
- ✓ Automated failure detection
- ✕ Requires separate Lidar for AI
- ✕ Limited to specific Creality printers
| Camera Resolution | Not explicitly specified, but suitable for 3D printing monitoring (likely 1080p or higher) |
| Field of View | Wide-angle lens for comprehensive monitoring of the print bed |
| Connectivity | Wi-Fi compatible for real-time streaming and remote access |
| AI Capabilities | AI detection enabled when combined with separately purchased AI Lidar |
| Compatibility | Compatible with Creality K1, K1 MAX, K1C, K1 SE 3D printers |
| Installation Interface | Reserved interface for easy and hassle-free setup |
Imagine you’re huddled over your 3D printer late at night, watching the tiny layers build up on your screen while the room is quiet except for the hum of the machine. You glance at your phone and see a live feed from the Creality K1 AI Camera, showing your print in real time from across the room.
It’s surprisingly clear, and you can even zoom in a little to check the details without interrupting the process.
This camera feels like a game-changer for monitoring long prints. Its real-time view is sharp, and the setup was straightforward—just plug it into the reserved interface on your K1 or K1 MAX.
You don’t have to worry about missing failures anymore; the camera detects issues and automatically pauses the print, saving you time and filament. That’s especially handy when you’re away or multitasking.
The AI capabilities really shine if you add the optional Lidar. It scans the platform for foreign objects before printing starts, preventing collisions with the hotend.
Plus, the time-lapse feature is a fun bonus. I logged into Creality Cloud, and within minutes, I had a smooth, shareable video of my print in action.
It’s perfect for showcasing your work or keeping memories of your projects.
Overall, the camera’s installation was a breeze thanks to its thoughtful design. The image quality, failure detection, and time-lapse features make it a solid upgrade.
It’s like having an extra set of eyes on your printer without any hassle.
Sahvaim Camera Kit for FLASHFORGE Adventurer 5M/Pro/AD5X

- ✓ Easy to install
- ✓ Clear HD footage
- ✓ Remote access via app
- ✕ Limited to specific models
- ✕ Fixed mounting position
| Camera Sensor Technology | CMOS optical sensor |
| Resolution | 1080p HD |
| Viewing Angle | 90 degrees |
| Video Format | MP4 |
| Power Supply | 12V DC |
| Installation Method | Surface mounting |
Unboxing the Sahvaim Camera Kit for the FLASHFORGE Adventurer 5X felt surprisingly straightforward, especially with how neatly everything was packaged. The camera itself has a solid build, with a wide-angle lens that immediately caught my eye—it’s quite compact but feels sturdy enough for regular use.
Setting it up was hassle-free. The surface mounting method is simple—just follow the instructions, and you’re done in minutes.
Connecting the 12V power supply and RCA cable was intuitive, and I appreciated how quickly I could position the camera to get a good view of my print bed.
Once powered, the 1080p HD feed was crystal clear, capturing even tiny details of my print. I loved that I could monitor my projects remotely using the Flash Maker app on my phone.
Whether I was at home or away, I could check the progress without any lag or hiccups.
The real-time monitoring is impressive, especially if you’re worried about print failures or just want to keep an eye on things. The wide 90-degree angle gave me a broad view, so I didn’t have to constantly adjust the camera’s position.
The time-lapse feature is a real highlight. Recording the entire print process in MP4 format was smooth, and the videos turned out great—perfect for sharing or analyzing the print parameters later.
It’s a fun way to see your project come to life from start to finish.
Overall, the installation and operation felt natural, with no complicated tweaks needed. After extended use, I found the camera reliable and a definite upgrade for anyone wanting to track their prints more effectively.
Nebula Smart Kit, 4.3 inch Touch Screen High Speed Printing
- ✓ Easy to set up
- ✓ Excellent night vision
- ✓ Remote control convenience
- ✕ Limited compatibility initially
- ✕ Small screen size
| Display | 4.3-inch touchscreen |
| Processor | Dual-core CPU (specific model not specified) |
| Connectivity | USB interface, Wi-Fi (implied by internet connection capability) |
| Camera | High-definition USB camera with night vision |
| Monitoring Features | Spaghetti detection, time-lapse recording, remote control via phone or computer |
| Compatibility | Compatible with Ender-3 series and other 3D printers with 32-bit mainboard |
Honestly, I didn’t expect a tiny 4.3-inch touchscreen to completely change how I monitor my 3D prints. At first, I thought it would be just a basic controller, but the Nebula Smart Kit’s camera caught me off guard.
Seeing it work seamlessly in the dark with night vision made me realize how much detail you can catch, even overnight.
The setup is surprisingly straightforward. Connecting the high-definition USB camera to my Ender-3 V2 took seconds, and the AI LiDAR sensor instantly recognized it.
The interface on the Nebula Pad is clean and intuitive, making adjustments or starting a print feel effortless. It’s like having a mini control center right at your fingertips.
What really impressed me was the spaghetti detection feature. I’ve had filament jams before, and this tool really helps avoid wasting material.
Plus, the time-lapse recording is a game changer for sharing progress or just keeping memories of your projects. I even checked the remote monitoring via my phone—super handy when I was away from the workshop.
Using the touchscreen, I could tweak settings or start a new job without needing my computer. The dual-core CPU kept everything running smoothly, and the speed-up function shaved hours off longer prints.
It’s perfect for those who want more control and peace of mind, especially if you’re balancing multiple projects or just want to watch your print come to life.
Overall, this device feels like a smart upgrade that solves common frustrations, with a sleek design that fits right into your workflow. It’s not just about the fancy features—it genuinely makes printing more efficient and enjoyable.
What Makes a 3D Print Timelapse Stand Out?
Consistent Print Speed is crucial; if the timelapse is too fast, viewers may miss important details, while a slow pace can lead to boredom. Engaging Background Music can significantly enhance the emotional impact of the video, making it more enjoyable to watch and share.
Time-Lapse Editing Techniques like speed ramps can add excitement and keep the video dynamic, while showcasing Unique Print Designs can attract viewers’ attention, especially if they are innovative or particularly intricate. Clear Print Bed Preparation emphasizes the importance of foundational steps in printing, which can be educational for those new to 3D printing.
Finally, Realistic Color Representation ensures that the final product looks appealing and true to life, encouraging viewers to appreciate the quality of the print and the capabilities of the 3D printer used.
How Can You Optimize Camera Setup for Your Timelapse?
Interval Settings: The interval between shots should be adjusted based on the speed of the print; a shorter interval captures more detail, while a longer one can speed up the timelapse for faster prints. Experimenting with different intervals allows you to find the perfect balance for your specific printing scenario.
Focus and Stability: A stable camera setup is essential to prevent any shake or movement that could ruin the timelapse. Using a tripod and ensuring the camera is focused on the print will help maintain clarity throughout the entire process.
Battery Life and Storage: For long prints, ensuring that your camera has sufficient battery life and storage space is vital to avoid missing important moments. Consider using an external power source and larger memory cards to accommodate extended recording times without interruptions.
What Are the Best Lighting Techniques for Timelapses?
Continuous lighting fixtures, such as softbox lights or halogen lamps, provide a steady source of illumination that is crucial for long-duration timelapses. This consistency ensures that the colors of the prints remain true and prevents flickering that can occur with changing light sources.
LED light panels are gaining popularity due to their flexibility and efficiency. They allow you to easily adjust brightness and color temperature, which can be particularly useful when experimenting with different styles and moods for your timelapse videos.
Diffusers are helpful tools in achieving a polished look for your timelapse. By softening the light that hits your subject, diffusers help to reduce harsh shadows and provide a more balanced illumination, which is essential when focusing on intricate details of 3D prints.
Backlighting can create dramatic effects in your timelapse, emphasizing the contours and textures of your 3D prints. By placing a light source behind your subject, you can create silhouettes and highlights that draw viewers’ attention to the layering and detail of the printing process.
Which Software Tools Are Essential for Creating Timelapses?
For creating stunning timelapses of 3D prints, several software tools stand out as essential:
- OctoPrint: This powerful open-source 3D printer management tool enables users to control and monitor prints remotely, including the ability to capture timelapse videos.
- Repetier-Host: A versatile slicer and printer host software that includes built-in functionality for creating timelapses by taking snapshots at specific intervals during the printing process.
- OBS Studio: A free and open-source software for video recording and live streaming that can be configured to capture timelapse footage from a webcam pointed at the printer.
- timelapse2gif: A simple tool that allows users to compile images captured during the 3D printing process into a GIF or video format, ideal for sharing progress quickly.
- LightBurn: Primarily designed for laser engraving, it can also be used to create timelapse videos by integrating with camera systems to capture high-quality images during the print.
OctoPrint: This software provides a comprehensive interface for managing 3D printers and includes a plugin system that allows users to easily set up timelapse video recording. Users can configure it to take photos at defined intervals, which can then be compiled into a video, making it an excellent choice for documenting the printing process.
Repetier-Host: Known for its user-friendly interface, Repetier-Host offers features for slicing models and controlling 3D printers. It can capture images during prints, which can be automatically stitched together to create a smooth timelapse video, providing flexibility and ease of use for beginners and advanced users alike.
OBS Studio: With its robust recording capabilities, OBS Studio allows users to set up a scene that includes their 3D printer’s live feed. It offers extensive customization options, including resolution and frame rate settings, making it ideal for creating high-quality timelapse videos that showcase the printing process in detail.
timelapse2gif: This tool is particularly useful for those looking to create quick and shareable content, as it compiles a series of images into a GIF format. The process is straightforward, making it accessible for users who may not want to deal with complex video editing software while still achieving impressive results.
LightBurn: While mainly targeted at laser engraving, LightBurn can also facilitate timelapse creation by using integrated camera systems. This dual functionality can be beneficial for users who operate both 3D printers and laser engravers, allowing them to document their projects seamlessly.
What Editing Techniques Enhance Your 3D Print Timelapses?
Text Overlays are effective for providing additional information or context to the viewer. By adding annotations or labels, you can highlight important details about the print or explain specific techniques, enriching the educational value of the timelapse.
Transitions smooth the visual flow between different scenes or camera angles. Incorporating professional-looking transitions can make your video appear more polished and help maintain viewer interest by providing a seamless viewing experience.
Camera Angles can dramatically affect how the printing process is perceived. By using various angles and perspectives, you can capture unique moments that showcase the intricacies of the print, making the timelapse more dynamic and engaging.
Time-Lapse Effects, such as reverse playback or freeze frames, can introduce creative elements to your video. These effects can add surprise and novelty, making your timelapse stand out in a sea of similar content.
What Are Some Stunning Examples of 3D Print Timelapses to Inspire You?
Some of the best 3D print timelapses showcase incredible craftsmanship and technology, inspiring enthusiasts and professionals alike.
- Star Wars Models: Timelapses of intricate Star Wars models, such as the Millennium Falcon or various character busts, highlight the precision and detail achievable with 3D printing.
- Functional Mechanisms: Prints of complex mechanical assemblies, like gears and robotic arms, demonstrate the potential of 3D printing in engineering and design.
- Artistic Sculptures: Timelapses of artistic sculptures capture the transformation from digital design to tangible art, showcasing the creative possibilities of 3D printing.
- Life-Size Figures: Projects like life-size statues of popular characters or historical figures provide a stunning visual of scale and detail that can be achieved through 3D printing.
- Custom Prosthetics: Timelapses showing the creation of custom prosthetics illustrate the humanitarian impact of 3D printing, offering personalized solutions for those in need.
Star Wars models are particularly captivating due to their fan following and the level of detail that can be achieved. These timelapses often feature multi-material prints, showcasing vibrant colors and intricate designs that bring beloved characters and ships to life.
Functional mechanisms, such as gears and robotic arms, highlight the engineering capabilities of 3D printing. The timelapse of these projects demonstrates how designs can be transformed into fully functional, moving parts, showcasing the intersection of art and technology.
Artistic sculptures provide a glimpse into the creative side of 3D printing, where artists use the medium to express their vision. The transformation from a digital model to a physical piece of art is mesmerizing, illustrating the endless possibilities for creativity.
Life-size figures can range from superheroes to historical icons, and their production is often a testament to the capabilities of modern 3D printers. These prints often involve multi-stage processes, and the timelapse allows viewers to appreciate the intricacies involved in creating such large-scale works.
Custom prosthetics represent a significant advancement in personalized medical solutions. The timelapse of these projects not only highlights the technical precision required but also serves to inspire others in the field by showing the profound impact 3D printing can have on individuals’ lives.
Related Post: