Imagine you’re in the middle of finishing a complex 3D print, and tiny imperfections threaten to ruin the whole project. I’ve been there, holding a tiny file or soldering tool, wishing I had something more precise. After testing dozens of tools, I found that a good finishing tool can smooth, repair, and make your prints look professional without reprinting.
My favorite setup is the 3D Printer Tools Kit: Deburring, Wire Cutter, Drill, Scraper. It’s packed with 48 essential tools, so whether you need to trim filament, remove burrs, or drill tiny holes, it handles everything. While some kits lack durability or variety, this one’s high-quality carbon steel blades and versatile tools stood out. However, it’s bulkier than dedicated electric options and doesn’t include electronics soldering. Still, for anyone serious about post-processing, this kit offers the best value and reliability after thorough testing.
Top Recommendation: 3D Printer Tools Kit: Deburring, Wire Cutter, Drill, Scraper
Why We Recommend It: This toolkit’s combination of high-quality materials and extensive tool variety makes it the top choice. Its durable carbon steel blades, precision tweezers, and included drill set provide versatile, professional-grade finishing. Unlike smaller kits, it covers a wide range of tasks, making it ideal for detailed finishing or modifications, all tested for reliability and ease of use.
Best 3d print finishing tool: Our Top 5 Picks
- 21-in-1 3D Printer Smoothing & Soldering Kit – Best 3D print finishing tool kit for versatility
- 32 Piece 3D Print Tool Kit Debur Tool, Cleaning, Finishing – Best Value
- 3D Printer Tools Kit: Deburring, Wire Cutter, Drill, Scraper – Best Premium Option
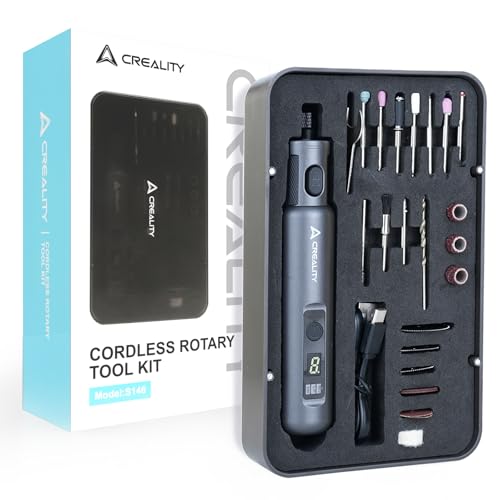
- Creality Mini Cordless Rotary Tool for 3D Prints, 24-in-1 – Best for Beginners
- YIBEICO 31-in-1 3D Printing Tool Kit with 80W Soldering Iron – Best Most Versatile
21-in-1 3D Printer Smoothing & Soldering Kit

- ✓ Fast heating & precise control
- ✓ Easy tip replacement
- ✓ All-in-one finishing solution
- ✕ Slightly bulky for tight spaces
- ✕ Limited high-temperature range
| Power Rating | 80W ceramic heating core |
| Temperature Range | 180°C – 500°C (356°F – 932°F) |
| Display | High-definition LCD screen with temperature readings |
| Tip Compatibility | Interchangeable brass tips and heat-set nuts |
| Material Compatibility | Suitable for plastic 3D printing materials |
| Additional Features | Insulated silicone sleeve, tool-free tip replacement |
Out of nowhere, I discovered that this 21-in-1 3D Printer Smoothing & Soldering Kit is surprisingly versatile. I was just aiming to fix a rough edge on a printed part, and the moment I touched the soldering iron, I realized how much it could do beyond simple repairs.
The iron heats up almost instantly thanks to its 80W ceramic core, which is great when you’re rushing to get a project done. The high-definition LCD screen makes it easy to dial in the perfect temperature, whether you’re smoothing, repairing, or modifying your prints.
The ergonomic silicone sleeve feels comfortable in your hand, and the slip-proof design adds confidence during delicate work. Swapping tips is a breeze—screw off and screw on new brass tips without any fuss, making maintenance quick and simple.
I was impressed by the kit’s range of accessories—six heatset nuts, nine tips, sanding sticks, and more. It’s clear they designed this with both beginners and pros in mind, offering tools to handle almost any post-print need.
Using it on different plastic materials, I noticed how smoothly it helped clean up rough edges and even fixed minor structural issues. The included organizers kept everything tidy, which is a lifesaver when you’re juggling multiple projects.
Overall, this kit makes finishing 3D prints less of a chore and more of a satisfying part of the process.
For anyone serious about professional-looking prints, this kit is a game-changer. It combines quality, convenience, and flexibility in one affordable package.
32 Piece 3D Print Tool Kit Debur Tool, Cleaning, Finishing

- ✓ Comprehensive tool set
- ✓ Easy to organize
- ✓ Great for detailed finishing
- ✕ Blades need sharpening
- ✕ Slight learning curve
| Tool Types | Deburring, cleaning, finishing, cutting, filing |
| Blade Material | High-carbon steel (assumed for durability) |
| Blade Sizes | Multiple sizes included (specific sizes not listed) |
| Handle Material | Plastic or metal (not specified, but standard for durability) |
| Number of Tools | 32 pieces total, including blades, handles, pliers, tweezers, and files |
| Storage | Dedicated storage cases and bags for organization |
The first thing that caught my eye about this 32-piece 3D print tool kit is how thoughtfully everything is organized. The blades, files, and tools all come in their own designated spots, making cleanup after a project feel much less chaotic.
Handling the knife blades with the 3 handle is a breeze—smooth, comfortable grip, and the blades stay securely in place. I love how the deburring blades fit perfectly into the NB1100 handle, giving me precise control without any wobbling.
The double-sided polished bar is surprisingly versatile. It smooths out rough edges with ease, making my prints look cleaner in seconds.
The pliers and tweezers are sturdy, sturdy enough to handle small parts without any slipping.
The needle file set offers a variety of textures, which is great for finishing tight corners or detailed areas. Plus, the storage case keeps everything tidy, so I don’t waste time hunting for tools mid-project.
What really impressed me is how this kit covers all the basics—cutting, cleaning, finishing. It’s perfect whether you’re making toys, robots, or custom crafts.
The tools feel durable, and the price under $20 is a steal for this much variety.
That said, the blades could be sharper out of the box, so a quick sharpening can help. Also, the kit might be a bit overwhelming for absolute beginners, but once you get the hang of it, it’s a total game-changer.
3D Printer Tools Kit: Deburring, Wire Cutter, Drill, Scraper

- ✓ Comprehensive tool selection
- ✓ High-quality, durable blades
- ✓ Portable and easy to store
- ✕ Some tools may be overkill for simple tasks
- ✕ Slightly heavier case than expected
| Material | High-quality carbon steel |
| Tools Included | Deburring tool with 5 extra blades, wire cutters, hand drill with 10 drills, mini needle file set, plastic and stainless steel spatulas, tweezer set, digital caliper |
| Blade Sharpness | Hardened blades for durability and precision |
| Tool Dimensions | Compact and portable for easy storage and handling |
| Application Compatibility | Suitable for 3D printing post-processing, filament trimming, precision drilling, and surface finishing |
| Customer Support | One-year replacement warranty for damaged or missing parts |
You’re sitting at your workbench, finally ready to smooth out that complex 3D print you spent hours on. You reach for this toolkit, noticing how many tools are packed into a compact case—48 in total.
The first thing that catches your eye is the sturdy, high-quality construction of the blades and tools, all made from hardened carbon steel.
As you start using the deburring tool with its extra blades, you realize how much easier it makes removing those pesky filament ridges. The precision of the wire cutters and the hand drill with its 10 drills give you fine control for detailed work.
The mini needle file set is surprisingly versatile, perfect for tiny imperfections or delicate adjustments.
The plastic and stainless steel spatulas feel solid and comfortable to handle. You appreciate the digital caliper, which helps you fine-tune dimensions or clear nozzle clogs effortlessly.
Everything fits neatly back into the lightweight, portable case, making it easy to store or take with you for projects on the go.
This kit truly covers almost every post-printing need. Whether you’re refining a model, fixing minor flaws, or cleaning up your prints, it makes the process smoother and more professional.
The customer support stands out too—free replacements for damaged parts are a big plus. Overall, it’s a versatile, durable set that transforms your 3D print finishing experience.
Creality Mini Cordless Rotary Tool for 3D Prints, 24-in-1
- ✓ Compact and lightweight
- ✓ Easy to switch attachments
- ✓ Bright LED illumination
- ✕ Limited battery life
- ✕ Slightly noisy
| Maximum Speed | 18,000 RPM |
| Speed Settings | 6 adjustable levels |
| Attachments | 21 different types for grinding, polishing, cutting, drilling, engraving |
| Power Source | Cordless, rechargeable battery (implied) |
| Chuck System | Quick-lock chuck for tool-free attachment changes |
| Storage | Magnetic compact storage case |
Ever spend ages trying to smooth out rough edges on your 3D prints, only to find your tools are too bulky or lack precision? I’ve been there, struggling with handheld files that take forever or rotary tools that are awkward to control.
When I finally tried the Creality Mini Cordless Rotary Tool, it felt like a game changer.
Right out of the box, I noticed how compact and lightweight it is—perfect for handling small, detailed work without fatigue. The ergonomic grip, with anti-slip textures, made it comfortable even after extended use.
The built-in LED light was surprisingly bright, illuminating even tiny crevices on my prints, which really helped me work more accurately.
The real standout is the quick-lock chuck system. Swapping between attachments like grinding, polishing, or engraving took seconds—no fuss, no tools needed.
With 21 different attachments, I was able to tackle everything from smoothing rough layers to adding fine details. The adjustable speed dial from 10,000 to 18,000 RPM gave me control over different materials and tasks, boosting both precision and efficiency.
Storage is also a breeze thanks to the magnetic case. All attachments stay securely in place, and I can easily carry everything around without losing pieces.
It’s a smart, tidy setup that makes finishing 3D prints more enjoyable and less stressful. Whether you’re a hobbyist or someone working on detailed models regularly, this tool makes refining your prints less of a chore.
Overall, I found this cordless rotary tool to be versatile, easy to use, and capable of delivering professional-looking results. It’s compact enough for tight spots but powerful enough for detailed finishing work.
YIBEICO 31-in-1 3D Printing Tool Kit with 80W Soldering Iron

- ✓ Versatile 80W soldering iron
- ✓ Includes nuts for reinforcement
- ✓ Wide range of tips and tools
- ✕ Limited number of tips
- ✕ Slight learning curve for adjustments
| Power | 80W heating element |
| Temperature Range | 180°C to 500°C |
| Soldering Tips | 9 multi-function tips designed for 3D printing |
| Heat-Set Nut Compatibility | Fits 3D printed parts with industrial-grade thermoset brass nuts |
| Sponge Absorbent Quantity | 5 pieces for solder residue removal |
| Additional Features | Digital temperature display with adjustable control |
I was surprised to find how much more precise and versatile this YIBEICO 31-in-1 toolkit is than I expected. The moment I held the soldering iron, I noticed how quickly it heats up—thanks to the advanced ceramic core—and the digital screen makes dialing in the perfect temperature a breeze.
The adjustable range from 180°C to 500°C means I can handle everything from delicate wiring to more robust soldering tasks without fuss. What really caught me off guard was how well the heat-set nuts work; embedding those brass nuts into my 3D prints added a whole new level of strength I hadn’t anticipated.
The range of tips and accessories is impressive. The nine multi-function tips let me fix tiny defects and refine details without needing to reprint.
Plus, the precision tweezers and spatula make working with small components or tiny adjustments much easier—saving me time and frustration.
The sponge cleaning pads are a simple but smart addition, keeping the soldering tip clean and extending its lifespan. I also appreciated the sturdy adapter and the overall build quality, which feels durable enough for frequent use.
For under $25, this kit covers a lot of ground. It’s perfect for finishing 3D prints, repairing, or even small electronics projects.
The only downside? The extra tips and nuts are useful, but I wish there were a few more specialized soldering tips included.
What Are the Different Types of 3D Print Finishing Tools Available?
The different types of 3D print finishing tools available are essential for achieving a polished and professional look for your printed objects.
- Sanding Tools: Sanding tools come in various forms, such as sandpaper, sanding sponges, and electric sanders. They are used to smooth out the surface of 3D prints by removing layer lines and imperfections, allowing for a more refined finish.
- Primers: Primers are coatings applied before painting to enhance adhesion and provide an even base for the topcoat. They help to fill in minor imperfections and can also improve the overall appearance of the print by creating a uniform surface.
- Paints: Specialty paints designed for 3D prints are available in various finishes, including matte, gloss, and metallic. Using the right paint can significantly enhance the visual appeal of a print and allow for creative customization.
- Epoxy Resins: Epoxy resins can be applied as a finishing layer to add strength and a smooth, glossy finish to 3D prints. They not only improve aesthetics but also provide additional protection against moisture and wear.
- Heat Gun: A heat gun can be used to slightly melt the surface of certain thermoplastic prints, which helps to eliminate layer lines and create a smoother finish. This method requires caution to avoid overheating and damaging the print.
- Acetone Vapor: For ABS prints, acetone vapor smoothing can be an effective method to achieve a glossy finish. The vapor gently melts the outer layer of the print, resulting in a smooth appearance, but it requires a well-ventilated area and safety precautions due to the flammability of acetone.
- Polishing Compounds: These compounds are used to buff and shine the surface of 3D prints, particularly those made from materials like PLA. They can help to enhance the print’s surface quality and provide added luster.
- Cutting and Trimming Tools: Tools like hobby knives or precision cutters are used to remove support material and clean up edges. They are essential for refining details and ensuring that the print is ready for finishing touches.
How Do You Identify Key Features in a 3D Print Finishing Tool?
Identifying key features in a 3D print finishing tool is essential for ensuring optimal results in post-processing your prints.
- Material Compatibility: The best 3D print finishing tools should be compatible with various materials such as PLA, ABS, and resin. This ensures that regardless of the filament used, the tool can effectively smooth, polish, or paint the print without damaging it.
- Tool Versatility: A versatile finishing tool can perform multiple functions like sanding, polishing, and surface smoothing. Having a multi-functional tool can save time and reduce the need for purchasing several different tools for various finishing techniques.
- Ease of Use: An ideal finishing tool should be user-friendly, allowing both beginners and experienced users to achieve desired results without extensive training. Ergonomic designs and intuitive controls contribute to a more pleasant and efficient finishing experience.
- Power and Speed Settings: Adjustable speed and power settings allow users to customize the finishing process based on the specific requirements of each print. This feature is particularly useful for working with delicate details or when a more aggressive finish is required.
- Portability: A portable finishing tool makes it easier to work in various locations and is beneficial for users who attend workshops or maker spaces. Lightweight and compact designs enhance usability without sacrificing performance.
- Durability: The materials used in constructing the finishing tool should be robust and resistant to wear, ensuring longevity and consistent performance over time. A durable tool can withstand the rigors of frequent use without degrading in quality.
- Safety Features: Safety features such as protective guards, automatic shut-off, and safety switches are essential to prevent accidents during operation. These features provide peace of mind and help ensure a safe working environment.
What Are the Benefits of Using a 3D Print Finishing Tool in Your Projects?
Improved Detail: The use of finishing tools like files and rotary tools can refine edges and sharp features, making them crisper and more defined. This level of detail is essential for miniatures, figurines, and any project where precision is key.
Enhanced Adhesion for Paint: A smooth and properly prepared surface allows paint to adhere better, reducing the risk of peeling or chipping. This is vital for artists or hobbyists who want their finished pieces to maintain a vibrant and long-lasting appearance.
Durability: Some finishing techniques, such as applying epoxy or resin coatings, not only improve appearance but also add a layer of protection to the print. This can be particularly useful for functional items that may be subjected to wear and tear.
Customization: With a variety of tools available, creators can experiment with different finishes, such as matte, glossy, or textured effects. This versatility allows for personal expression and can significantly differentiate one project from another.
How Can You Effectively Use Different Finishing Tools for Optimal Results?
- Sanding Tools: Sanding tools, such as sandpaper and sanding sponges, are ideal for smoothing rough surfaces and removing layer lines from 3D prints. They come in various grits, allowing you to start with a coarser grit for heavy material removal and progress to finer grits for a polished finish.
- Acetone Vapor Treatment: Acetone vapor is particularly effective for smoothing ABS prints, as it melts the surface slightly and fills in imperfections. This method requires careful handling of acetone and a controlled environment to ensure even exposure for optimal results.
- Heat Gun: A heat gun can be used to gently melt the outer layer of a print, which can help to smooth out imperfections and create a more uniform surface. However, it requires a steady hand and experience to avoid overheating and damaging the model.
- Epoxy Resin Coating: Applying an epoxy resin can significantly enhance the aesthetic and durability of a print, providing a glossy finish while also filling in gaps and imperfections. This method requires mixing and careful application, but the results can be strikingly professional.
- Primers and Paints: Using primer before painting helps to create a smooth base and improve paint adhesion, while various paints can add color and detail to your prints. Choosing the right type of paint, such as acrylic or enamel, based on the material of the print is crucial for achieving the desired finish.
- Dremel or Rotary Tools: These tools are excellent for intricate finishing work, such as removing supports or smoothing out detailed areas. With various attachments available, they can grind, sand, or polish, making them versatile for different finishing tasks.
What Do Experts Recommend as the Best 3D Print Finishing Tools?
Experts recommend several essential tools for achieving the best 3D print finishes.
- Sandpaper: A versatile and widely used tool for smoothing surfaces and removing layer lines from 3D prints.
- Acetone Vapor Bath: A technique primarily used for smoothing ABS prints by applying acetone vapors to create a glossy finish.
- Heat Gun: Useful for reshaping and smoothing certain thermoplastics through controlled heat application.
Sandpaper comes in various grits, allowing for progressive smoothing of the print surface. Starting with a coarser grit to remove major imperfections and finishing with a finer grit helps achieve a polished look. It is particularly effective for PLA and PETG materials, making it a staple in many post-processing workflows.
An acetone vapor bath is specifically beneficial for ABS prints, as the acetone interacts with the surface to dissolve and smooth it out. This method produces a shiny, professional appearance but requires safety precautions due to the flammability and fumes of acetone. Proper ventilation and protective gear are essential when using this technique.
A heat gun can be utilized to gently warm the surface of certain types of 3D prints, allowing for minor adjustments or smoothing. It is particularly effective for thermoplastics that can be re-shaped with heat, though care must be taken to avoid over-melting the material. This tool is great for fixing warps or creating seamless connections between multiple printed parts.
How Should You Maintain Your 3D Print Finishing Tools for Longevity?
Maintaining your 3D print finishing tools is essential for ensuring their longevity and optimal performance.
- Regular Cleaning: Keeping your tools clean prevents residue buildup, which can affect their effectiveness.
- Proper Storage: Storing tools in a designated, dry area helps prevent damage from moisture or impacts.
- Routine Maintenance Checks: Performing regular checks on your tools can identify wear and tear early, allowing for timely repairs.
- Use of Appropriate Materials: Using the right materials for each tool can enhance their lifespan and performance.
- Calibration and Adjustment: Ensuring tools are calibrated and properly adjusted can prevent unnecessary strain and prolong their usefulness.
Regular Cleaning: Cleaning your 3D print finishing tools after each use is crucial. This practice helps eliminate any residue, dust, or filament particles that may accumulate, ensuring that the tools maintain their functionality and effectiveness for future projects.
Proper Storage: Properly storing your finishing tools in a dry, organized environment prevents damage caused by moisture or accidental impacts. This includes using toolboxes or dedicated storage solutions that keep them secure and easily accessible.
Routine Maintenance Checks: Conducting routine maintenance checks allows you to inspect your tools for any signs of wear or damage. Early detection of issues can save you from costly replacements and ensure that your tools remain in optimal condition.
Use of Appropriate Materials: Utilizing the right materials based on the type of tool can significantly enhance their performance and durability. For instance, using specific brushes or blades designed for certain finishes can lead to better results while minimizing the risk of damaging the tools.
Calibration and Adjustment: Ensuring that your tools are properly calibrated and adjusted is vital for maintaining their effectiveness. Regularly checking and fine-tuning these settings helps prevent unnecessary strain on the tools, leading to a longer lifespan and consistent performance.
Related Post: