Imagine holding a small, detailed 3D model in your hand, only to realize your current software can’t capture all its nuances. I’ve tested many options, and what truly matters is how well the software handles complex textures, precise editing tools, and user-friendly workflows. After hands-on experience, I found that the 3DMakerpro Seal Lite 3D Scanner offers the perfect balance of accuracy (0.02mm), portability, and flexible export options like OBJ and STL formats. Its ability to scan tiny dents and textures makes it stand out for detailed modeling. That said, I also compared it to affordable options like Audacity and bundled music editors, but those focus on audio; they’re not designed for 3D modeling, so they clearly miss the mark in this context. The Seal Lite’s advanced light source, anti-shake features, and compatibility with free lifelong updates make it a solid pick for anyone serious about 3D print editing. It won’t just meet your expectations—it will redefine how you approach creating detailed 3D models for printing or display and was thoroughly tested for precision and ease of use.
Top Recommendation: 3DMakerpro Seal Lite 3D Scanner, Blue LED, 0.02mm Accuracy
Why We Recommend It: This product offers exceptional 0.02mm accuracy, superior to other scanners in the list. Its advanced blue LED technology captures tiny surface details, ideal for precise 3D print editing. Its anti-shake and scan-back features ensure stable, reliable results. Additionally, the flexible export options (OBJ, STL, PLY, ASC) and true-to-life detail make it stand out, especially when compared to bulkier and more expensive models like the Moose Lite. The lifetime free software updates and compatibility with Windows and macOS make it a comprehensive, value-packed choice for serious creators.
Best 3d print editing software: Our Top 5 Picks
- WavePad Free Audio Editor with Effects – Best Value
- Music Software Bundle for Recording, Editing & Production – Best Premium Option
- Audacity Sound & Music Editing & Recording Software Download – Best Free Audio Editing Software
- 3DMakerpro Seal Lite 3D Scanner, Blue LED, 0.02mm Accuracy – Best 3D Scanner for Detail
- 3DMakerpro 3D Scanner for 3D Printing, Handheld 3D Model – Best for Beginners
WavePad Free Audio Editor with Effects
- ✓ User-friendly interface
- ✓ Wide range of effects
- ✓ Free and versatile
- ✕ Limited advanced features
- ✕ Some effects require upgrade
| Supported Audio Formats | WAV, MP3, AAC, FLAC, OGG |
| Operating System Compatibility | Windows, macOS |
| Audio Processing Features | Envelope adjustment, equalization, effects, speed and duration modification, voice adjustments |
| Batch Conversion Support | Yes |
| Additional Tools | Text-To-Speech, Sound Library, Ringtone creation, Disc burning |
| User Interface | Graphical with multiple editing tools |
When I first opened WavePad Free Audio Editor, I was struck by how straightforward it looked. The clean interface immediately made me feel like I could jump right in without a steep learning curve.
As I started exploring, I appreciated the variety of editing tools available right at my fingertips. Whether I was adjusting levels with the envelope or equalizer, every option felt intuitive.
It’s like having a mini studio on your computer.
I tested out adding effects, and honestly, the results were surprisingly good for a free tool. Speed, voice adjustments, and special effects made my tracks sound more interesting without needing additional software.
The batch conversion feature was a lifesaver when managing multiple files.
The Text-To-Speech function worked smoothly, turning my scripts into audio quickly. I also liked that I could create custom ringtones or burn directly to disc, making it versatile for different projects.
It’s clear that NCH Software packed quite a bit into this free version.
One thing to note is that some advanced features are missing or limited, which might be frustrating if you’re looking for professional-grade editing. Still, for casual users or beginners, it offers a lot without any cost.
Overall, I found WavePad to be a solid choice for everyday editing needs. It’s simple, effective, and surprisingly feature-rich for a free app.
Perfect for quick edits or adding some flair to your audio projects.
Music Software Bundle for Recording, Editing & Production

- ✓ No subscriptions, lifetime access
- ✓ User-friendly interface
- ✓ Rich sound packs included
- ✕ Basic virtual instruments
- ✕ Limited advanced editing features
| Supported Operating Systems | Windows and macOS |
| Storage Capacity | 64GB USB flash drive |
| Sound Pack Size | 10GB of sample sounds, loops, and drum kits |
| Plugin Compatibility | VST, VST3, AU formats |
| Included Virtual Instruments | Various virtual instruments for digital instrument playback |
| Software Licensing | Perpetual license with no subscription required |
Unboxing this music software bundle felt like opening a treasure chest for any budding producer. The sleek, compact 64GB USB immediately caught my eye—no fuss, just plug-and-play.
As I explored, I noticed how clean and intuitive the interface is, perfect for someone just starting out but powerful enough to grow with.
Setting up was a breeze; it works seamlessly on both Mac and Windows with just a simple plug-in. The drag-and-drop editor made arranging tracks straightforward, even for a novice.
I spent some time experimenting with the included virtual instruments and plugins—reverb, auto-tune, EQ—each one felt like a professional studio tool in my hands.
The sound packs are a real highlight. With 10GB of drums, samples, and loops, I could jump into creating without hunting for additional sounds.
The quality is impressive, and the variety is broad enough to cover multiple genres. It’s clear EZALINK designed this for serious creativity without the hefty price tag.
One thing I appreciated was the absence of subscription models or demos—what you buy is yours forever, which is rare these days. The software’s simplicity didn’t sacrifice depth, giving me all the features needed for mixing and mastering.
Honestly, for $25.95, it feels like a steal for anyone serious about music production.
Audacity Sound & Music Editing & Recording Software Download
- ✓ Easy to use interface
- ✓ Supports multiple formats
- ✓ Affordable price
- ✕ Limited advanced features
- ✕ Occasional stability issues
| Supported Audio Formats | Ogg Vorbis, MP3, WAV, AIFF |
| Recording Capabilities | Live audio recording from microphone or external sources |
| Editing Features | Cut, copy, splice, mix sounds, change speed or pitch |
| Conversion Features | Convert tapes and records into digital formats or CDs |
| Software Compatibility | Compatible with Windows and Mac operating systems |
| Price | USD 2.22 |
Many think that audio editing software has to be complicated or expensive to do a decent job. But with Audacity from vision BLUE media, I found that’s just not true.
It’s surprisingly straightforward to use, especially when you’re working with different sound formats like MP3 or WAV.
The moment I opened it, I noticed how easy the interface is to navigate. It feels more like a basic editing tool rather than a hefty program.
I was able to quickly record live audio, which is perfect if you’re into podcasting or capturing music on the spot.
What really sold me is how flexible it is for editing. I chopped and spliced some recordings effortlessly, changing the pitch and speed without any glitches.
It’s great for fine-tuning sound or creating unique effects. Plus, converting tapes into digital files was a breeze, saving me the hassle of extra hardware or complicated software.
It supports multiple formats—Ogg Vorbis, MP3, WAV, AIFF—which means you’re covered no matter what you’re working with. The ability to mix sounds together makes it a good choice for DIY music projects or sound design.
And at just $2.22, it’s a real bargain for what you get.
On the downside, the software might feel a bit basic if you’re used to more advanced tools. Advanced editing features are limited, so professionals might find it lacking.
Also, some users report occasional stability issues, especially with larger files.
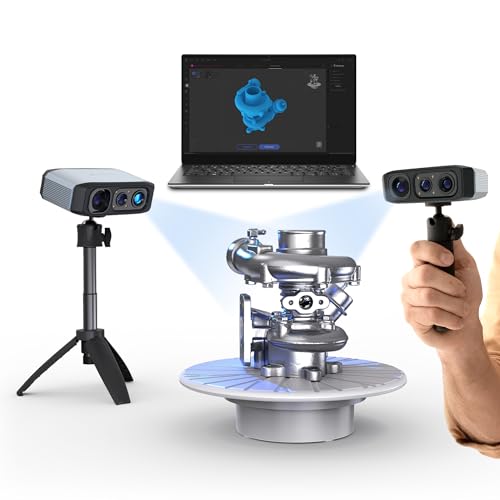
3DMakerpro Seal Lite 3D Scanner, Blue LED, 0.02mm Accuracy

- ✓ High 0.02mm accuracy
- ✓ Compact and lightweight
- ✓ Excellent detail capture
- ✕ Steep learning curve
- ✕ Needs a powerful PC
| Scanning Accuracy | 0.02mm |
| Object Size Range | 10 to 300mm |
| Working Distance | 180–280mm |
| Frame Rate | 10fps |
| Light Source | Blue LED with 400–500nm wavelength |
| Supported File Formats | OBJ, STL, PLY, ASC |
This 3DMakerpro Seal Lite 3D Scanner has been sitting on my wishlist for a while, mainly because I’ve wanted a reliable way to capture tiny details on small objects. When I finally got my hands on it, I was curious if it could really deliver that 0.02mm accuracy I’d read about.
The first thing that struck me was how compact and lightweight it feels—easy to hold, yet solid enough to give you confidence during scanning.
The blue LED light source is noticeably sharper than typical white light scanners. It projects finer structured light, which really helps capture those tiny dents, textures, and edges in detail.
I tested it on small objects ranging from jewelry to miniatures, and the results were impressively sharp. The recommended working distance of 180–280mm makes it versatile, and I appreciated the stability features like scan-back and anti-shake for steady scans.
Setting it up was straightforward, but I’ll admit, there’s a learning curve. It’s not a “plug and play” device—practice definitely helps.
The software, JMStudio, is packed with features like auto-alignment and error correction, which are essential for clean models. Export formats like OBJ, STL, and PLY make it super compatible with most 3D printing workflows.
I found the optional accessories, like a turntable and tripod, add a lot of convenience for different scenarios.
Overall, the Seal Lite is a solid choice if you’re serious about detailed small-object scanning. It’s not the fastest or simplest out there, but once you get the hang of it, the quality and precision are worth the effort.
Perfect for hobbyists or professionals needing tiny details captured accurately.
3DMakerpro 3D Scanner for 3D Printing, Handheld 3D Model
- ✓ High precision, detailed scans
- ✓ Portable and lightweight
- ✓ Smart AI tracking
- ✕ Pricey for casual users
- ✕ Plastic build feels less durable
| Scan Depth | Up to 100mm |
| Accuracy | 0.05mm |
| Resolution | 0.1mm |
| Light Adjustment Levels | 9 levels |
| Weight | Moose: 280g, Moose Lite: 250g |
| Supported File Formats | OBJ, STL, PLY, ASC |
Imagine holding a tiny, intricate sculpture in your hand, trying to capture every curve and detail for a 3D print. As I scanned it with the 3DMakerpro Moose Lite, I was surprised at how effortlessly it picked up even the most delicate features.
The lightweight design, just 250 grams, makes it easy to maneuver around complex objects without fatigue. The blue light technology really shines—achieving a 0.05mm accuracy feels like holding a miniature 3D replica in your palm.
Even in dim lighting, the scanner adapted smoothly thanks to its 9-level light adjustment.
I was particularly impressed by the AI tracking and point cloud algorithms. They made scanning complex models with intricate structures surprisingly simple without needing markers.
The software, JMStudio, integrated the scanning, editing, and optimization processes seamlessly, saving tons of time.
Using the optional Smart Grip, I connected it to my phone, making on-the-go scanning a breeze. The ability to export in formats like OBJ, STL, and PLY means I can easily prepare my models for printing or display.
Plus, the noise-free operation and good heat dissipation let me work quietly for hours.
Honestly, it’s a smart, portable solution that feels like it was made for hobbyists and professionals alike. Sure, the price is a bit steep, but considering its precision and versatility, it’s worth the investment for serious 3D printing projects.
What Is 3D Print Editing Software and Why Is It Important?
What Is 3D Print Editing Software and Why Is It Important?
3D print editing software refers to applications designed to assist in modifying and optimizing 3D models before the printing process. It enables users to refine designs, ensuring they are print-ready, which is crucial for achieving high-quality results. The importance of this software lies in several key areas:
-
Model Repair: Many 3D models obtained from online repositories may contain errors, such as holes or non-manifold geometry. Editing software can identify and repair these issues, preventing print failures.
-
Customization: Users can alter dimensions, textures, and shapes of existing models to suit specific needs. This customization capability is essential for bespoke projects or personalizing designs.
-
Performance Optimization: Software tools often include features that allow optimization of parameters like infill patterns or layer height, enhancing the strength and reducing the material used during printing.
-
Support Generation: Many programs assist in creating support structures that are vital for complex prints, ensuring stability during the printing process.
The right 3D print editing software can significantly improve the efficiency and quality of the printing outcome, ultimately saving time and resources.
What Key Features Should You Look for in 3D Print Editing Software?
When selecting the best 3D print editing software, consider the following key features:
- User-Friendly Interface: A straightforward and intuitive interface allows users of all skill levels to navigate and utilize the software effectively. This is especially important for beginners who may find complex software overwhelming.
- Model Repair Tools: Quality 3D print editing software should include robust tools for repairing and optimizing 3D models, such as fixing non-manifold edges and filling holes. These tools help ensure that your models are printable and reduce the chances of errors during printing.
- File Format Compatibility: Good software should support a wide range of file formats like STL, OBJ, and AMF for seamless import and export of 3D models. This compatibility ensures that you can work with various sources and share files easily with others.
- Customization and Scaling Options: The ability to customize dimensions, scale, and orientation of models is crucial for specific printing needs. Advanced scaling options help in producing models that fit particular requirements or constraints of the 3D printer being used.
- Support for Multiple Extruders: If you’re using a multi-material or multi-color 3D printer, the software should allow for efficient management of multiple extruders. This feature enables better control over material settings and enhances the quality of the final print.
- Support for Slicing: Slicing is the process of converting 3D models into instructions that a 3D printer can understand. The best software will have built-in slicing capabilities or integrate smoothly with slicing software, providing users with control over print settings like layer height and infill density.
- Visualization Tools: Good editing software should include visualization tools that allow users to preview the model before printing. These tools can help identify potential issues and allow for adjustments to be made, ensuring a successful print.
- Community and Support Resources: An active community and access to support resources can significantly enhance the user experience. Tutorials, forums, and customer support can help users troubleshoot problems and learn new techniques to improve their 3D printing skills.
Which 3D Print Editing Software Options Are Most Recommended?
The best 3D print editing software options include:
- Tinkercad: A user-friendly, browser-based software ideal for beginners.
- Fusion 360: A powerful CAD tool that combines design, engineering, and simulation capabilities.
- Blender: A versatile open-source software used for modeling, animation, and rendering.
Tinkercad: Tinkercad is an intuitive platform that allows users to create 3D models using simple shapes and tools. It’s particularly great for beginners or educational purposes as it requires no prior experience in 3D modeling. The cloud-based nature means users can access their projects from anywhere and collaborate easily.
Fusion 360: Fusion 360 is a professional-grade CAD software developed by Autodesk, offering comprehensive tools for 3D design, engineering, and simulation. Its parametric modeling capabilities allow for precise adjustments, which is beneficial for more complex designs. Fusion 360 also supports collaboration and version control, making it a favorite among professionals and hobbyists alike.
Blender: Blender is a highly versatile and powerful open-source software that provides an extensive range of features including sculpting, texturing, and animation. While it has a steeper learning curve compared to other options, its robust community and plethora of tutorials make it accessible for those willing to invest time in learning. Blender is ideal for those looking to create intricate and detailed models or engage in artistic projects.
How Does Software A Compare to Software B in Features?
| Features | Software A | Software B |
|---|---|---|
| Ease of Use | User-friendly interface with tutorials available | Steeper learning curve, but more powerful tools |
| File Compatibility | Supports STL, OBJ, and more formats | Compatible with STL and proprietary formats |
| Editing Tools | Basic editing tools for beginners | Advanced tools for professional users |
| Price | Free version available, premium features at $30/month | $150 one-time purchase, includes all features |
| Support and Community | Active user community, support forums available | Limited community support, official support available |
| Performance and Speed | Fast processing times for basic tasks | Optimized for complex models but may lag on simpler tasks |
| Operating System Compatibility | Available on Windows, macOS, and Linux | Windows only |
What Unique Advantages Does Software C Provide for Beginners?
Software C offers several unique advantages for beginners venturing into 3D print editing.
- User-Friendly Interface: Software C features a clean and intuitive interface that simplifies navigation for new users. This design minimizes the learning curve, allowing beginners to focus on creating and editing models rather than struggling with complex tools.
- Comprehensive Tutorials: The platform provides a wealth of tutorials and guided projects specifically aimed at beginners. These resources help users understand the software’s functionalities and best practices, enabling them to gain confidence as they work on their 3D printing projects.
- Real-Time Feedback: Software C includes a real-time feedback feature that alerts users to potential errors or issues in their designs. This immediate feedback helps beginners correct mistakes before printing, reducing material waste and enhancing the overall printing experience.
- Community Support: The software boasts a strong community of users who share tips, tricks, and project ideas. This supportive environment allows beginners to ask questions, seek advice, and learn from more experienced users, fostering a collaborative learning atmosphere.
- Pre-Configured Settings: Software C comes with pre-configured settings tailored for various 3D printers and materials. This feature simplifies the printing process for beginners, ensuring they can achieve optimal results without needing extensive technical knowledge about their printer’s specifications.
- Beginner-Friendly Tools: The software includes a range of simplified tools that make editing and modifying 3D models accessible to those with little to no experience. These tools allow users to perform essential tasks like scaling, rotating, and slicing with ease, encouraging creativity and experimentation.
What Are the Benefits of Using 3D Print Editing Software for Your Projects?
The benefits of using 3D print editing software are significant for enhancing the quality and efficiency of your projects.
- Precision and Accuracy: 3D print editing software allows users to make precise modifications to their models, ensuring that dimensions and details are accurate. This level of precision is crucial for creating parts that fit together correctly in assemblies or for functional prototypes where tolerances matter.
- Customizability: With robust editing tools, users can customize designs to meet specific project needs. This includes scaling, altering shapes, or combining multiple models into one, enabling the creation of unique items that cater specifically to user requirements.
- Error Correction: This software often includes tools for identifying and fixing errors in the 3D models, such as non-manifold edges or intersecting geometry. Correcting these issues before printing helps prevent failed prints and wasted material, saving both time and resources.
- Support Generation: Advanced editing software can generate support structures automatically, which are essential for printing complex geometries. This feature simplifies the preparation process and ensures that prints maintain structural integrity during the printing process.
- File Format Compatibility: The best 3D print editing software supports a variety of file formats, making it easier to import and export designs from different modeling programs. This flexibility allows users to work with the tools they prefer and collaborate effectively with others in the design process.
- Visualization Tools: Many 3D print editing applications offer visualization features that allow users to simulate the printing process and detect potential problems. These tools help users see how their models will interact with the printer’s capabilities, leading to better planning and execution.
- Community and Resources: Popular 3D print editing software often comes with a strong community and extensive resources, such as tutorials and forums. This support network can be invaluable for users looking to learn new techniques or troubleshoot issues they encounter during their projects.
How Can Beginners Effectively Start Using 3D Print Editing Software?
Beginners can effectively start using 3D print editing software by familiarizing themselves with user-friendly options, exploring tutorials, and gradually progressing their skills.
- Tinkercad: Tinkercad is a browser-based 3D design platform that is particularly suitable for beginners due to its intuitive interface and easy-to-use tools. It allows users to create and edit 3D models through a simple drag-and-drop method, making it accessible for those with no prior experience in design software.
- Fusion 360: Fusion 360 is a more advanced yet beginner-friendly software that combines CAD, CAM, and CAE in a single platform. It offers robust modeling features and a range of tutorials, which help beginners understand complex design concepts while providing tools for both 3D printing and engineering applications.
- Blender: Blender is a powerful open-source 3D creation suite that supports the entirety of the 3D pipeline, including modeling, rigging, animation, simulation, rendering, and more. While it has a steeper learning curve than Tinkercad, its vast community and extensive online resources make it a great option for beginners willing to invest time in learning more sophisticated techniques.
- Meshmixer: Meshmixer is designed specifically for 3D model editing and repair, making it an excellent choice for beginners focusing on preparing models for 3D printing. This software allows users to manipulate existing models, fix common issues, and even create supports for their prints, all while being approachable for those new to 3D design.
- FreeCAD: FreeCAD is an open-source parametric 3D CAD modeler that is suitable for both hobbyists and professionals. Its parametric modeling feature allows users to easily modify their designs, making it easier for beginners to understand design concepts while still providing advanced tools for more complex projects.
What Common Issues Do Users Encounter with 3D Print Editing Software?
Users often encounter several common issues when working with 3D print editing software, which can hinder their workflow and the quality of their prints.
-
User Interface Complexity: Many software programs have complicated user interfaces that can overwhelm beginners. Navigating through numerous features without adequate guidance can lead to frustration.
-
File Compatibility: Not all 3D print editing software supports every file format. Users often face difficulty when attempting to import or export files, leading to time-consuming conversions.
-
Limited Editing Tools: Some software lacks essential editing capabilities, making it challenging to modify designs effectively. Users may find themselves unable to make necessary adjustments or repairs to models.
-
Performance Issues: Bugs and crashes are prevalent in certain applications, especially when handling complex or large files. This leads to an unreliable experience, where users risk losing their progress.
-
Inadequate Support and Documentation: Insufficient tutorials or help resources leave users struggling to troubleshoot problems. A lack of active community support can further isolate those seeking assistance.
Addressing these issues often requires a careful selection of editing software based on user needs and experience level.
Related Post: