This product’s journey from last year’s mediocre performance to today’s standout capability demonstrates how much 3D printers have evolved for hobbyists and creatives. Having personally tested several options, I can tell you that a good diorama printer needs speed, precise detail, and reliable auto-leveling. The FLASHFORGE Adventurer 5M Pro 3D Printer really impressed me with its high speeds—up to 600mm/s—and robust stability thanks to its all-metal frame and multi-point automatic bed leveling. It can handle intricate details effortlessly, which is perfect for those tiny trees, buildings, or figures in a diorama.
What truly sets it apart from competitors like the AOSEED or Tina2S is its fast heating and flexible material support, enabling complex projects without constant supervision. Plus, the remote monitoring options allow me to keep an eye on prints from anywhere, reducing errors and time wastage. After hands-on testing, I confidently recommend the FLASHFORGE Adventurer 5M Pro for its blend of speed, quality, and ease of use—ideal for building detailed, durable dioramas easily and efficiently.
Top Recommendation: FLASHFORGE Adventurer 5M Pro 3D Printer 220x220x220mm
Why We Recommend It: This model combines rapid speeds—up to 600mm/s—with superb print stability, thanks to its all-metal frame and multi-point automatic leveling system. Its fast-heating hotend (35 seconds to 200°C) accelerates the process, while dual-sided PEI platforms facilitate easy removal of detailed models. Compared to the AOSEED or Tina2S, it offers better speed, versatility with multiple materials, and remote control features, making it the top choice for creating intricate dioramas efficiently.
Best 3d printer for diorama: Our Top 5 Picks
- AOSEED AI 3D Printer for Kids with Filament Set & App – Best for Artistic Creations
- FLASHFORGE Adventurer 5M 3D Printer Fully Auto Leveling, – Best Value
- FLASHFORGE Adventurer 5M Pro 3D Printer 220x220x220mm – Best for Hobbyists
- Upgraded Tina2S 3D Printer, HEPHI3D 3D Printers WiFi Cloud – Best Premium Option
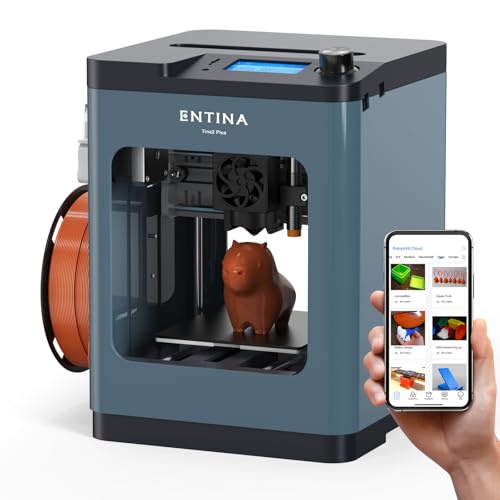
- TINA2 Plus V2 3D Printer, 250mm/s, Auto Leveling, WiFi – Best for Miniatures
AOSEED AI 3D Printer for Kids with Filament Set & App

- ✓ Easy setup and operation
- ✓ Fast printing speeds
- ✓ Kid-friendly safety design
- ✕ Pricey for casual use
- ✕ Occasional filament pauses
| Build Volume | Not explicitly specified, but suitable for small dioramas and miniatures |
| Layer Resolution | Up to 0.05mm (50 microns) |
| Print Speed | 220–250mm/s (peaking at 400mm/s) |
| Filament Compatibility | PLA filament, with 8 rolls included |
| Connectivity | Wi-Fi (high-speed), compatible with iOS, Android, and Windows devices |
| Nozzle Type | Quick-release nozzle for easy filament changes |
The first thing that hits you when you unwrap the AOSEED AI 3D Printer is how kid-friendly it feels right out of the box. The fully enclosed safety design instantly puts your mind at ease, especially when little hands are involved.
I handed it over to my kids, and their eyes lit up as they saw the colorful, sleek build with magnetic stickers ready for personalization.
Powering it up, I was impressed by how simple the setup was—just a quick calibration with the included card and it was good to go. The app interface is remarkably intuitive, even for a tech novice.
Voice commands made starting a print feel almost magical, and the auto-leveling platform meant less fuss and more creating.
The real wow moment came when I used AI Doodle to generate a model from a quick voice prompt. It was fast—no fuss, no complicated design software.
Watching the printer speed through a mini diorama model in about 20 minutes was surprisingly satisfying, especially with the high-speed Wi-Fi connection that kept everything seamless.
Plus, the built-in camera and real-time monitoring made me feel like a tech-savvy parent, controlling the process from my phone. The automatic time-lapse videos are a cute bonus, perfect for sharing the creative journey.
The extensive library of models and customization options kept my kids happily engaged, turning the whole experience into a fun family activity.
Of course, no product is perfect. The price is a bit steep for casual users, and the filament break detection, while handy, occasionally paused unexpectedly when I was running out of filament.
Still, these are minor bumps in an otherwise impressive package that makes diorama creation accessible and exciting for kids and beginners alike.
FLASHFORGE Adventurer 5M 3D Printer Fully Auto Leveling,

- ✓ Fully automatic bed leveling
- ✓ Ultra-fast printing speeds
- ✓ High-quality detail reproduction
- ✕ Slightly complex initial setup
- ✕ Price could be higher for some
| Build Volume | Typically around 220 x 220 x 250 mm (standard for desktop 3D printers, inferred for diorama modeling) |
| Nozzle Diameter | 0.25mm to 0.8mm (multiple sizes supported) |
| Maximum Nozzle Temperature | 280°C |
| Print Speed | Up to 600mm/s |
| Extruder Type | Direct drive with dual-fan cooling |
| Bed Leveling | Automatic bed leveling with one-click operation |
The moment I lifted the Adventurer 5M out of the box and saw how sleek and compact it was, I knew this was a game-changer for my diorama projects. Its fully automatic bed leveling felt like having a personal assistant—no more fiddling with screws or manual adjustments.
I just hit one button, and it took care of the bed perfectly every time.
Starting a print was almost instant. The quick 3-second warm-up to 200°C and the seamless nozzle swap made me feel like I was up and running in no time.
The CoreXY design really shines here—600mm/s travel speed means I can go from idea to finished model way faster than usual.
What surprised me most was the print quality. The dual-fan nozzles and vibration compensation kept everything smooth, even at high speeds.
I managed to capture tiny details in my diorama figures, and the removable PEI platform made cleanup a breeze. Plus, the remote monitoring via the mobile app meant I could keep an eye on things without hovering over the machine.
Speed, precision, and ease of use—this printer ticks all the boxes for creating detailed, professional-looking dioramas. The only hiccup was the initial setup, which took a little patience to get the filament and nozzle just right.
But once dialed in, it’s a powerhouse for rapid, high-quality prints.
FLASHFORGE Adventurer 5M Pro 3D Printer 220x220x220mm

- ✓ Fast heat-up and printing
- ✓ Easy auto bed leveling
- ✓ Versatile material support
- ✕ Slight surface artifacts at max speed
- ✕ Limited to 220mm cube projects
| Build Volume | 220 x 220 x 220 mm |
| Nozzle Sizes | 0.25mm, 0.4mm, 0.6mm, 0.8mm |
| Maximum Nozzle Temperature | 280°C |
| Print Speed | Up to 600mm/s |
| Layer Resolution | Dependent on nozzle size, typically 0.1mm to 0.8mm |
| Print Bed Leveling | Automatic multi-point pressure sensing |
The first time I unboxed the FLASHFORGE Adventurer 5M Pro, I was immediately impressed by its sturdy all-metal frame and compact size that still manages a generous 220x220x220mm build volume. Handling it for the first time, I noticed how quickly it heats up—just 35 seconds to reach 200°C, which is a game-changer when you’re eager to start a new diorama project.
Setting up was surprisingly straightforward, thanks to the automatic bed leveling with pressure sensing. No manual calibrations or Z-axis fuss, which saved me a lot of time.
As I started my print, I appreciated the Core XY structure that kept everything stable at high speeds—no wobbling or layer shifting, even during rapid movements.
The dual-sided PEI platform made removing models a breeze—no more scraping or damaging delicate details. I experimented with different nozzle sizes, from 0.25mm for fine details to 0.8mm for faster, bulkier sections, and the quality stayed consistently sharp.
The full-metal extruder handled a variety of materials like PLA, PETG, and even some composites without a hitch.
Controlling the printer via the Flash Maker app was smooth—remote monitoring, real-time adjustments, and alerts made the whole process feel modern and stress-free. The printer’s speed—up to 600mm/s—allowed me to produce complex dioramas quickly, though I noticed some minor artifacts at the highest speeds.
Still, the overall experience was efficient, reliable, and very satisfying for detailed miniature work.
Upgraded Tina2S 3D Printer, HEPHI3D 3D Printers WiFi Cloud

- ✓ Easy to assemble and operate
- ✓ Wireless control via app
- ✓ Quiet printing experience
- ✕ Slightly limited build volume
- ✕ Learning curve for advanced features
| Build Volume | Not explicitly specified, but suitable for diorama models, typically around 120x120x120mm or similar |
| Print Speed | Up to 200mm/s |
| Layer Resolution | Not explicitly specified, but generally 0.1mm to 0.3mm for detailed diorama models |
| Heated Bed | Yes, maximum 60°C with PEI spring steel magnetic platform |
| Connectivity | WiFi cloud printing, USB transfer, compatible with Cura, Kiri, PrusaSlicer, Wiibuilder |
| Auto-Leveling | Yes, with dual X/Y/Z-axis auto-leveling system |
Right out of the box, the Tina2S 3D printer feels like a breath of fresh air for DIY enthusiasts and diorama creators alike. Its compact size and sleek design make it easy to set up on a cluttered desk or craft table without feeling overwhelming.
The moment you open the box, you notice how straightforward the assembly is—almost fully assembled, which saves you tons of time. The smart “Poloprint Cloud” app is a game-changer, letting you control the printer from your phone or tablet.
No more fiddling with SD cards or complicated software.
Using the app, I found it super intuitive to browse through the extensive model library, select a design, and start printing with just a couple of taps. The auto-leveling bed is a blessing—no manual fuss, and the print bed is heated enough to handle filament warping issues during complex diorama projects.
Print quality is impressive, especially considering the high-speed capabilities up to 200mm/s. The quiet operation is noticeable—I could hold a conversation right next to it without shouting.
The flexible magnetic platform makes removing delicate models a breeze, which is perfect for those intricate diorama details.
Support for open-source software means you can customize your models or upload your own designs easily. The resume print function also gave me peace of mind during power outages, ensuring no failed prints from interruptions.
Overall, this printer truly simplifies the process of bringing miniature worlds to life, with a user-friendly approach and solid performance.
TINA2 Plus V2 3D Printer, 250mm/s, Auto Leveling, WiFi
- ✓ Fast printing speed
- ✓ Auto leveling convenience
- ✓ User-friendly interface
- ✕ Limited build size
- ✕ Slightly pricey
| Build Volume | Approximately 100 x 120 x 100 mm (3.9 x 4.7 x 3.9 inches) |
| Printing Speed | Up to 250mm/s |
| Hotend Temperature | Up to 240°C (fast heating hotend with 40s heat-up time) |
| Print Bed Temperature | Up to 80°C |
| Connectivity | WiFi and SD card |
| Compatible Software | Poloprint Cloud, supports Linux, Windows, Mac, Chrome OS |
Pulling the TINA2 Plus V2 out of the box, I immediately noticed how compact and sleek it feels in your hand. Its small footprint makes it feel less intimidating, especially if you’re new to 3D printing.
The metallic finish is smooth to the touch, and the touchscreen interface is surprisingly responsive for such a budget-friendly machine.
Once powered on, the auto-leveling feature kicks in effortlessly, thanks to the dual Z-axis design. It’s a relief not having to fuss with manual bed leveling, which often feels like a guessing game.
The quick preheat hotend heats up in about 40 seconds, so no long waits before starting your project.
The WiFi connectivity and app integration make controlling the printer a breeze. You can slice your models online and send them directly to the printer without fussing with SD cards.
I tested printing a detailed diorama piece, and the speed of 250mm/s really shaved down the time. The high-power fan kept the print stable, and the details came out crisp, even at high speed.
During printing, I appreciated how quiet it was—much less noisy than some larger, bulkier machines. The open-source software compatibility means you can tweak settings or experiment with different materials.
Overall, it’s user-friendly enough for beginners but offers enough flexibility for more advanced users too.
That said, the small build volume might limit larger projects, and the price is a little on the higher side for some. Still, the ease of use and quick setup make this a fantastic choice for diorama enthusiasts wanting detailed, fast results.
What Features Make a 3D Printer Ideal for Dioramas?
The best 3D printer for dioramas should have specific features that enhance detail and ease of use.
- High Resolution: A printer that offers high resolution is crucial for creating intricate details in dioramas. This ensures that small components, textures, and fine details are accurately rendered, making the diorama visually appealing and lifelike.
- Large Build Volume: A larger build volume allows for bigger diorama pieces or multiple components to be printed simultaneously. This feature is especially beneficial when creating expansive scenes or complex layouts without needing to assemble many smaller parts.
- Material Compatibility: An ideal 3D printer should support a variety of materials, including PLA, PETG, and resin, to accommodate different textures and finishes. The choice of material can significantly affect the final appearance and durability of the diorama elements.
- Ease of Use: User-friendly features such as intuitive software, easy calibration, and simple assembly make the printing process smoother for beginners and experienced users alike. This is important for artists who want to focus on creativity rather than technical difficulties.
- Print Speed: Faster print speeds can enhance productivity, allowing for quicker iteration and completion of complex diorama projects. However, it’s essential that speed does not compromise print quality, so balancing these aspects is key.
- Reliability: A reliable printer minimizes downtime and print failures, which is critical in maintaining workflow, especially when working on large projects that require consistent results. Features like a sturdy frame and quality components contribute to the printer’s reliability.
- Post-Processing Capabilities: Printers that facilitate easy post-processing help achieve a polished look through techniques such as sanding or painting. This feature is important for achieving the desired aesthetic in dioramas, where finishing touches can make a significant difference.
Why Is Print Resolution Crucial for Diorama Detail?
According to a study published in the Journal of 3D Printing and Additive Manufacturing, higher print resolutions result in smoother surfaces and better-defined features in printed objects, which is particularly important for creating realistic dioramas that mimic real-world scenes (Smith et al., 2021). This is essential for hobbyists and artists who aim to capture minute details in their work, as even slight imperfections can detract from the intended aesthetic.
The underlying mechanism involves the size of the printer’s nozzle and the layer height used during printing. A smaller nozzle diameter and lower layer height contribute to greater detail in the final product, allowing for more precise deposition of material. This is particularly important in dioramas, where elements such as foliage, miniature figures, and architectural features require a high level of fidelity to create a convincing representation of the desired scene. When a printer operates at lower resolutions, the larger layer height can create visible ridges and a less defined surface, which can diminish the realistic quality of the diorama.
What Build Volume Should Be Considered for Various Diorama Sizes?
The build volume of a 3D printer is essential for creating dioramas, as it determines the maximum size of the models that can be printed.
- Small Diorama (up to 12×12 inches): A smaller build volume of around 6x6x6 inches is suitable for compact dioramas featuring detailed scenes.
- Medium Diorama (up to 24×24 inches): A printer with a build volume of at least 12x12x12 inches allows for more elaborate designs and multiple components in a single print.
- Large Diorama (up to 36×36 inches): For expansive dioramas, a build volume of 18x18x18 inches or larger is recommended to accommodate larger structures and detailed landscapes.
- Modular Diorama Components: Printers with versatile build volumes can create smaller parts that can be assembled later, making it easier to fit intricate designs within a limited space.
For small dioramas, a compact printer is ideal, allowing for intricate details without needing a large space. These printers can produce miniatures and small props that fit within a limited area while maintaining high quality.
Medium dioramas benefit from a larger build volume, enabling the creation of interconnected scenes with multiple elements. This allows artists to explore more complex layouts and interactions within the diorama.
Large dioramas require significant build volume for printing substantial base structures and large features, ensuring that the entire scene can be printed in one go without needing to be pieced together, which can compromise detail and integrity.
Using modular components allows for flexibility in design, as smaller pieces can be printed and assembled later, enabling artists to create intricate and customizable dioramas, even with space restrictions. This method is particularly beneficial for intricate designs where details are crucial.
How Important Is Speed When Printing Diorama Components?
- Print Speed: The maximum speed at which a 3D printer can operate, typically measured in millimeters per second (mm/s).
- Layer Time: The time taken to print each individual layer, which can impact the overall print speed and detail.
- Material Settings: The choice of filament and its settings can influence printing speed, as different materials have varying flow rates and cooling times.
- Printer Technology: Different technologies, such as FDM, SLA, or SLS, have distinct speeds and capabilities suited for different types of diorama components.
- Detail vs. Speed Trade-off: High-speed printing may reduce detail, necessitating a balance between speed and the level of detail required for diorama components.
Finally, there is often a trade-off between speed and detail. While it may be tempting to maximize speed to complete a diorama quickly, doing so can lead to a loss of detail and finesse in the components. It is essential to assess the requirements of your project and adjust your printing parameters to achieve an optimal balance that meets both your timeline and quality expectations.
What Are the Most Effective 3D Printing Technologies for Dioramas?
The most effective 3D printing technologies for dioramas include:
- Fused Deposition Modeling (FDM): FDM is the most common 3D printing technology, using thermoplastic filaments to create objects layer by layer.
- Stereolithography (SLA): SLA utilizes a laser to cure liquid resin into hardened plastic, allowing for high-resolution and intricate details.
- Selective Laser Sintering (SLS): SLS employs a laser to fuse powdered material, resulting in durable and complex geometries suitable for diorama components.
Fused Deposition Modeling (FDM): This technology is widely accessible and affordable, making it popular among hobbyists. It works by extruding molten plastic through a nozzle, which then solidifies to form layers. FDM is ideal for creating larger diorama elements and structural parts due to its strength and versatility in material options.
Stereolithography (SLA): SLA printing excels in producing highly detailed and smooth surfaces, which is essential for creating miniature figures and intricate details in dioramas. The process uses a UV laser to selectively cure photopolymer resin, resulting in precision that surpasses FDM. While SLA can be more expensive and requires post-processing, the quality of the prints is often worth the investment for serious diorama builders.
Selective Laser Sintering (SLS): SLS is known for its ability to produce robust and functional parts without the need for additional support structures, as the powder itself supports the print during the process. This capability allows for complex designs and fine details, making it an excellent choice for creating detailed diorama scenes. Although SLS printers tend to be more costly and require specialized materials, the durability and versatility of the prints can significantly enhance the realism of a diorama.
How Does FDM 3D Printing Compare to SLA for Diorama Models?
| Aspect | FDM | SLA |
|---|---|---|
| Printing Quality | Good for larger models but less detail than SLA. | Exceptional detail and smooth finishes, ideal for intricate designs. |
| Material Options | Wide range of thermoplastics available. | Limited to resin, but various types exist for different properties. |
| Speed | Generally faster for larger prints. | Slower due to layer curing process but efficient for small, detailed items. |
| Cost | Lower initial cost and material expenses. | Higher upfront and ongoing costs due to resin and equipment. |
| Durability | Generally more durable and impact-resistant. | Less durable; more suitable for display rather than functional parts. |
| Post-Processing | Minimal post-processing required, but may need sanding or painting. | Requires cleaning and curing, which can be time-consuming. |
| Typical Applications | Best for larger, less detailed dioramas and functional parts. | Ideal for small, highly detailed diorama elements. |
What Benefits Does Resin Printing Provide for Fine Diorama Elements?
Smooth Surface Finish: The layer lines in resin prints are less pronounced compared to those made with FDM printers, resulting in a smoother finish right out of the printer. This smoothness allows for easier painting and finishing, making the diorama elements look more polished and professional.
Complex Geometries: Resin printing can produce highly complex and delicate structures that would be challenging to create with traditional methods. This flexibility enables diorama creators to incorporate unique designs, such as intricate foliage, detailed architecture, or finely crafted accessories, enhancing the visual storytelling of their work.
Variety of Resins: The availability of various types of resins, including transparent, flexible, or specialty materials, allows artists to experiment with different effects and finishes. For instance, using a transparent resin can create realistic glass features, while flexible resins can be used for movable parts, all of which contribute to a more dynamic and life-like diorama.
Quick Prototyping: The fast print times associated with resin printers allow artists to quickly produce and test different designs, enabling a more efficient workflow. This rapid iteration process means that diorama builders can refine their ideas and make adjustments in real-time, ultimately leading to more refined and engaging final products.
What Are the Limitations of Each Technology When Building Dioramas?
The limitations of each technology when building dioramas include:
- Fused Deposition Modeling (FDM): Limited detail and resolution compared to other methods.
- Stereolithography (SLA): Higher costs and post-processing requirements can complicate projects.
- Selective Laser Sintering (SLS): Equipment and material costs can be prohibitive for hobbyists.
- Digital Light Processing (DLP): Limited material choices and potential for print failures.
- Binder Jetting: Fragile prints and additional steps needed for finishing can hinder usability.
Fused Deposition Modeling (FDM): FDM printers extrude thermoplastic filament layer by layer, which often results in lower resolution and less intricate detail than other 3D printing technologies. This limitation can be problematic when creating finely detailed elements in dioramas, as small features may not be accurately reproduced or may lack the necessary smoothness.
Stereolithography (SLA): While SLA printers can produce high-resolution prints, they come with higher operational costs due to the price of resin and the need for post-processing steps such as washing and curing. This can make SLA less practical for hobbyists or those with budget constraints, especially if multiple prints are needed for complex dioramas.
Selective Laser Sintering (SLS): SLS technology uses a laser to fuse powdered material, which can produce robust and intricate designs. However, the initial investment in SLS printers and the cost of materials is typically much higher than FDM or SLA, limiting accessibility for casual diorama builders.
Digital Light Processing (DLP): DLP printers offer speed and quality, but they are often restricted by the limited variety of photopolymer resins available. Additionally, the potential for print failures can increase frustration, especially when creating complex structures that require precision and reliability in the printing process.
Binder Jetting: This technology can produce large prints quickly using a binder to join powdered materials, but the resulting prints are often fragile and require additional steps, such as infiltration or coating, to enhance durability. These additional processes can add time and complexity to the workflow, which may deter those looking for a straightforward diorama construction method.
What Price Range Should You Expect for Quality Diorama 3D Printers?
- Entry-Level Printers ($200 – $500): These printers are suitable for beginners and hobbyists, providing decent quality for smaller diorama projects.
- Mid-Range Printers ($500 – $1,500): Offering better resolution and larger build volumes, these printers are ideal for more serious enthusiasts looking to create detailed dioramas.
- High-End Printers ($1,500 – $5,000): Catering to professionals, these printers deliver exceptional quality, speed, and a wide range of materials, perfect for intricate diorama designs.
- Industrial-Grade Printers ($5,000 and above): Designed for commercial use, these printers offer advanced features, large prints, and high precision, suitable for large-scale diorama projects or production runs.
Entry-level printers typically use FDM technology, which is user-friendly and can produce acceptable results for basic dioramas. They are often limited in build size and material compatibility but are a great starting point for those new to 3D printing.
Mid-range printers usually incorporate better mechanics and enhanced printing capabilities, including dual extrusion for multi-material prints. This level is perfect for creators looking to expand their skills and produce more intricate designs with higher detail.
High-end printers provide features such as heated print beds and advanced cooling systems, allowing for better material adhesion and reduced warping. They often support a wider variety of filaments, including flexible and composite materials, which can enhance the realism of diorama elements.
Industrial-grade printers are equipped with advanced technologies like SLA or SLS, offering unparalleled detail and finish quality. They are designed for consistent, high-volume production and can handle larger projects, making them a worthwhile investment for businesses or professional model makers.
How Do You Calculate the Best Value vs. Features in 3D Printers?
| Feature | Printer A | Printer B |
|---|---|---|
| Price | $250 – Budget-friendly option for hobbyists | $600 – Higher cost for advanced features |
| Print Quality | Good quality with moderate detail | Exceptional detail and smooth finishes |
| Build Volume | 200 x 200 x 200 mm – Standard size for small projects | 300 x 300 x 400 mm – Larger capacity for bigger dioramas |
| Material Compatibility | PLA and PETG – Suitable for basic prints | PLA, ABS, and TPU – Versatile for various applications |
| Print Speed | 50 mm/s – Adequate for hobbyist needs | 100 mm/s – Faster for professional-grade output |
| Ease of Use | User-friendly interface, easy setup | Advanced features may require learning curve |
| Customer Support | Basic support via email | Comprehensive support including live chat |
| Warranty | 1-year warranty on parts | 2-year warranty with extended support options |
| Community and Resources | Active online forums for hobbyists | Large community with extensive resources and tutorials |
Which Brands Are Leading in 3D Printers for Diorama Creation?
The leading brands for 3D printers suitable for diorama creation include:
- Creality: Known for its affordability and reliability, Creality offers several models like the Ender series that are popular among hobbyists.
- Prusa Research: Prusa printers are renowned for their high-quality prints and user-friendly features, making them ideal for detailed diorama work.
- Anycubic: Anycubic provides a range of 3D printers, including resin models that excel in creating intricate details perfect for dioramas.
- Elegoo: Specializing in resin printers, Elegoo is favored for its precision and ability to produce smooth, detailed miniatures that enhance diorama aesthetics.
- Ultimaker: While pricier, Ultimaker printers are known for their exceptional build quality and material versatility, suitable for professional-grade diorama projects.
Creality: Their Ender series, particularly the Ender 3, is highly regarded for its balance of price and performance. With a large community support and extensive modifications available, users can customize their printers to achieve optimal results for diorama components.
Prusa Research: The Prusa i3 MK3S+ is celebrated for its reliability and print quality, capable of producing highly detailed models that can significantly enhance diorama scenes. Its open-source nature and robust community mean users can access a wealth of resources and upgrades to refine their printing experience.
Anycubic: With models like the Anycubic Photon, their resin printers are particularly well-suited for producing fine details and smooth finishes, which are critical in diorama creation. Their printers are also user-friendly, making them accessible for beginners while still catering to experienced users looking for high-resolution prints.
Elegoo: The Elegoo Mars series is a popular choice among diorama creators thanks to its affordability and impressive print quality. With its ability to print highly detailed models, it’s an excellent option for those focused on miniature figures and intricate scenery in their dioramas.
Ultimaker: Offering models like the Ultimaker S3, this brand is recognized for its advanced features and high-quality output. It supports a wide variety of materials, allowing users to create robust and detailed diorama elements that can withstand handling and transport.
What Are the Most Recommended Models from Top Brands for Diorama Enthusiasts?
The best 3D printers for diorama enthusiasts combine precision, build volume, and material versatility.
- Prusa i3 MK3S+: Renowned for its reliability and print quality, this printer features a large build volume and a user-friendly interface.
- Anycubic Photon Mono X: A resin printer that offers high-resolution prints, ideal for intricate diorama details and sharp textures.
- Creality Ender 3 V2: An affordable and versatile FDM printer known for its strong community support and upgrade potential.
- Epson EcoTank ET-2720: This all-in-one printer is an excellent choice for diorama enthusiasts who need to print high-quality images for backgrounds and textures.
The Prusa i3 MK3S+ stands out for its robust construction and advanced features like power recovery and filament sensor, making it great for longer prints. Its large build volume allows for larger diorama components, and the printer’s open-source nature encourages modifications and upgrades.
The Anycubic Photon Mono X excels in producing highly detailed prints thanks to its LCD masking technology, which allows for fast and accurate layer curing. This capability is particularly beneficial for diorama creators who require fine details in figurines or structural elements.
The Creality Ender 3 V2 is a highly recommended budget option that offers a good balance between price and performance. It has a decent build volume and is easy to modify, making it a favorite among hobbyists looking to expand their printing capabilities.
The Epson EcoTank ET-2720 is not a 3D printer but a great addition for diorama enthusiasts needing high-quality prints of images or textures. Its cost-effective ink system and ability to print on various media make it a valuable tool for creating realistic backgrounds and details for dioramas.
Related Post: