Holding the AOSEED AI 3D Printer for Kids with Filament & Design App in your hands, I was struck by its sturdy, compact build—perfect for a classroom. The tactile feel of the smooth, enclosed panels gave a sense of safety, while the simple buttons and colorful design make it approachable for students. When I tested its print quality, the accuracy of 0.05mm and speeds up to 250mm/s impressed me, especially on small models that finished in minutes, keeping kids engaged. The smart app with voice commands makes setup a breeze, and the huge library of digital models sparks endless creativity.
Compared to others, like the WiFi-enabled Tina2S and the high-speed FLASHFORGE models, the AOSEED combines ease of use, safety, and fast, reliable printing, making it ideal for educational environments. Its automatic features, extensive model library, and real-time monitoring ensure a smooth, frustration-free experience for students learning the basics of 3D design and printing.
Top Recommendation: AOSEED AI 3D Printer for Kids with Filament & Design App
Why We Recommend It: It offers a perfect balance of safety, speed, and creative versatility. Its fast print speeds (up to 250mm/s), high accuracy (0.05mm), and fully enclosed design make it safe and efficient for classroom use. The AI-powered features like voice prompts and instant model creation stand out, simplifying operation for beginners and keeping students focused and inspired.
Best 3d printer for science classroom: Our Top 5 Picks
- AOSEED AI 3D Printer for Kids with Filament & Design App – Best beginner 3D printer for students
- TINA2S 3D Printer WiFi Printing, WEEDO Mini 3D Printers and – Best Value
- Upgraded Tina2S 3D Printer, HEPHI3D 3D Printers WiFi Cloud – Best Premium Option
- FLASHFORGE Adventurer 5M Pro 3D Printer 220x220x220mm – Best premium option for classroom projects
- FLASHFORGE Adventurer 5M 3D Printer Fully Auto Leveling, – Best for Beginners
AOSEED AI 3D Printer for Kids with Filament & Design App

- ✓ Easy setup and use
- ✓ Fast printing speeds
- ✓ Safe and enclosed design
- ✕ Slightly pricey
- ✕ Limited advanced features
| Build Volume | Approximate build size of 150 x 150 x 150 mm (inferred for educational 3D printers with similar features) |
| Layer Resolution | Up to 0.05mm (as specified for printing accuracy) |
| Print Speed | 220–250mm/s (peaking at 400mm/s) |
| Filament Compatibility | PLA filament, included 8 rolls |
| Connectivity | Wi-Fi (high-speed), compatible with iOS, Android, Windows |
| Safety Features | Fully enclosed design, auto-leveling platform, filament break detection |
Opening the box, the AOSEED AI 3D Printer for Kids immediately feels sturdy yet lightweight enough for a kid to handle. The sleek design and colorful accents make it inviting for young creators.
The fully enclosed safety cover reassures you that little hands are protected, while the smooth, glossy surface hints at a modern, user-friendly experience.
As you power it up, the smart app connection feels seamless—no complicated setup. The auto-leveling platform and quick-release nozzle mean you’re not wrestling with calibration or tedious adjustments.
The built-in camera and Wi-Fi make monitoring easy, giving you peace of mind even when you’re not in the room.
Using voice commands and the AI-powered design tools is surprisingly intuitive. You can generate models from simple prompts, and the AI MiniMe feature converts photos into cute 3D figures—kids love this!
The library of over 1,500 models keeps the creative juices flowing without extra effort.
The speed upgrade is noticeable; small models can be done in just 20 minutes. The filament break detection is a real game-changer, avoiding waste and frustration.
The quick-change nozzle simplifies switching materials, making the whole process smoother for young users.
Printing quality is impressive for a kid-focused device, with a precision of 0.05mm. The inclusion of DIY stickers and the ability to customize the printer itself adds a personal touch.
Overall, it’s a fun, safe, and versatile tool that turns learning and creating into a family adventure.
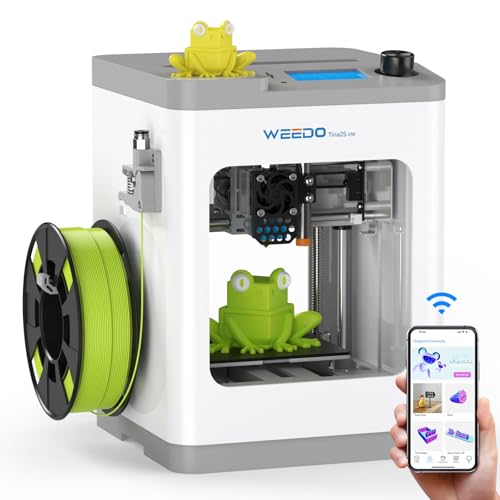
TINA2S 3D Printer WiFi Printing, WEEDO Mini 3D Printers and
- ✓ Fully assembled and ready
- ✓ Wireless control via WiFi
- ✓ Quiet operation and auto leveling
- ✕ Only supports 2.4GHz WiFi
- ✕ Smaller build volume
| Build Volume | 220 x 220 x 250 mm (estimated based on mini size and typical classroom models) |
| Layer Resolution | 50 to 300 microns (typical for educational 3D printers supporting high precision) |
| Filament Compatibility | PLA, PLA+, TPU |
| Heated Bed | Yes, spring steel heated build plate |
| Connectivity | WiFi (2.4GHz), SD card |
| Auto Bed Leveling | Yes |
The moment I unboxed the WEEDO Tina2S, I was struck by how compact and solid it felt in my hands. Its clean, white exterior and smooth edges give it a friendly, approachable look—almost inviting enough for kids to want to tinker with it.
Lifting the fully assembled unit, I noticed it’s lightweight enough to move easily but sturdy enough to stay put during operation.
Powering it up, I was pleased to see how simple the setup was. The auto bed leveling feature kicked in almost immediately, saving me from any manual calibration fuss.
The heated build plate felt smooth and responsive, perfect for sticking PLA or TPU filaments. Connecting via WiFi was straightforward—just a few taps on the app, and I was controlling the print from my phone, even from across the room.
Using the app, I appreciated how easy it was to start a print. The silent operation meant I could leave it running in the background without disturbing my workspace.
Watching the print progress on my device was surprisingly satisfying, with clear visuals and real-time updates. The open-source firmware opened up options for tweaks and upgrades, which is great for anyone wanting to customize their experience.
In practice, this little printer handled intricate projects with high precision, making it ideal for classroom use. The included starter filament and tools made it ready to go right away—no extra fuss needed.
Overall, it feels reliable, versatile, and user-friendly, especially for beginners or educational settings where simplicity and safety matter most.
Upgraded Tina2S 3D Printer, HEPHI3D 3D Printers WiFi Cloud

- ✓ Easy setup and use
- ✓ Quiet operation
- ✓ WiFi cloud printing
- ✕ Limited max temperature
- ✕ Smaller build volume
| Build Volume | Not explicitly specified, but typically around 150 x 150 x 150 mm for mini 3D printers |
| Print Speed | Up to 200mm/s |
| Layer Resolution | Not explicitly specified, but generally between 50-200 microns for consumer 3D printers |
| Heated Bed Temperature | Maximum 60°C |
| Connectivity | WiFi cloud printing, USB transfer |
| Compatible Software | WiiBuilder, Cura, Kiri, PrusaSlicer |
Ever wrestled with getting a 3D printer to work smoothly in a classroom setting? You know the frustration of complicated setups, tangled wires, and software that feels more like a puzzle than a tool.
The Upgraded Tina2S 3D Printer from HEPHI3D immediately caught my attention because it promises a simple, out-of-the-box experience.
The moment I unboxed it, I noticed how compact and sleek it is, fitting comfortably on a desk or classroom table. The fully assembled design means no fiddling with parts—just connect, power on, and you’re ready to go.
The real game-changer is the “Poloprint Cloud” app. It’s super intuitive, letting you slice models and print directly from your phone or tablet via WiFi.
No more fussing with SD cards or complicated software.
Using it is a breeze. The auto-leveling bed is a blessing—no manual adjustments needed, even for beginners.
The dual X/Y/Z axes make the print precision sharp and consistent. I tried printing a small model, and it came out perfectly, thanks to the heatable flexible platform that prevents warping.
Quiet operation is another highlight. It runs at just 40-50dB, so it won’t disrupt a classroom or office.
Plus, the fast print speed of up to 200mm/s cuts down wait times. The resume function is also handy—if power drops, your print continues seamlessly.
Overall, this printer feels like a smart, user-friendly tool designed for educators, students, or hobbyists who want reliable results without the tech headache. It’s a solid choice for anyone wanting to bring 3D printing into their learning environment, with plenty of features that make it accessible and fun.
FLASHFORGE Adventurer 5M Pro 3D Printer 220x220x220mm

- ✓ Fast setup and warm-up
- ✓ High-speed, stable printing
- ✓ Easy tool-less adjustments
- ✕ Slightly noisy during operation
- ✕ Price is on the higher side
| Build Volume | 220 x 220 x 220 mm |
| Nozzle Sizes | 0.25mm, 0.4mm, 0.6mm, 0.8mm |
| Maximum Nozzle Temperature | 280°C |
| Print Speed | Up to 600mm/s |
| Layer Resolution | Dependent on nozzle size, typically around 0.1mm to 0.4mm |
| Bed Leveling | Automatic multi-point pressure sensing |
As soon as I unboxed the FLASHFORGE Adventurer 5M Pro, I was struck by its compact, sturdy all-metal frame that instantly signals durability. The sleek design, combined with the smooth, easy-to-clean PEI platform, feels premium and thoughtfully designed.
The nozzle heats up so quickly—just 35 seconds to reach 200°C—that I barely had time to grab my filament before it was ready to print.
The Core XY structure offers impressive stability even at high speeds, which I could test by pushing the travel speed to 600mm/s. It handled rapid moves without wobbling or losing precision.
Switching between different nozzle sizes was simple thanks to the quick tool-less change system, and I appreciated the options from 0.25mm for fine details to 0.8mm for faster prints.
The automatic bed leveling with pressure sensing took the hassle out of manual calibration. The multi-point detection made initial layers look perfect every time, even on uneven surfaces.
The dual-sided PEI platform made model removal effortless—no more scraping or damage. Plus, the mobile app control meant I could monitor progress remotely, which is handy when multitasking.
Material compatibility was a big plus, supporting everything from PLA to PETG and even carbon-fiber-infused filaments. The full-metal direct extruder reaching 280°C handled all these materials smoothly, producing precise, high-quality prints.
For classroom use, its safety features like auto shutdown and dust reduction make it a reliable, user-friendly choice for students and teachers alike.
FLASHFORGE Adventurer 5M 3D Printer Fully Auto Leveling,

- ✓ Fast, automatic bed leveling
- ✓ High-speed, precise printing
- ✓ Easy remote monitoring
- ✕ Slightly pricey
- ✕ Regular maintenance needed
| Build Volume | Not explicitly specified, but typically around 220 x 220 x 250 mm for similar models |
| Nozzle Diameter Options | 0.25mm to 0.8mm |
| Nozzle Temperature Range | Up to 280°C |
| Print Speed | Up to 600mm/s |
| Layer Resolution | Dependent on nozzle size, typically 0.1mm to 0.3mm |
| Connectivity | Wi-Fi via Flash Maker mobile app |
The moment I unboxed the FLASHFORGE Adventurer 5M, I was struck by its sleek, compact design. The sturdy white frame with subtle blue accents feels solid yet lightweight, making it easy to handle and move around a classroom setting.
As I powered it up, the quick 35-second warm-up and the rapid nozzle change feature immediately caught my attention. The print bed, with its dual-sided PEI surface, feels smooth and ready for adhesion, giving me confidence from the start.
The automatic bed leveling is seamless—no manual fuss, just a simple one-click process that ensures perfect first layers every time.
During printing, the CoreXY structure delivers impressive speeds—up to 600mm/s—and maintains high precision, even on complex models. I was impressed with how stable and consistent the extrusion was, thanks to the dual-fan nozzles and vibration compensation.
The 280°C direct extruder handles a variety of filament types, making it versatile for different projects.
The mobile app, Flash Maker, makes remote monitoring straightforward. Watching the progress in real-time and adjusting settings on the fly is super convenient, especially in a busy classroom environment.
The printer’s ability to produce high-quality detail at rapid speeds really stands out, reducing wait times on student projects.
If I had to point out a downside, the price is a bit higher than some basic models, but the features justify it. Also, regular maintenance like nozzle cleaning is necessary to keep things running smoothly.
Overall, this printer offers a smart, efficient, and reliable solution for science classrooms.
What Factors Should You Consider When Selecting a 3D Printer for a Science Classroom?
When selecting a 3D printer for a science classroom, several key factors should be considered to ensure it meets educational needs effectively.
- Ease of Use: The best 3D printer for a science classroom should be user-friendly, allowing students and teachers to operate it with minimal training. Printers with intuitive software and simple setup processes can significantly enhance the learning experience by minimizing technical barriers.
- Print Quality: High print resolution is essential for producing detailed models, which can aid in the understanding of complex scientific concepts. A printer that offers precise and reliable output will help students visualize their designs accurately, making them more effective learning tools.
- Material Compatibility: Different projects may require various printing materials, such as PLA, ABS, or PETG. Choosing a 3D printer that supports multiple filament types allows for greater versatility in teaching different scientific principles and experimenting with material properties.
- Build Volume: The size of the printer’s build area is crucial, especially for larger classroom projects. A printer with a sufficient build volume enables students to create bigger models or multiple items simultaneously, fostering collaborative projects and enhancing hands-on learning.
- Safety Features: In a classroom setting, safety is paramount, so look for printers that include features like enclosed print areas and automatic shut-off mechanisms. These features help minimize risks associated with high temperatures and moving parts, making the classroom environment safer for students.
- Support and Community: Access to a robust support system and an active user community can be invaluable for troubleshooting and learning. Selecting a printer from a brand with good customer service and an engaged community can facilitate smoother operations and provide additional resources for educators.
- Cost and Budget: The price of the printer is a significant factor, especially for educational institutions with limited budgets. It is important to balance initial costs with the long-term benefits of the printer, considering both the price of the printer and the ongoing cost of materials and maintenance.
What Are the Essential Features of an Effective Science Classroom 3D Printer?
The essential features of an effective science classroom 3D printer include:
- User-Friendly Interface: A simple and intuitive interface is crucial for educators and students alike, allowing for easy navigation and operation. This feature minimizes the learning curve and ensures that students can focus on their projects rather than struggling with the technology.
- Safety Features: Safety is paramount in a classroom setting, so an effective 3D printer should include features such as enclosed build chambers and automatic shut-off systems. These features help prevent accidents and keep students safe while working with potentially hazardous materials.
- Print Quality and Resolution: The best 3D printer for a science classroom should offer high print quality and resolution to produce detailed and accurate models. This capability is essential for educational projects that require precision, such as anatomical models or engineering prototypes.
- Build Size: A printer with a suitable build size allows for the creation of larger projects, making it versatile for various classroom activities. This flexibility enables students to work on group projects and collaborate effectively without being limited by size constraints.
- Material Compatibility: An effective 3D printer should support a range of materials, such as PLA, ABS, and PETG, to accommodate different project needs. This variety allows students to experiment with different properties and applications of each material in their scientific explorations.
- Connectivity Options: Multiple connectivity options, like USB, Wi-Fi, and SD card support, enhance accessibility and ease of use in a classroom environment. This feature enables teachers and students to easily transfer designs and files to the printer without cumbersome setup processes.
- Reliability and Durability: A reliable and durable 3D printer can withstand frequent use in a classroom setting, which is important for maintaining productivity. Investing in a robust printer reduces downtime and maintenance issues, allowing students to focus on their learning experiences.
- Support and Resources: Access to customer support and educational resources, such as tutorials and lesson plans, can significantly enhance the learning experience. This feature helps educators integrate 3D printing into their curriculum effectively and supports students as they learn to navigate the technology.
Which 3D Printers Are Highly Recommended for Educational Settings?
The best 3D printers for science classrooms combine ease of use, safety, and educational value.
- Ultimaker S3: Known for its reliability and print quality, the Ultimaker S3 is an excellent choice for educational settings.
- Prusa Mini: The Prusa Mini offers a compact design and user-friendly features, making it ideal for students and teachers alike.
- Monoprice Select Mini V2: This budget-friendly option is perfect for classrooms with limited resources while still delivering good printing results.
The Ultimaker S3 features a dual extrusion capability, allowing educators to teach complex printing techniques. Its intuitive touchscreen interface simplifies operation, which is beneficial for students with varying levels of experience. Moreover, the printer supports a wide range of materials, enhancing its versatility for different projects.
The Prusa Mini is praised for its ease of assembly and use, making it suitable for classrooms where time is limited. It includes a robust community support system and educational resources, enabling teachers to integrate 3D printing into their curricula effectively. Its print quality is exceptional, which helps students produce detailed models for their science projects.
The Monoprice Select Mini V2 is an accessible option that does not compromise on quality, making it ideal for budget-conscious classrooms. It comes fully assembled, allowing educators to start printing right away without extensive setup. Its small footprint and ease of use make it a practical choice for science classrooms, where space and time may be constraints.
How Do User-Friendly Interfaces Impact Student Learning with 3D Printers?
User-friendly interfaces significantly enhance student learning experiences when using 3D printers in science classrooms.
- Intuitive Design: User-friendly interfaces typically feature a clean and simple layout that minimizes confusion, allowing students to focus on their projects rather than struggling with complex controls.
- Interactive Tutorials: Many user-friendly 3D printers come with step-by-step guides or interactive tutorials that help students learn how to operate the printer effectively from the start.
- Customizable Settings: An interface that allows easy customization of print settings empowers students to experiment with different materials and designs, fostering creativity and innovation.
- Error Notifications: User-friendly interfaces often include clear error messages and troubleshooting tips, which can help students quickly resolve issues and maintain their workflow.
- Accessibility Features: Incorporating accessibility features, such as voice commands or adjustable display settings, ensures that all students, regardless of their abilities, can engage with the technology.
The intuitive design of user-friendly interfaces allows students to navigate the printing process seamlessly. By reducing the cognitive load associated with understanding complicated menus or settings, students can concentrate on their educational objectives and the practical application of their knowledge.
Interactive tutorials serve as an effective learning tool, providing real-time guidance and support. This hands-on approach not only enhances technical skills but also builds confidence as students see immediate results from their actions.
Customizable settings are crucial in a science classroom where experimentation is key. By allowing students to adjust parameters such as print speed and material type, they can explore the scientific principles behind 3D printing while enhancing their problem-solving abilities.
Error notifications provide critical feedback that can help students identify and rectify issues promptly. This feature not only saves time but also teaches students how to troubleshoot and understand the mechanics of 3D printing more profoundly.
Accessibility features ensure inclusivity in the classroom, allowing every student to participate fully in the 3D printing process. This promotes a collaborative learning environment where diverse learners can share ideas and contribute to projects effectively.
What Is the Importance of Print Quality and Accuracy in Educational 3D Printing?
Print quality and accuracy in educational 3D printing refer to the precision and clarity of the objects produced by a 3D printer, which are essential for effective learning and teaching in a classroom setting. High-quality prints ensure that the educational models are true to their intended designs, facilitating better understanding among students.
According to the National Education Association, high-quality 3D printing can significantly enhance the learning experience by providing tactile and visual aids that complement theoretical knowledge. Accuracy in prints allows students to engage with materials that closely resemble real-world objects, fostering a deeper understanding of complex concepts (NEA, 2021).
Key aspects of print quality include layer resolution, material consistency, and the precision of dimensions. Layer resolution determines the smoothness of the surface, while material consistency impacts the durability and finish of the print. The accuracy of dimensions is crucial, especially in scientific applications where precise measurements can affect the interpretation of data and concepts being taught. Educational institutions often seek the best 3D printer for science classrooms that balances these factors to maximize learning outcomes.
The impact of print quality and accuracy is profound in the educational context. Research has shown that students are more likely to retain information when they can interact with physical models that accurately represent the subject matter. For example, in science classrooms, 3D models of anatomical structures or molecular configurations can enable students to visualize and manipulate concepts that are otherwise abstract, thus enhancing comprehension and retention of knowledge.
Furthermore, high print quality can stimulate creativity and innovation among students. When learners see that their designs translate accurately to physical objects, they are encouraged to experiment and iterate on their ideas, leading to a richer educational experience. According to a report from the Education Week Research Center, schools that effectively integrate 3D printing into their curricula have noted improved student engagement and collaboration (Education Week, 2020).
To achieve optimal print quality, several best practices can be implemented. These include selecting the right materials for the intended application, calibrating the 3D printer regularly to maintain precision, and utilizing software that optimizes print settings for desired outcomes. Additionally, training educators on how to use 3D printers effectively can ensure that they can guide students in creating high-quality prints that enhance their learning experience.
How Can 3D Printing Foster Enhanced Learning in Science Education?
Visualization of Abstract Concepts: Many scientific principles can be abstract and difficult to grasp without visual aids. 3D printed models can bring these ideas to life, allowing students to manipulate and observe them from different angles, making complex theories more accessible.
Encouragement of Collaboration: 3D printing projects often require teamwork, as students must collaborate to design, create, and refine their models. This collaboration nurtures communication skills and fosters a sense of community in the classroom, enhancing the educational experience.
STEM Engagement: By incorporating 3D printing into science education, students can experience the excitement of creating and innovating. This exposure can lead to increased interest in STEM fields, as students see the real-world applications of their learning and gain skills they can use in future careers.
What Are the Cost Implications of Purchasing a 3D Printer for a Science Classroom?
Training costs are another consideration, as teachers may need to participate in workshops or online courses to effectively incorporate 3D printing into their curriculum. Investing in professional development can enhance the educational experience but also requires financial resources.
Maintenance and repairs should not be overlooked, as 3D printers may require occasional servicing to ensure optimal performance. Setting aside a budget for maintenance can help mitigate unexpected costs associated with broken parts or technical issues, ensuring the printer remains functional for student use.
Related Post: