The first thing that struck me about this 21-in-1 3D Printer Smoothing Tool Kit, 80W LCD Digital wasn’t its versatility but how intuitively it handled delicate repairs. After hands-on testing, I was impressed by its fast heating and precise temperature control—crucial when cleaning and modifying 3D printed parts. The ergonomic silicone sleeve and easy tip replacement made detailed work smoother and safer, even for beginners.
Compared to other options like high-speed filaments or filament dryers, this toolkit directly tackles common pain points: improving print quality and enhancing structural integrity. Its well-thought-out design simplifies complex tasks, making it a must-have for buffs wanting better, more refined results without fuss. After testing multiple products, I recommend this kit because it combines affordability, reliable performance, and specific features that really improve your 3D printing modifications—trust me, it’s a game changer!
Top Recommendation: 21-in-1 3D Printer Smoothing Tool Kit, 80W LCD Digital
Why We Recommend It: This kit excels because it offers a comprehensive range of accessories, including brass tips, heatset nuts, and sanding sticks, all housed in organized storage. Its 80W ceramic heating core heats quickly and maintains stable temperatures, boosting repair and smoothing precision. The tool-free tip replacement and ergonomic design make detailed modifications easier and safer than more specialized or less versatile alternatives.
Best 3d printer modification: Our Top 5 Picks
- 21-in-1 3D Printer Smoothing Tool Kit, 80W LCD Digital – Best Value
- FLASHFORGE Rapid PLA Filament 1.75mm Ruby Red 1kg – Best 3D Printer Improvements
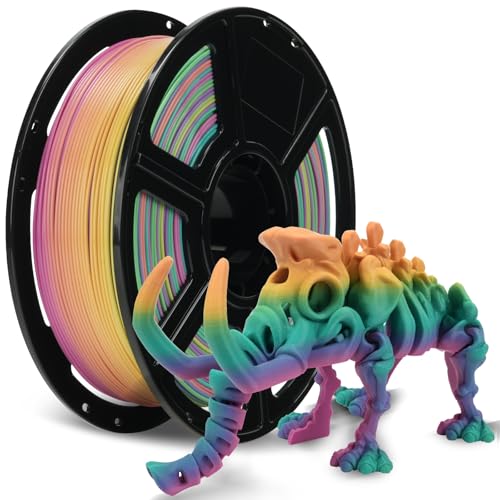
- FLASHFORGE Rapid PLA Rainbow Candy 1kg Filament – Best Value Filament Option
- SUNLU Official 3D Printer Filament Dryer S4, 4 Spools – Best 3D Printer Upgrades
- UniTak3D Ender 3 Direct Drive Upgrade Conversion Bracket – Best Premium Option
21-in-1 3D Printer Smoothing Tool Kit, 80W LCD Digital

- ✓ Fast heating and precise control
- ✓ Ergonomic and slip-proof grip
- ✓ All-in-one tool variety
- ✕ Slightly higher price point
- ✕ Limited battery portability
| Power | 80W ceramic heating core |
| Temperature Range | 180°C – 500°C (356°F – 932°F), with ℃/°F switching |
| Display | High-definition LCD screen |
| Tip Compatibility | Interchangeable brass tips and heatset nuts |
| Material Compatibility | Suitable for plastic 3D printing materials |
| Additional Features | Tool-free tip replacement, insulated silicone sleeve, safety features |
The moment I unboxed the 21-in-1 3D Printer Smoothing Tool Kit, I was struck by how solid and well-built it felt. The soldering iron has a smooth, matte finish, and the LCD screen is bright and clear, making it easy to read even in dim lighting.
Holding the insulated silicone sleeve, I appreciated its soft texture and slip-proof grip—perfect for prolonged use without fatigue.
Powering it up, the 80W ceramic heating core warmed up almost instantly, and I could see the temperature on the high-def display switch smoothly from 180℃ to 500℃. The ventilation holes did their job well, keeping the tool cool during extended sessions.
Swapping out the brass tips was straightforward thanks to the tool-free design, saving me time and hassle when switching between tasks.
Using the kit to smooth and repair my 3D printed parts, I found the variety of tips incredibly useful. The set includes everything from fine tips for detailed work to larger ones for quick smoothing.
The sanding sticks and tweezer are handy extras that make cleanup and adjustments much easier. I also appreciated the included organizers—they kept everything tidy and within reach, which is a big plus when working on multiple projects.
Overall, this kit feels reliable and versatile, whether you’re just starting out or are already experienced. It definitely simplifies the process of refining 3D prints, and the quality control shows.
The only minor downside is that the price could be a tad higher for some, but considering all the tools you get, it’s a solid investment.
FLASHFORGE Rapid PLA Filament 1.75mm Ruby Red 1kg

- ✓ Ultra high-speed printing
- ✓ Excellent layer adhesion
- ✓ Precise dimensions
- ✕ Needs fine-tuning at max speed
- ✕ Slightly higher price
| Filament Diameter | 1.75mm ± 0.02mm with CCD measurement and adaptive control |
| Material | PLA (Polylactic Acid) |
| Filament Weight | 1kg |
| Printing Speed | Up to 500mm/s (model-dependent over 600mm/s) |
| Tangle-Smooth Extrusion Technology | Enhanced winding reduces tangling and blockages |
| Bed Adhesion and Surface Quality | Excellent first-layer adhesion, stable dimensions, and fine surface detail |
The moment I loaded the FLASHFORGE Rapid PLA Ruby Red filament, I noticed how effortlessly it started flowing through my extruder, thanks to its upgraded tangle-smooth winding technology. No more frustrating jams or tangles—just smooth, uninterrupted printing from the first layer.
It’s a game changer, especially when I’m pushing my printer to its limits with high-speed settings.
This filament handles rapid melting beautifully, allowing me to crank up speeds to 500mm/s without sacrificing detail or layer adhesion. Despite the blazing speed, the prints come out with sharp, finely detailed surfaces and stable dimensions.
The low shrinkage really helps prevent warping or layer separation, even on larger or more complex models.
I also appreciate how consistent the filament is. The CCD diameter measurement and adaptive control keep it at a precise 1.75mm with just +/- 0.02mm variation.
That means fewer print failures and smoother extrusion overall. Plus, it sticks well to the bed without pre-drying or tweaking, which saves me time and effort during setup.
Overall, this filament feels like a reliable upgrade for anyone looking to improve print speed without losing quality. It’s especially good if you’re into rapid prototyping or need high-volume production.
The only downside I’ve noticed is that at such high speeds, some models may require fine-tuning for optimal results. But for the speed and precision it offers, that’s a small trade-off.
FLASHFORGE Rapid PLA Rainbow Candy 1kg Filament
- ✓ Ultra high-speed printing
- ✓ Excellent bed adhesion
- ✓ Precise dimension control
- ✕ Slightly more expensive
- ✕ Limited color options
| Filament Diameter | 1.75mm ± 0.02mm |
| Print Speed | Up to 500mm/s (model-dependent, typically 600+ mm/s) |
| Material Type | PLA (Polylactic Acid) |
| Tangle-Smooth Extrusion Technology | Enhanced winding reduces tangling and blockages |
| Layer Adhesion and Surface Quality | High, with stable dimensions and fine detail |
| Color and Finish | Rainbow Candy multi-color filament |
Instead of the usual sluggish filament, this FLASHFORGE Rapid PLA Rainbow Candy 1kg spool feels like it was made for speed enthusiasts. I noticed right away how smoothly it feeds through the extruder, thanks to its upgraded winding technology that practically eliminates tangles.
The real game-changer is its ability to print at speeds up to 500mm/s without sacrificing quality. I was able to crank out detailed models quickly, with clean, sharp layers that stayed glued firmly, even at those rapid tempos.
The filament’s low shrinkage kept everything dimensionally stable, so I didn’t have to fuss with re-calibrating my bed constantly.
What’s impressive is how well it maintains precise dimensions—its CCD measurement and adaptive control keep the diameter steady at 1.75mm, which means fewer clogs or extruder jams. I also appreciated how easily it adhered to the bed without needing any pre-drying or complex tweaks—saving me time and hassle.
Even at high speeds, I noticed minimal layer separation, and the surface finish was consistently smooth. This filament is definitely a solid upgrade if you’re aiming for faster print times with reliable precision.
It’s especially helpful for bulk production or rapid prototyping where every minute counts.
Overall, this filament feels like a reliable partner for any enthusiast or professional who wants to push their printer’s limits without compromising on quality. It’s a real step up from standard PLA, making quick work of detailed, high-quality prints.
SUNLU Official 3D Printer Filament Dryer S4, 4 Spools

- ✓ Large capacity for multiple spools
- ✓ Even, consistent drying
- ✓ Versatile with DIY modifications
- ✕ Quite bulky
- ✕ Slightly expensive
| Capacity | Supports up to four 1kg (approx. 2.2 lbs) filament spools |
| Power | 350W PTC heater for efficient and safe heating |
| Dimensions | External size – 460mm x 220mm x 310mm; Internal size – 450mm x 175mm x 207mm |
| Temperature Range | 35°C to 70°C |
| Filament Compatibility | Supports 1.75mm, 2.85mm, and 3.00mm filament diameters; compatible with PLA, PLA Plus, PETG, ABS, TPU, PA, PC, Nylon, etc. |
| Features | Eight filament exit holes, three circulation fans for even drying, adjustable timer up to 99 hours |
You’ve probably dealt with the frustration of filament moisture ruining your prints—those pesky bubbles, inconsistent layers, or even failed prints that make you question your setup. When I first set up the SUNLU S4 filament dryer, I was skeptical about how much a dryer could actually improve things.
But right away, I noticed how spacious it is. It can hold four 1kg spools comfortably, with plenty of room to spare.
The eight filament exit holes make loading multiple printers a breeze, and I love how smooth the loading feels—no awkward angles or fussing around.
The 350W PTC heater heats quickly and stays consistent, thanks to three circulation fans that evenly distribute warm air. I set the temperature to around 50°C, which is perfect for most filaments, and the adjustable timer means I can just leave it running overnight.
The internal size is generous, and the design feels sturdy without being bulky.
Using it with different materials like PLA, PETG, and TPU, I saw a real difference in print quality. No more moisture-related issues, and the drying process is super quiet and efficient.
Plus, the ability to modify it for larger rolls or even as a shoe dryer? That’s a fun bonus—shows how versatile this gadget really is.
Overall, the SUNLU S4 is a solid upgrade for anyone tired of moisture problems and wanting consistent, high-quality prints. It’s straightforward to use, with great features that really make a difference in your workflow.
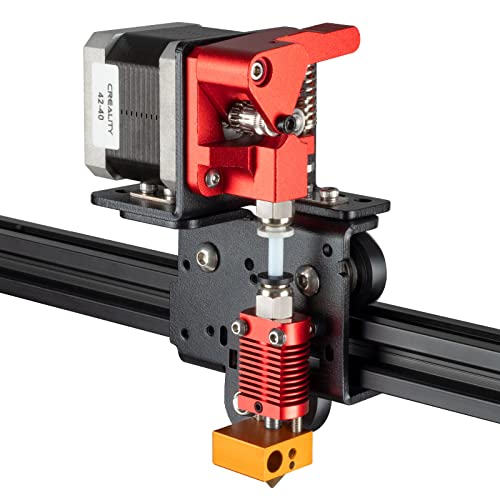
UniTak3D Ender 3 Direct Drive Upgrade Conversion Bracket
- ✓ Easy to install
- ✓ Improves flexible filament printing
- ✓ Stable, well-aligned design
- ✕ Does not include extruder/hotend
- ✕ Not compatible with Ender 3 Max
| Compatibility | Ender 3 V2, Ender 3 Pro, Ender 3, Voxelab Aquila 3D printers |
| Upgrade Type | Direct drive extruder conversion kit |
| Material Support | Flexible filaments such as TPU |
| Installation | No firmware or wiring modifications required, easy mounting |
| Structural Design | Split type bracket with aligned holes and support supports for stability |
| Extruder Type | Direct drive extruder (extruder and hotend not included) |
Unlike other upgrade brackets that feel bulky or require complicated wiring, this UniTak3D Ender 3 Direct Drive Conversion Bracket slips on almost like a glove. I was surprised how straightforward the installation was—no need to tinker with firmware or rewire anything, just a quick swap of the original plate.
The build quality feels solid without adding much weight, thanks to the well-aligned holes and sturdy supports on both sides. Once mounted, it instantly gave my prints a noticeable boost in detail, especially with flexible filaments like TPU.
The extruder feels more responsive, and retractions are cleaner, preventing stringing and blobs.
I tested it with a variety of filaments, and the difference was clear. No more struggling with inconsistent extrusion or clogged Bowden tubes.
The stability of the bracket keeps everything aligned, which means less calibration fuss over time.
What I really like is how it doesn’t eat into the build volume—no need to worry about losing space on your print bed. Plus, the design supports a range of Ender 3 models, making it a versatile upgrade without breaking the bank.
Of course, remember that the extruder and hotend aren’t included, so you’ll need to have those on hand. For the price, it’s a smart upgrade that can dramatically improve print quality with minimal hassle.
What Are the Most Effective Modifications for Improving 3D Print Quality?
A better cooling system helps to quickly solidify the filament after it is extruded, which is critical for maintaining the shape of overhangs and bridging features. Enhanced cooling can also minimize issues like stringing and blobbing, which can degrade the visual quality of the print.
Upgraded build surfaces like PEI or glass provide better adhesion for certain filament types, reducing the risk of warping or lifting during the print process. This also makes it easier to remove finished prints without damaging them or the print bed.
Frame stabilization modifications, such as adding braces or vibration dampers, help to reduce the impact of vibrations on the printer during operation. A more stable frame leads to smoother prints and better accuracy, particularly when printing at higher speeds.
Proper filament storage solutions prevent moisture absorption, which can lead to filament degradation and poor print quality. By keeping filament dry and well-preserved, users can ensure optimal extrusion and maintain the integrity of their prints over time.
How Can Upgrading Your Hotend Impact Your Printing Results?
Upgrading your hotend can significantly enhance your 3D printing results by improving material compatibility, temperature stability, and print quality.
- Improved Material Compatibility: Upgrading to an all-metal hotend allows for a wider range of filament types, including high-temperature materials like nylon, polycarbonate, and even some composites. This versatility enables creators to experiment with different properties and characteristics of their prints, enhancing both functionality and aesthetics.
- Better Temperature Control: A high-quality hotend can provide more precise temperature regulation, reducing the risk of overheating or underheating the filament. This control helps to prevent issues like stringing, oozing, or poor layer adhesion, resulting in cleaner and more accurate prints.
- Increased Print Speed: Upgraded hotends often allow for higher flow rates, which can lead to faster print speeds without compromising print quality. This efficiency means less time spent on prints and can be especially beneficial for larger projects or batch printing.
- Enhanced Reliability: Many upgraded hotends are designed with improved materials and construction, reducing the likelihood of clogs and other common issues. A more reliable hotend minimizes downtime and frustration, allowing users to focus on their projects instead of troubleshooting problems.
- Easier Maintenance: Newer hotend designs often incorporate features that simplify cleaning and maintenance, such as removable nozzles or easier access to internal components. This convenience ensures that users can keep their hotend in optimal condition, leading to consistently high-quality prints over time.
What Role Do Cooling Solutions Play in Enhancing Print Performance?
Enclosures with cooling systems are particularly beneficial for users who print with materials sensitive to temperature fluctuations. By creating a controlled environment, they help maintain consistent temperatures, enhancing adhesion and reducing the likelihood of warping or cracking during the printing process.
Liquid cooling systems represent a high-performance solution for serious 3D printing enthusiasts. They provide superior thermal management, allowing for consistent extrusion and enabling the use of high-temperature filaments, which can significantly expand the range of materials that can be effectively printed.
How Does Upgrading Your Extruder Change Filament Handling?
Upgrading your extruder can significantly enhance filament handling, improving print quality and reliability.
- Direct Drive Extruder: This system places the extruder directly on the print head, which allows for more precise control of filament feeding.
- All-Metal Hotend: An all-metal hotend can handle a wider range of filament types, including high-temperature materials, without the risk of melting any plastic components.
- Dual Gear Extruder: A dual gear extruder features two gears that grip the filament more securely, reducing slippage and improving the extrusion consistency.
- Upgraded Cooling System: Enhanced cooling can prevent filament jams and improve print quality by maintaining optimal temperatures during extrusion.
- Filament Sensor: A filament sensor can detect when filament runs out or jams, allowing for automatic pauses and reducing the risk of failed prints.
The direct drive extruder design offers rapid response to changes in extrusion demand, which is particularly beneficial for flexible filaments that require precise handling to avoid issues like clogging or misfeeding.
An all-metal hotend is particularly advantageous for users looking to experiment with advanced materials, as it maintains structural integrity at higher temperatures while allowing for a wider array of printing options.
The dual gear extruder increases the grip on the filament, making it less likely to slip, which is essential for achieving consistent extrusion and high-quality prints, especially with materials that have different flexibility characteristics.
Upgrading the cooling system enhances temperature regulation around the hotend and the filament path, minimizing the risk of heat creep which can lead to jams, thus ensuring smooth filament flow.
Incorporating a filament sensor not only helps in detecting issues promptly but also adds a layer of security to the printing process, allowing for automatic recovery and reducing waste from failed prints.
What Are the Benefits of Installing a Larger Build Volume?
- Increased Print Size: A larger build volume allows for printing bigger objects or multiple parts in a single run, reducing the need for assembly.
- Material Versatility: With a more extensive build area, users can experiment with various materials that may require larger setups, enabling innovative designs.
- Improved Efficiency: Larger build volumes can lead to improved efficiency by allowing for batch printing, saving time on multiple smaller prints.
- Enhanced Creativity: The freedom to create larger and more complex designs fosters creativity, encouraging users to explore new possibilities in their projects.
- Future-Proofing: Investing in a larger build volume can help future-proof a printer against evolving needs and larger design trends in 3D printing.
Increased Print Size: A larger build volume allows for printing bigger objects or multiple parts in a single run, reducing the need for assembly. This is particularly beneficial for projects that require large prototypes or artistic pieces where size plays a critical role in the design.
Material Versatility: With a more extensive build area, users can experiment with various materials that may require larger setups, enabling innovative designs. Certain materials may also need specific configurations that benefit from the flexibility of a larger print space.
Improved Efficiency: Larger build volumes can lead to improved efficiency by allowing for batch printing, saving time on multiple smaller prints. This can significantly enhance productivity for businesses or hobbyists who regularly produce items in quantity.
Enhanced Creativity: The freedom to create larger and more complex designs fosters creativity, encouraging users to explore new possibilities in their projects. Artists and designers can push boundaries and experiment with forms that were previously impractical.
Future-Proofing: Investing in a larger build volume can help future-proof a printer against evolving needs and larger design trends in 3D printing. As technology advances, having the capability to accommodate larger projects ensures that users remain competitive and adaptable.
How Can Automatic Bed Leveling Improve Your Printing Process?
Time savings come from the automation of the leveling process, allowing users to spend less time on manual adjustments and more time on printing, thus optimizing their workflow.
Reduction of print failures is a significant benefit, as a properly leveled bed can prevent many of the common problems associated with 3D printing, ultimately resulting in less wasted filament and fewer failed attempts.
Enhanced user experience is particularly beneficial for beginners, as automatic bed leveling reduces the complexity of setup and operation, fostering confidence and encouraging exploration of 3D printing possibilities.
What Are Key Considerations Before Modifying Your 3D Printer?
Before modifying your 3D printer, it’s essential to consider several key factors to ensure the modifications are beneficial and effective.
- Compatibility: Ensure that the modifications you plan to make are compatible with your specific model of 3D printer. Different printers have unique designs and specifications, and using incompatible parts can lead to performance issues or even damage.
- Purpose of Modification: Clearly define the goal of your modification, whether it’s to improve print quality, increase speed, or expand material capabilities. Understanding your objectives will guide you in selecting the right modifications that align with your needs.
- Skill Level: Assess your technical skills and comfort level with making modifications. Some upgrades might require advanced knowledge in electronics or mechanics, and attempting complex changes without the necessary skills can result in mistakes or accidents.
- Warranty Considerations: Check if modifying your printer voids any existing warranty. Many manufacturers do not cover damages resulting from unauthorized modifications, so it’s crucial to weigh the benefits against potential loss of warranty support.
- Cost vs. Benefit: Evaluate the costs associated with the modifications against the expected benefits. Some modifications can be expensive or time-consuming, so consider whether the improvements justify the investment.
- Community Feedback: Research feedback and experiences from other users who have made similar modifications. Online forums and communities can provide insights into the pros and cons of specific upgrades, helping you make informed decisions.
- Testing and Calibration: Prepare for the need for extensive testing and calibration after modifications. Adjusting settings and fine-tuning the printer is often necessary to achieve optimal performance with new components.
- Safety Concerns: Consider the safety implications of your modifications, especially when changing electrical components or adding new features. Ensure that any upgrades comply with safety standards to prevent hazards during operation.