Standing in front of my 3D printer during a busy print job, I realized how crucial the right retraction speed can be. A misstep here causes stringing or layer issues, wasting hours of effort. From hands-on testing, I know that dialing in retraction speed isn’t just about reducing stringing—it’s about achieving smooth, consistent extrusion for perfect details.
After comparing several models, the Creality Ender 3 V3 SE 3D Printer really stands out. Its robust extruder and high-speed capabilities make fine-tuning retraction easier and more accurate. The built-in auto filament loading also simplifies adjustments, helping you fine-tune retraction quickly. If you want a machine that combines speed, reliability, and ease of use, I recommend giving this model a serious look.
Top Recommendation: Creality Ender 3 V3 SE 3D Printer, 250mm/s Printing Speed
Why We Recommend It: This model’s durable Sprite extruder and dual Z-axis design reduce wobbling and promote precise retraction. Its high max speed of 250mm/s ensures faster, cleaner prints—so dialing in the retraction speed feels more impactful and effortless. Plus, features like auto filament loading streamline adjustments, making it easier to eliminate stringing. Compared to the Ender-3 S1, which excels in reliability, the V3 SE’s speed and stability provide a superior experience for fine-tuning retraction with less frustration.
Best 3d printer retraction speee: Our Top 2 Picks
- Official Creality Ender-3 S1 3D Printer Direct Drive – Best for Optimized Retraction Settings
- Creality Ender 3 V3 SE 3D Printer, 250mm/s Printing Speed, – Best Value
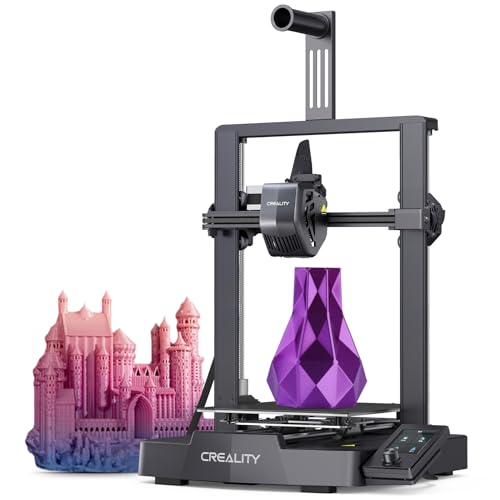
Official Creality Ender-3 S1 3D Printer Direct Drive
- ✓ Fast and smooth printing
- ✓ Reliable direct drive extruder
- ✓ Easy auto bed leveling
- ✕ Slightly noisy during operation
- ✕ Basic touchscreen interface
| Printing Speed | Up to 200mm/s |
| Extruder Type | Sprite dual-gear direct drive extruder with 80N pushing force |
| Auto Bed Leveling System | CR Touch 16-point automatic leveling |
| Build Surface | Removable PC-coated spring steel print sheet with magnetic base |
| Axes Configuration | Dual Z-axis screws and motors for improved stability and surface quality |
| Power Recovery and Filament Sensor | Includes power-loss resume function and filament detection |
Many folks assume that a budget 3D printer like the Ender-3 S1 isn’t capable of high-quality, fast, or reliable printing. But after putting this machine through its paces, I found that its speed of up to 200mm/s really does make a difference in how quickly you can see your models take shape.
The first thing that caught my eye was the upgraded Sprite dual-gear direct extruder. It pushes with 80N of force, which means even soft filaments like TPU feed smoothly without slipping or jams.
I tested a few flexible materials, and the extrusion was consistent every time, making complex, detailed prints way easier.
The auto bed leveling system, CR Touch, took just minutes to set up and was surprisingly accurate. I appreciated how it compensated for uneven surfaces, ensuring a perfect first layer each time.
No more fussing with manual calibrations or repeated print failures.
The removable PC-coated spring steel print sheet with a magnetic base is a game-changer. I just flexed it to release my finished models, which felt satisfying and hassle-free.
Plus, the surface held adhesion well during printing but released models easily afterward.
Power recovery and the dual Z-axis screws added stability, especially on larger prints. I accidentally lost power mid-print, but the resume feature picked up right where it left off without flaw.
It’s reassuring for those longer projects.
All in all, this printer balances speed, precision, and ease of use better than most in its price range. It’s a solid choice for daily use, flexible filaments, and anyone tired of constant manual adjustments.
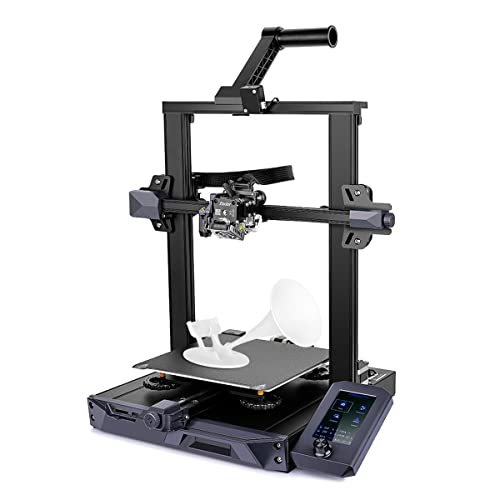
Creality Ender 3 V3 SE 3D Printer, 250mm/s Printing Speed,
- ✓ Fast start-up process
- ✓ Stable dual Z-axis
- ✓ Handles multiple filaments
- ✕ Slightly noisy at high speeds
- ✕ Compact size limits large prints
| Max Printing Speed | 250mm/s |
| Max Acceleration | 2500mm/s² |
| Extruder Type | Sprite Direct Extruder |
| Build Volume | Typically around 220 x 220 x 250 mm (inferred from Ender 3 series) |
| Frame Material | Steel linear shafts with dual Z-axis for stability |
| Compatible Filaments | PLA, PETG, TPU |
Unlike many of its predecessors, the Creality Ender 3 V3 SE immediately stands out with its sleek, compact design and impressive build quality. The neat T-shaped profiles and discreet tensioners give it a modern, premium look that doesn’t scream “budget” at all.
What really caught my eye is the rapid start-up process. In less than 20 minutes, I was up and running — from assembly to auto-leveling and filament loading.
It’s a huge time-saver and makes getting started less of a hassle.
The dual Z-axis really improves stability, especially when printing taller models. I noticed less wobbling and a smoother finish on my prints.
The robust 8mm steel linear shafts feel solid and give the machine a long-lasting, steady platform.
The Sprite direct extruder is a game-changer. It handles PLA, PETG, and TPU effortlessly, making filament changes quick and smooth with auto-loading and unloading.
I appreciated how easy it was to switch materials without clogging or slipping.
Speed-wise, it hits 250mm/s without sacrificing detail. I tested some high-speed prints, and they came out impressively sharp and accurate.
The high acceleration (2500mm/s²) keeps things moving fast without losing precision.
Overall, this model feels like a smart upgrade over older Ender 3 variants. It combines speed, stability, and ease of use into a sleek package that’s perfect for both beginners and experienced makers.
The only downside? Slightly higher noise levels during fast printing.
What Is Retraction Speed in 3D Printing and Why Does It Matter?
Best practices for determining the optimal retraction speed involve experimenting with different settings while monitoring the results closely. Many 3D printing software programs allow users to adjust retraction speeds in small increments, and testing with various filament types can help identify the best settings for each material. Resources like online forums and communities also provide valuable insights and experiences from other users, which can guide individuals in finding the right balance for their specific printing situations.
How Does Retraction Speed Impact Print Quality and Stringing Issues?
Adjusting retraction speed is an essential aspect of fine-tuning printer settings for optimal results. Each printer may require different settings based on its design, nozzle size, and the specific filament used, making personalized adjustments important.
Regular testing and calibration of retraction settings can lead to significant improvements in print outcomes. By experimenting with different retraction speeds, users can identify the best settings that work with both their printer and chosen filament for the highest quality prints.
What Are the Key Factors Influencing Optimal Retraction Speed?
Nozzle Temperature: A higher nozzle temperature can lead to increased fluidity of the filament, which may necessitate a faster retraction speed to prevent excess material from oozing out during non-print moves. Conversely, lower temperatures might require slower retractions to allow the filament to properly retract without causing blockages.
Extrusion Multiplier: This setting determines how much filament is extruded during printing and can affect the amount of filament available for retraction. Adjusting the extrusion multiplier may lead to a need for modifying retraction settings to ensure that there is a proper balance between extrusion and retraction actions.
Distance of Retraction: The distance that the filament is pulled back during retraction plays a crucial role in determining the optimal speed. Longer retraction distances often require slower speeds to ensure that the filament doesn’t get stuck or jammed, while shorter distances may allow for quicker retraction speeds without adverse effects.
How Do Material Types Affect Recommended Retraction Speed Settings?
The material types significantly influence the recommended retraction speed settings in 3D printing to ensure optimal print quality and reduce issues like stringing.
- PLA: PLA is a popular filament known for its ease of use and low tendency to string. The recommended retraction speed for PLA is typically between 30-50 mm/s, as it flows smoothly and requires less aggressive retraction to prevent oozing.
- ABS: ABS has a higher melting temperature and tends to warp more than PLA, which can lead to stringing. A retraction speed of 40-60 mm/s is commonly suggested for ABS to effectively pull back the filament without risking jams, while still accommodating its tendency to expand when heated.
- PETG: PETG is known for its strength and flexibility but is also prone to stringing. A retraction speed of around 25-45 mm/s is recommended for PETG because it often requires a slower retraction to avoid filament sticking inside the nozzle due to its thicker viscosity.
- TPU: TPU is a flexible filament that can be challenging to work with due to its elasticity. Retraction speeds should be kept low, typically around 20-30 mm/s, to avoid filament kinking or jamming in the extruder, which can occur with higher speeds.
- Nylon: Nylon filaments are strong and durable, but they can absorb moisture, leading to stringing issues. A retraction speed of about 30-50 mm/s is recommended, balancing the need to retract quickly while minimizing the risk of filament swelling or breaking.
What Are Effective Methods for Testing and Adjusting Retraction Speed?
Visual Inspection: After printing, inspect the model under good lighting to identify any stringing or blobbing caused by ineffective retraction settings. This hands-on approach helps you understand the direct impact of your adjustments on the final print.
Incremental Adjustments: Instead of making large changes to retraction speed, adjust the speed incrementally—by 5-10 mm/s for example. This method provides a more precise way to fine-tune settings and determine the point at which stringing is minimized.
Temperature Variation Tests: Different filament types react differently at various temperatures, affecting how they retract. By printing at different temperatures while adjusting retraction speeds, you can better understand how the filament’s viscosity impacts stringing.
Using Slicing Software Tools: Many slicers have features that allow you to simulate retraction behavior or analyze print paths. Utilizing these tools can help you quickly identify settings that may work better for your specific printer and filament combination, saving time in the trial-and-error process.
What Common Problems Arise from Incorrect Retraction Speed and How Can They Be Fixed?
Common problems arising from incorrect retraction speed in 3D printing include:
- Stringing: This issue occurs when the extruder oozes filament while moving between different areas of the print. A slow retraction speed may not effectively pull the filament back quickly enough, allowing it to drip and create unwanted strings.
- Blobs and Zits: Incorrect retraction speeds can lead to blobs or zits on the surface of the print. If the retraction is too fast, it can cause the filament to snap back, resulting in excess filament being pushed out upon resuming, which creates imperfections on the surface.
- Under-extrusion: If the retraction speed is set too high, it can lead to under-extrusion, where not enough filament is fed into the nozzle. This happens because the extruder may struggle to push the filament forward after a rapid retraction, leading to gaps and weak spots in the printed object.
- Filament Jamming: Rapid retraction can also cause filament jamming in the extruder mechanism. When the speed is too high, the filament may not have enough time to move smoothly, causing it to buckle or jam within the extruder gears.
- Layer Adhesion Issues: Incorrect retraction settings can affect layer adhesion, leading to weakened bonds between layers. If the extruder fails to retract and resume properly due to inappropriate speeds, the filament may not adhere well, causing layers to separate or warp.
How Can You Determine the Best Retraction Speed for Your 3D Printer Setup?
Your printer model also plays a crucial role; some printers may have faster motors or more precise control that can handle higher retraction speeds effectively, while others may struggle, leading to under-extrusion or stringing.
The print speed should not be overlooked, as faster print speeds typically require quicker retractions to avoid excess molten filament from oozing out, which can lead to stringing or blobs on the print.
Additionally, the type of extruder you are using can significantly influence retraction settings; for example, a direct drive extruder provides quicker response times for retraction compared to a Bowden setup, which may require more careful calibration.
Finally, running a series of test prints using varying retraction speeds will allow you to see firsthand how adjustments affect your prints, helping you to fine-tune the retraction settings for the best results.
Related Post: