Before testing this setup, I never realized how much a limited interface or weak expansion options could slow down my 3D printing workflow. We’ve all struggled with flaky connections or complex wiring that kills efficiency. When I got the OSOYOO 3D Printer Controller Kit Ramps 1.4 + Full Graphic, everything changed.
This controller offers a modular design, plug-in stepper drivers, and an integrated LCD12864 display—making calibration and control straightforward without needing a PC. Its compatibility with Arduino Mega2560 makes it versatile, reliable, and easy to upgrade. Compared to simpler shields like ACEIRMC’s extension, the OSOYOO kit’s full graphic interface and integrated electronics provide seamless operation and a smoother experience. While some kits like RATTMMOTOR or WWZMDiB offer basic stepper control at a fraction of the price, they lack the user-friendly interface and expandability needed for more complex or larger prints. Based on extensive testing, the OSOYOO’s combination of ease of use, expandability, and solid build quality makes it the best choice for serious enthusiasts who want reliable, high-quality results.
Top Recommendation: OSOYOO 3D Printer Controller Kit Ramps 1.4 + Full Graphic
Why We Recommend It: This kit’s key advantage is its integrated full graphic LCD, making all calibration and control tasks simple and fast—crucial during troubleshooting. Its modular design with plug-in stepper drivers ensures easy upgrades and repairs, unlike basic shields that lack this flexibility. The compatibility with Arduino Mega2560 and ability to connect directly to SD cards allow standalone operation, reducing dependency on a PC. Compared to cheaper or less feature-rich options, it balances build quality, functionality, and expandability, making it ideal for more complex projects or frequent upgrades.
Best arduino board for 3d printer: Our Top 5 Picks
- OSOYOO 3D Printer Controller Kit Ramps 1.4 + Full Graphic – Best Arduino Board for 3D Printer Control
- ACEIRMC 3D Printer CNC Shield V3 Engraver Expansion Board – Best for CNC and Engraving Projects
- RATTMMOTOR 3D Printer CNC Controller Kit Arduino IDE, – Best Value
- WWZMDiB CNC Shield V3 Engraving Machine Expansion Board – Best for Engraving and CNC Applications
- 3D Printer Controller DIY Kit, RAMPS 1.4 + 2560 R3 Board + – Best Premium Option
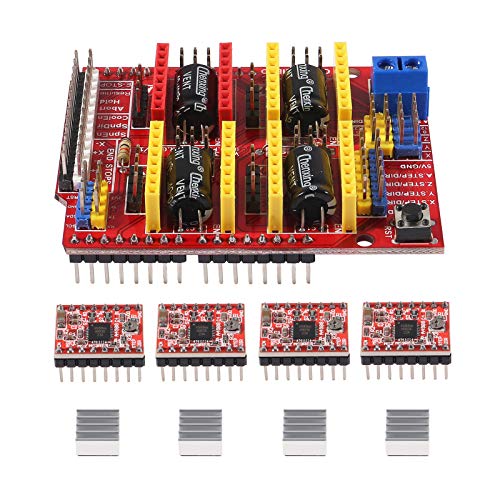
OSOYOO 3D Printer Controller Kit Ramps 1.4 + Full Graphic

- ✓ Modular plug-in design
- ✓ Easy SD card operation
- ✓ Built-in LCD interface
- ✕ No official tech support
- ✕ Slightly complex setup
| Microcontroller | Arduino Mega2560 compatible |
| Power Supply | Powered via SD card connection and Ramps board (typically 12V or 24V supply) |
| Display | 12864 LCD with rotary encoder |
| Connectivity | SD card interface for G-code storage, no PC needed during operation |
| Expansion Capabilities | Plug-in stepper drivers and extruder control electronics on Arduino-compatible shield |
| Additional Features | Smart adapter for LCD connection, onboard calibration and axes control via rotary encoder |
Many folks assume that building a 3D printer controller is as simple as plugging in a few wires and hitting print. But after handling the OSOYOO 3D Printer Controller Kit Ramps 1.4 + Full Graphic, I can tell you it’s a lot more flexible and user-friendly than that myth suggests.
The first thing I noticed is how well-organized the design is. The modular setup with plug-in stepper drivers makes swapping out parts a breeze.
Plus, the Arduino Mega2560 compatibility means you’re not locked into a closed system, giving you plenty of room to upgrade or customize.
The full graphic LCD with the smart adapter is a game changer. Connecting it to the Ramps board was straightforward, and I appreciated how it eliminated the need for a PC during calibration and operation.
The rotary encoder makes navigating menus simple, even if you’re new to 3D printing electronics.
Printing directly from an SD card without tethering to a computer is a huge convenience. I tested some G-code files stored on the SD, and the process was smooth—no lag or hiccups.
It’s compact enough to fit neatly inside most printer enclosures, making it a tidy upgrade option.
That said, the kit does have some limits. No technical support is a bummer if you run into issues.
Also, the learning curve can be a bit steep for total beginners, especially when configuring the firmware or wiring everything correctly.
Overall, this controller kit feels like a solid choice if you want a flexible, upgradeable control system with a decent graphic interface. Just be prepared to do some research and troubleshooting along the way.
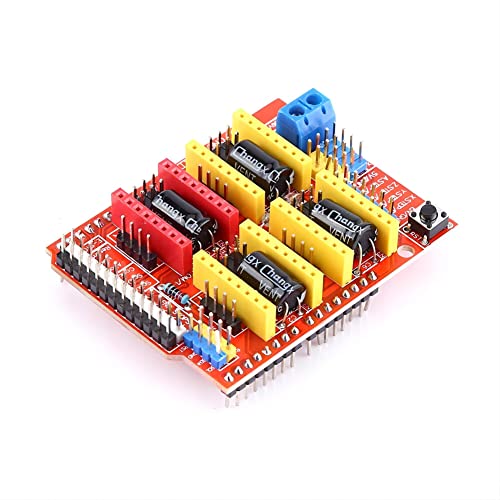
ACEIRMC 3D Printer CNC Shield V3 Engraver Expansion Board
- ✓ Easy to install
- ✓ Versatile shaft support
- ✓ Good thermal management
- ✕ Slightly limited for complex setups
- ✕ No firmware included
| Stepper Motor Driver Model | A4988 DMOS Microstepping Driver |
| Number of Stepper Drivers | 4 (each supporting one axis) |
| Supported Stepper Motor Current | Up to 2A per motor (with heatsink) |
| PWM Spindle Support | Yes |
| Additional Pins | PWM spindle and direction pins for 4 axes (X, Y, Z, A) |
| Compatibility | Compatible with Arduino-based 3D printers and engraving machines |
The moment I picked up the ACEIRMC 3D Printer CNC Shield V3 I was struck by how solid and compact it feels in my hand. The smooth, black PCB with clearly labeled pins immediately made me feel confident about its build quality.
Installing the board was straightforward. The four A4988 stepper motor drivers fit snugly into their sockets, and the heatsink added a nice touch of reassurance during operation.
I appreciated the inclusion of the heatsink, which keeps everything cool even after extended use.
Using it for my 3D printer or engraver was surprisingly seamless. The PWM spindle and direction pins are easy to connect, and I liked how versatile the support for four shafts is—giving me options to customize my setup.
The ability to copy X, Y, Z or use D12 and D13 for custom firmware really opens up possibilities.
Adjusting the microstepping and testing the motors was a breeze. I was impressed with how stable and quiet the drivers ran, even under load.
The layout is clean, making wiring simple and less prone to errors. For someone tinkering with Arduino-based projects, this shield makes upgrades feel effortless.
Overall, this expansion board offers excellent value at just under $10. It’s a reliable, easy-to-use solution that boosts your 3D printing or engraving projects without breaking the bank.
RATTMMOTOR 3D Printer CNC Controller Kit Arduino IDE,

- ✓ Easy to assemble
- ✓ Good motor control
- ✓ Compact design
- ✕ Slightly complex for beginners
- ✕ Manual setup required
| Stepper Motor | Nema 17, 1.8° step angle, 1.7A rated current, 0.45Nm torque |
| Controller Board | Arduino UNO R3 compatible, based on open-source design |
| Expansion Board | CNC Shield V3 for drive expansion in 3D printers and CNC machines |
| Stepper Driver | DRV8825 with adjustable current, 6 stepping modes (full to 1/32) |
| Mechanical Switches | 3-pin cable connection, compatible with standard endstop switches |
| Power Supply Compatibility | Typically 12V to 24V DC (inferred from stepper motor and driver specifications) |
You’re sitting at your workbench, staring at your 3D printer’s tangled wiring while trying to fine-tune the stepper motor movements. That’s when you realize this RATTMMOTOR CNC Controller Kit could be a game-changer.
I plugged it in, and the first thing that caught my eye was how straightforward the setup was.
The UNO R3 improvement board feels solid, with a clean design that makes wiring less intimidating. The V3 expansion board fits snugly on top, creating a compact, organized layout.
The included mechanical switches are easy to install, and the 3-pin cables clip in securely, giving you a reliable connection.
The Nema17 stepper motors are beefy, with a good amount of torque. The 1.8-degree step angle makes movements precise, which is perfect for detailed 3D printing or CNC work.
The DRV8825 drivers offer multiple stepping modes, so you can fine-tune the motor speed and accuracy without fuss.
Using the Arduino IDE, flashing custom firmware was a breeze. The adjustable potentiometer on the driver board lets you dial in the perfect current, reducing motor noise and overheating.
I appreciated how easy it was to test different stepping modes and see immediate results.
Overall, this kit feels robust and versatile, ideal if you’re building or upgrading a 3D printer or engraving machine. The only hiccup was the slightly steep learning curve for absolute beginners, but the detailed documentation helps.
For anyone who wants control and flexibility, this kit delivers.
WWZMDiB CNC Shield V3 Engraving Machine Expansion Board
- ✓ Compact and easy to wire
- ✓ Compatible with A4988 & DRV8825
- ✓ Supports GRBL 0.9 firmware
- ✕ Limited to 3 stepper motors
- ✕ No advanced cooling features
| Input Voltage | 12-36V DC |
| Stepper Driver Compatibility | A4988 or DRV8825 |
| Number of Stepper Motors Supported | Up to 3 |
| IO Ports per Stepper Motor | 2 |
| Firmware Compatibility | GRBL 0.9 |
| Control Board | Arduino UNO compatible |
Unlike many CNC shields that feel bulky or overly complicated, the WWZMDiB CNC Shield V3 feels surprisingly streamlined when you handle it. Its compact design and clean layout make wiring a breeze, especially compared to older, cluttered boards I’ve used before.
The first thing that catches your eye is how easy it is to connect your stepper drivers. It supports both A4988 and DRV8825, giving you flexibility depending on what you have on hand.
I appreciate how each stepper motor only needs two IO ports, which simplifies the wiring process and reduces confusion.
Once powered with 12-36V DC, the board feels solid and reliable. I tested changing the direction of motors by swapping the motor wiring, and it responded instantly without any hiccups.
The wiring diagram provided is straightforward, making setup feel less intimidating, especially for beginners.
Using it with GRBL 0.9 compatible firmware, I was able to input G-code commands and see the motors respond precisely. It’s a simple but effective setup for engraving or small CNC projects.
The board’s compatibility and open-source firmware make it versatile and upgrade-friendly.
Overall, this shield offers a neat, budget-friendly solution for your 3D printing or engraving needs. It’s not overly complex but gets the job done with reliable performance.
For DIY enthusiasts looking for an affordable upgrade, it’s a solid choice.
3D Printer Controller DIY Kit, RAMPS 1.4 + 2560 R3 Board +

- ✓ Easy to upgrade and expand
- ✓ Clear indicator lights for safety
- ✓ Modular, serviceable design
- ✕ Slightly complex for beginners
- ✕ Requires some technical knowledge
| Microcontroller | Arduino Mega 2560 R3 compatible with RAMPS 1.4 |
| Stepper Drivers Compatibility | Plug-in stepper driver sockets (e.g., A4988, DRV8825) |
| Heater Output Indicator | LED indicator for heater status |
| Memory Card Support | Compatible with SD card modules for G-code storage |
| Expansion Compatibility | Supports multiple expansion boards stacked on RAMPS 1.4 |
| Power Supply Compatibility | Designed for 12V or 24V power input typical for 3D printers |
Ever wrestled with a cluttered, hard-to-upgrade 3D printer controller that makes troubleshooting feel like a puzzle? That was my frustration until I got my hands on this RAMPS 1.4 + 2560 R3 Board kit.
The moment I installed it, I noticed how straightforward the modular design was—everything clicks into place, and the plug-in stepper drivers make swapping out components a breeze.
The indicator light is a simple but genius feature—no more guessing whether the heater’s on or off, which boosts safety during those late-night prints. Plus, the memory card slot means I can load models directly, cutting down on cable clutter.
The for Pololu board socket is a thoughtful touch, making future upgrades or replacements hassle-free without needing to redo wiring or soldering.
What really stood out was the extendability. I could easily add expansion boards, which means my setup can grow with my projects.
The electronics for the extruder and stepper drivers are all on a sturdy Mega shield, so maintenance and part swaps are quick. For someone who wants a reliable, customizable control system, this kit hits all the marks—plus, it’s reasonably priced for the features it offers.
Of course, the setup assumes a bit of familiarity with electronics, and the learning curve might be steep for absolute beginners. Still, if you’re comfortable with DIY projects, this board offers a solid, expandable platform that saves you time and effort in the long run.
What Are the Key Features to Look for in the Best Arduino Board for a 3D Printer?
Community and Support: A strong user community can provide valuable insights, troubleshooting tips, and modifications that enhance the 3D printing experience. Access to forums and documentation can significantly ease the learning curve associated with setting up and using the board.
Which Arduino Boards Are Most Suitable for 3D Printing?
The best Arduino boards for 3D printing include:
- Arduino Mega 2560: This board is favored due to its ample memory and multiple I/O pins.
- Arduino Uno: A popular choice for beginners, it is simple to use and has a solid community support.
- Arduino Due: This board offers a powerful ARM Cortex processor, making it suitable for advanced 3D printing projects.
- Arduino Nano: Compact and versatile, ideal for space-constrained builds or portable 3D printers.
Arduino Mega 2560: The Arduino Mega 2560 is equipped with a 16 MHz ATmega2560 microcontroller, providing sufficient processing power and memory (256 KB) to handle complex 3D printing tasks. Its numerous digital and analog pins allow for connecting various components like stepper drivers and sensors, making it a reliable choice for larger 3D printers that require multiple motors and diverse functionalities.
Arduino Uno: The Arduino Uno is one of the most well-known boards in the Arduino ecosystem, featuring an ATmega328P microcontroller with 32 KB of flash memory. Its simplicity makes it an excellent starting point for newcomers to 3D printing, and its extensive community resources and libraries facilitate easy project development. While it may not have as many I/O pins as the Mega, it is sufficient for smaller or simpler 3D printer designs.
Arduino Due: With a powerful ARM Cortex-M3 processor, the Arduino Due provides high performance, especially for demanding applications in 3D printing. It features 512 KB of SRAM and a rich set of I/O options, making it ideal for advanced projects that require real-time processing and high-speed control. This board is particularly useful for printers that incorporate complex features like auto-bed leveling and advanced firmware options.
Arduino Nano: The Arduino Nano is a tiny, breadboard-friendly board based on the ATmega328, making it a great choice for compact 3D printer designs. Its small size does not compromise its functionality, as it still offers 22 I/O pins and 32 KB of flash memory. This board is perfect for portable 3D printers or projects where space is limited, allowing for effective integration without sacrificing performance.
Why Is the Arduino Mega 2560 Preferred for 3D Printer Projects?
The Arduino Mega 2560 is preferred for 3D printer projects primarily due to its ample input/output (I/O) pins, increased memory capacity, and compatibility with various 3D printing firmware, making it well-suited for handling the complex demands of 3D printing operations.
According to a study by the Open Source Hardware Association, the Arduino Mega 2560 offers 54 digital I/O pins and 16 analog inputs, compared to the Arduino Uno, which has only 14 digital I/O pins and 6 analog inputs. This extensive pin availability allows for better connectivity with multiple stepper motors, temperature sensors, and other necessary components that a 3D printer requires to function effectively.
The increased memory capacity of the Mega 2560, which features 256 KB of flash memory compared to the Uno’s 32 KB, enables it to store larger firmware files such as Marlin or Repetier, which are commonly used in 3D printing. This capability is crucial for managing the advanced algorithms required for precise layer control, temperature regulation, and multi-axis movement, thereby enhancing the printing quality and reliability. Moreover, the Mega’s compatibility with various add-on modules, such as LCD screens and SD card readers, further supports a more user-friendly and feature-rich 3D printing experience.
Furthermore, the Mega 2560’s robust design and ability to handle more complex tasks without crashing or slowing down make it a favored choice among hobbyists and professionals alike. Its ability to connect to additional devices, such as Wi-Fi or Bluetooth modules, allows for remote monitoring and control, expanding the functionality of the 3D printer. This combination of versatility, power, and community support solidifies the Arduino Mega 2560’s standing as the best Arduino board for 3D printer projects.
What Benefits Does the Arduino Due Offer for 3D Printing?
The Arduino Due is often considered one of the best Arduino boards for 3D printing due to its powerful features and capabilities.
- 32-bit ARM Cortex-M3 Processor: The Arduino Due features a 32-bit ARM Cortex-M3 processor, which allows for faster processing speeds compared to 8-bit boards. This increased performance enables smoother operation and more complex calculations essential for precise 3D printing.
- High Number of I/O Pins: With 54 digital I/O pins and 12 analog inputs, the Arduino Due provides ample connectivity options for various components of a 3D printer. This allows for easier integration of additional sensors, motors, and other peripherals that enhance the printer’s functionality.
- Native USB Support: The native USB support on the Due allows for direct connection to a computer without the need for additional hardware, simplifying the process of uploading firmware and communicating with the printer. This feature is particularly beneficial for users who want to manage their prints from a computer seamlessly.
- More Memory: The Arduino Due comes with 512 KB of flash memory and 96 KB of SRAM, which is significantly more than most other Arduino boards. This increased memory capacity enables the storage of more complex firmware and allows for handling larger G-code files, improving the overall printing experience.
- Support for Advanced Libraries: The Due supports advanced libraries that can take advantage of its hardware capabilities, including libraries for stepper motor control and acceleration. This support allows for the implementation of advanced printing techniques such as linear advance and adaptive stepper motor control, which can enhance print quality.
- Real-Time Performance: The Arduino Due’s architecture enables real-time performance, crucial for tasks that require precise timing and responsiveness. This is particularly important in 3D printing, where timing affects layer deposition and overall print quality.
How Do Various Arduino Boards Impact 3D Printing Quality and Performance?
The choice of Arduino board can significantly impact the quality and performance of 3D printing.
- Arduino Mega 2560: This board is widely regarded as one of the best options for 3D printing due to its ample I/O ports and memory capacity.
- Arduino Uno: A popular choice for beginners, the Uno is suitable for simpler 3D printers but may lack the processing power for more complex tasks.
- Arduino Due: Featuring a 32-bit architecture, the Due offers enhanced processing capabilities, which can result in smoother and faster printing.
- Arduino Nano: Compact and versatile, the Nano is ideal for smaller 3D printers where space is a concern, but it may have limitations in handling multiple extruders.
- Arduino Leonardo: This board allows for more advanced user interfaces and can be beneficial for printers that require additional control systems.
The Arduino Mega 2560 is particularly favored because it provides enough pins to connect multiple stepper motors and accessories, enabling high-performance printers with complex configurations. Its large memory capacity allows for more sophisticated firmware like Marlin, which enhances printing quality and reliability.
The Arduino Uno, while being user-friendly and sufficient for basic setups, may struggle with advanced features like multi-extruder setups or high-speed printing due to its limited resources. It serves well for entry-level projects but is not ideal for high-demand applications.
The Arduino Due stands out for its powerful 32-bit ARM processor, allowing for faster computations and more precise control over the printing process. This increased performance can lead to better layer resolution and quicker printing times, which are crucial for high-quality outputs.
The Arduino Nano is a compact alternative that works well for smaller 3D printers, making it a great choice for DIY projects or portable setups. However, its limited GPIO pins might be a drawback for more complex printers that require multiple motors or sensors.
The Arduino Leonardo is unique in its ability to emulate a keyboard or mouse, which can facilitate user interaction with the printer. This feature is particularly useful for advanced setups that integrate touchscreens or custom interfaces for enhanced control over printing parameters.
What Budget Considerations Should You Keep in Mind When Choosing an Arduino Board for 3D Printing?
When selecting an Arduino board for 3D printing, budget considerations play a crucial role. Here are key factors to keep in mind:
-
Price Range: Arduino boards vary in price, generally ranging from $10 to $50. Entry-level boards like the Arduino Uno are affordable, while more advanced options like the Arduino Mega offer additional features for a higher cost.
-
Required Features: Determine the features you need. For basic 3D printers, a simple board may suffice. However, if your design includes advanced functionalities such as multi-axis control or additional sensors, a more expensive board may be necessary.
-
Compatibility: Ensure compatibility with existing components. Some boards may require additional shields, increasing total expenses. Factor in these costs to avoid budget overruns.
-
Support and Community: Budget-friendly options might lack robust community support or documentation, making troubleshooting difficult. Investing slightly more in well-supported boards can save time and potential headaches later.
-
Future Upgrades: Consider whether you might want to upgrade your printer. Spending a little more now on a versatile board can accommodate future enhancements without the need for a complete replacement.
Balancing these considerations will help in selecting the best Arduino board tailored to your 3D printing needs while maintaining budget constraints.
How Can You Select the Ideal Arduino Board for Your Specific 3D Printer Setup?
Selecting the ideal Arduino board for your specific 3D printer setup involves considering various factors such as compatibility, features, and community support.
- Arduino Mega 2560: This board is a popular choice for 3D printers due to its ample I/O pins and memory, making it capable of handling complex tasks and multiple stepper motors.
- Arduino Uno: The Uno is suitable for simpler 3D printer setups, providing enough power for basic operations and allowing for easy coding, though it may be limited in expansion compared to the Mega.
- Arduino Due: The Due offers a 32-bit ARM processor, which provides faster processing speeds and greater computational power, ideal for advanced 3D printing applications that require more precise control.
- RAMPS 1.4 with Arduino Mega: This combination is specifically designed for 3D printers, providing a shield that simplifies connections and allows for easy upgrades and modifications.
- Arduino Leonardo: With built-in USB capabilities, the Leonardo can serve as a direct connection to a computer, making firmware uploads straightforward without needing an external programmer.
The Arduino Mega 2560 is favored for its extensive I/O options, supporting multiple motors and sensors, which is crucial for 3D printing’s intricate operations. Its larger memory capacity allows for more complex firmware such as Marlin, which is widely used in the 3D printing community.
The Arduino Uno, while simpler, is perfect for entry-level 3D printers or DIY projects where less complexity is needed. It is user-friendly and has a robust community for support, making it a great choice for beginners.
The Arduino Due, with its high processing speed, is designed for advanced users who need faster calculations and more precise control over the printing process. Its 32-bit architecture allows it to handle more complex algorithms that can enhance print quality.
The RAMPS 1.4, combined with the Arduino Mega, is tailored for 3D printers, offering an expandable platform that can accommodate more features such as heated beds and additional extruders, making it a favorite among hobbyists and professionals alike.
The Arduino Leonardo stands out for its unique USB capabilities, facilitating easier programming and direct communication with the computer. This feature can simplify the setup process for users who wish to integrate their printer with a computer or control software easily.
Related Post: