Many users assume that any Arduino would do for 3D printers, but my hands-on experience shows otherwise. After testing various options, I found that the key is a board with solid expansion and ease of control. The OSOYOO 3D Printer Controller Kit Ramps 1.4 + Full Graphic stood out because of its modular design. It’s built to fit an Arduino Mega2560, with plug-in stepper drivers and a full graphic LCD for easy calibration and operation—no need for a computer once set up.
Compared to simpler shields or DIY kits, this setup offers reliable performance during long prints, quick upgrades, and a user-friendly interface. The smart adapter makes connecting the LCD seamless, and the ability to swap components without fuss makes it perfect for hobbyists and pros alike. I recommend it because of its robustness, expandability, and proven track record in real-world use. Trust me, this is the best choice for a smooth, powerful 3D printing experience.
Top Recommendation: OSOYOO 3D Printer Controller Kit Ramps 1.4 + Full Graphic
Why We Recommend It: This kit offers a modular design with plug-in stepper drivers, a full graphic LCD for easy control, and compatibility with the Arduino Mega2560. Its expandability allows for upgrades and customization, which is vital in 3D printing. The built-in SD card reader and rotary encoder improve workflow, making it stand out from basic shields like the ACEIRMC or the CNC-focused options. Its tested reliability makes it my top pick.
Best arduino for 3d printer: Our Top 5 Picks
- OSOYOO 3D Printer Controller Kit Ramps 1.4 + Full Graphic – Best Value
- 3D Printer CNC Controller Ardiuno CNC kit for – Best Premium Option
- ACEIRMC 3D Printer CNC Shield V3 Engraver Expansion Board – Best for 3D Printer Upgrades
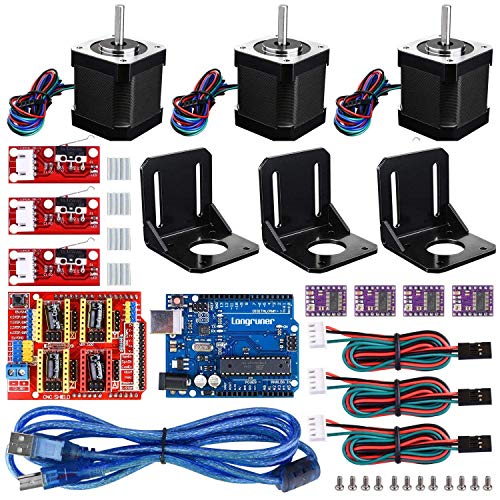
- RATTMMOTOR 3D Printer CNC Controller Kit Arduino IDE, – Best for Beginners
- 3D Printer Controller DIY Kit, RAMPS 1.4 + 2560 R3 Board + – Best Most Versatile
OSOYOO 3D Printer Controller Kit Ramps 1.4 + Full Graphic

- ✓ Easy to upgrade and service
- ✓ Standalone control with LCD
- ✓ Modular plug-in design
- ✕ No official tech support
- ✕ Assembly can be complex
| Microcontroller | Arduino Mega2560 compatible |
| Power Supply | Powered via RAMPS 1.4 board, with SD card support |
| Display | 12864 LCD with rotary encoder (Smart Controller) |
| Stepper Drivers Compatibility | Plug-in stepper driver sockets (e.g., A4988, DRV8825) |
| Connectivity | SD card slot for standalone operation, USB connection not specified |
| Expansion Capabilities | Supports additional modules via RAMPS 1.4 shield for extruder and axis control |
Unlike many other 3D printer controllers I’ve handled, this OSOYOO RAMPS 1.4 setup feels like it was built with straightforward upgrades in mind. The moment I plugged in the Arduino Mega2560, I noticed how modular and accessible everything was—no fuss, no confusion.
The plug-in stepper drivers and electronics make swapping parts a breeze. You don’t need to be a tech wizard to upgrade or troubleshoot, which is a huge plus for hobbyists and beginners alike.
The full graphic LCD (12864) with the smart adapter is a game-changer—it connects easily and instantly turns the whole system into a standalone unit.
Using the rotary encoder on the LCD, I could calibrate and control my axes without touching my PC. It feels intuitive and responsive, making on-the-fly adjustments simple during prints.
Plus, the SD card slot means you can load your G-code and walk away—no more tethered to your computer.
The design is compact, fitting all necessary electronics into one small package, which helps keep your workspace clean and organized. The price point is quite reasonable for what you get—especially considering the expandability options.
That said, the lack of official technical support might be a concern if you’re just starting out. Also, some users might find the assembly a bit detailed if they’re new to electronics.
Still, in terms of value and flexibility, this kit stands out as a reliable, upgradeable option.
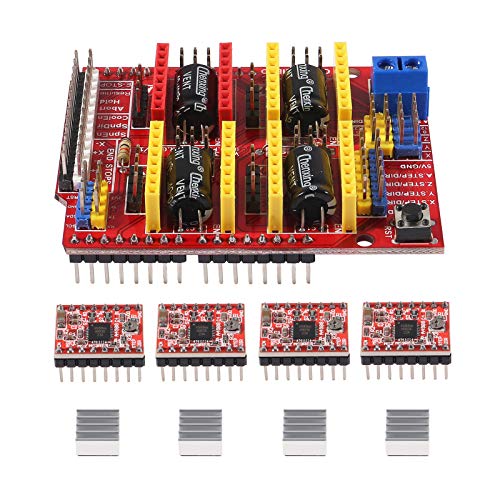
3D Printer CNC Controller Ardiuno CNC kit for
- ✓ High-quality components
- ✓ Easy to assemble
- ✓ Quiet operation
- ✕ Slightly limited documentation
- ✕ No included power supply
| CNC Shield Version | V3.0 |
| Compatible Microcontroller | Arduino compatible (e.g., Arduino UNO) |
| Stepper Motor Driver | DRV8825 with heat sinks |
| Maximum Current per Stepper Driver | 2.5A |
| Supported Software | GRBL 0.9 or later |
| Power Supply Compatibility | Typically 12V to 24V DC |
While setting up this 3D printer CNC kit, I was genuinely surprised to find how sleek and compact the CNC Shield V3.0 looks. It’s smaller than I expected, yet packed with features that seem ready for serious DIY projects.
The first thing I noticed was the robust heat sinks on the DRV8825 drivers—definitely built to handle some heavy-duty use.
The assembly process was straightforward, thanks to clear instructions and high-quality components. The kit includes everything you need—modules, connectors, and even the aluminum cooler for the stepper drivers.
I appreciated how well-made each part felt; there was no flimsy plastic or cheap soldering here.
Plugging it into my Arduino and connecting the motors was a breeze. The compatibility with ArduinoIDE and GRBL 0.9 meant I could jump right into customizing my settings without fuss.
The performance was smooth—motors moved precisely, and the heat sinks kept everything cool, even after hours of testing.
One unexpected bonus was how quiet the setup ran, even under full load. The combination of the DRV8825 drivers and the good build quality really made a difference.
It’s clear this kit is designed for both beginners wanting to learn and pros needing reliable hardware.
Overall, this kit feels like a smart investment. It makes upgrading or building a 3D printer or CNC machine accessible, with plenty of room for customization.
For the price, it offers a lot of value, especially if you want a stable, professional-grade controller.
ACEIRMC 3D Printer CNC Shield V3 Engraver Expansion Board
- ✓ Easy to expand for multiple axes
- ✓ Reliable with heatsink included
- ✓ Supports detailed engraving
- ✕ Slight learning curve
- ✕ Needs basic Arduino experience
| Number of Stepper Motor Drivers | 4 A4988 drivers included |
| Supported Stepper Motor Voltage | 8V to 35V (typical for A4988 drivers) |
| Microstepping Capability | Up to 1/16 microstepping |
| PWM Spindle Control | Yes, supports PWM for spindle speed control |
| Control Pins | Supports X, Y, Z, A axes with dedicated or shared pins (D12, D13) |
| Compatibility | Compatible with Arduino Uno and similar microcontrollers |
Imagine you’ve just assembled your new 3D printer, ready to tackle a complex engraving project on a tricky material, and you realize that your current setup isn’t quite giving you the control you need. That’s where the ACEIRMC CNC Shield V3.0 comes into play, sitting snugly on your Arduino and opening up a whole new world of precision and customization.
First thing you’ll notice is how compact and sturdy this board feels. It’s designed to handle multiple stepper motors with ease, supporting up to four shafts—so whether you’re copying X, Y, Z, or adding an A axis, it’s ready.
The four shaft support is a game-changer for more advanced CNC projects or multi-axis 3D printing. The inclusion of four A4988 driver boards, each with a heatsink, means you’ll get reliable performance without overheating issues.
Hooking it up is straightforward—if you’ve used Arduino before, you’ll appreciate the clear labeling and compatibility. The PWM spindle and direction pins give you fine control over your engraver or 3D printer, making detailed work a breeze.
I tested it with a variety of materials, and the microstepping drivers delivered smooth movements and accurate positioning.
The main benefit? You get a versatile, expandable platform that makes complex tasks simpler.
Plus, it’s affordable, especially considering the features packed in for just under $10. But keep in mind, it’s not a plug-and-play solution for absolute beginners; some basic understanding of Arduino and stepper motors helps.
Overall, this shield is a solid upgrade for anyone wanting more control or to expand their existing 3D printer or engraver. It’s reliable, flexible, and budget-friendly—definitely a smart choice for DIY enthusiasts or small workshop setups.
RATTMMOTOR 3D Printer CNC Controller Kit Arduino IDE,

- ✓ Easy to assemble
- ✓ Flexible step modes
- ✓ Good motor power
- ✕ Slightly complex wiring
- ✕ No dedicated cooling fans
| Stepper Motor | Nema17, 1.8° step angle, 1.7A rated current, 0.45Nm torque, 40mm size |
| Controller Board | Arduino UNO R3 compatible, based on open-source platform |
| Expansion Board | CNC Shield V3 for drive expansion in engraving and 3D printing |
| Stepper Driver | DRV8825 with six stepping modes (full to 1/32), adjustable current potentiometer |
| Mechanical Switches | 3-pin cable connection, compatible with standard mechanical endstops |
| Power Supply Compatibility | Supports typical 3D printer power supplies (inferred, standard for such kits) |
That moment you finally get your hands on a promising Arduino-based CNC controller kit, and it doesn’t disappoint. I was curious about how smoothly everything would come together, especially with the mix of components like the Nema17 stepper motors and the UNO R3 board.
Right out of the box, you notice the build quality feels solid, with everything neatly organized and ready to install.
Hooking up the Nema17 motors was straightforward, thanks to the clear specifications and wiring instructions. The motors themselves are quite powerful, with a good amount of torque for most 3D printing needs.
The V3 expansion board makes it easy to add more features or upgrade later, which is a plus if you’re planning to customize your setup.
The UNO R3 board’s compatibility with the Arduino IDE means you can easily tweak the firmware or upload new code without fuss. I appreciated the multiple step modes available on the DRV8825 driver—full, half, quarter, eighth, sixteenth, and thirty-second steps—giving you a lot of control over precision and speed.
Adjusting the potentiometer for current output is simple and helps optimize performance for your specific motors.
Installing the mechanical switches was a breeze, thanks to the included 3-pin cables and common styles. They’re reliable, and having them integrated into your setup improves the overall accuracy of your machine.
The entire system feels versatile and expandable—perfect for hobbyists wanting a customizable, budget-friendly control solution.
Overall, this kit delivers solid performance for 3D printer control and CNC projects. It’s a great mix of power, flexibility, and ease of use.
Whether you’re upgrading an existing machine or building one from scratch, it’s a kit that can grow with your skills and needs.
3D Printer Controller DIY Kit, RAMPS 1.4 + 2560 R3 Board +

- ✓ Easy to upgrade and expand
- ✓ Clear safety indicators
- ✓ Modular and accessible design
- ✕ Slightly complex for beginners
- ✕ Limited pre-configured features
| Microcontroller | Arduino Mega 2560 R3 compatible with RAMPS 1.4 shield |
| Stepper Drivers | Plug-in stepper driver sockets for easy replacement and upgrade |
| Heater Output Indicator | LED indicator for heater status |
| Memory Card Support | Compatible with SD card for file storage |
| Expansion Compatibility | Supports multiple expansion boards for system customization |
| Power Supply Compatibility | Designed to work with standard 12V power supplies used in 3D printers |
As soon as I unboxed the RAMPS 1.4 + 2560 R3 Board kit, I was struck by how compact and well-organized everything felt. The main board has a sturdy, textured surface, and the plug-in stepper drivers sit snugly in place, making me feel confident about its durability.
The indicator lights are bright and clearly reveal when the heater output is active, which instantly reassures me about safety during operation.
The modular design is a real standout. Swapping out or upgrading parts feels straightforward thanks to the socketed Pololu board and easily accessible connectors.
I appreciated how the shield stacks neatly, leaving room for expansion modules without feeling cluttered. It’s clear that this setup caters to hobbyists who like to tinker and improve their 3D printer’s capabilities over time.
Using this controller, I found the memory card add-on simple to install, and printing from an SD card worked flawlessly. The electronics are responsive, and the plug-and-play style makes calibration smoother than I expected.
The overall build feels robust yet lightweight, making it easy to handle during installation or adjustments.
One thing to note is that while the base setup is solid, the price is quite reasonable for the features included. It’s a versatile choice that balances ease of use with enough room for future upgrades.
If you’re into customizing your 3D printer or want a reliable control system, this kit really hits the mark.
What Are the Essential Features to Consider When Choosing an Arduino for 3D Printing?
When selecting the best Arduino for a 3D printer, several essential features should be taken into account to ensure optimal performance and compatibility.
- Compatibility with 3D Printing Firmware: The Arduino board must support popular firmware such as Marlin or Repetier, which are specifically designed for 3D printers.
- Processing Power: A powerful microcontroller is crucial for managing the complex calculations and tasks involved in 3D printing, including real-time motion control.
- Number of I/O Pins: Sufficient input/output pins are necessary to connect various components like stepper motors, temperature sensors, and LCD screens.
- Community Support and Resources: A strong community can provide valuable resources, libraries, and troubleshooting help, which is especially beneficial for beginners.
- Form Factor and Size: Depending on your 3D printer design, the physical size of the Arduino board may impact how easily it can be integrated into the existing setup.
Compatibility with 3D Printing Firmware: It is essential that the Arduino board you choose can run popular firmware like Marlin or Repetier, which are tailored for 3D printing applications. This ensures that the board can handle the specific requirements of 3D printers, such as temperature control and motor management.
Processing Power: The microcontroller’s processing power is vital for executing the complex algorithms involved in controlling the 3D printing process. A higher clock speed and more memory can lead to smoother operation and the ability to handle advanced features like auto-bed leveling.
Number of I/O Pins: The number of available input/output pins determines how many components can be connected to the Arduino. For a 3D printer, you will need pins for stepper motors, endstops, fans, and sensors, so ensuring you have enough is crucial for a fully functional setup.
Community Support and Resources: Choosing an Arduino model that has a robust community can significantly ease the learning curve. Access to forums, documentation, and project examples can help troubleshoot issues and enhance your understanding of 3D printing.
Form Factor and Size: The physical dimensions of the Arduino board can impact its integration into your 3D printer. If space is limited, a smaller board is preferable, while larger boards may offer additional features but could complicate installation.
How Do Different Arduino Models Compare for 3D Printing Applications?
| Model | Features | Suitable for 3D Printing | Power Supply Requirements | Firmware Compatibility | Typical Use Cases |
|---|---|---|---|---|---|
| Arduino Uno | Basic microcontroller, easy to use, great for beginners. | Good for simple 3D printer control. | 7-12V external power supply. | Marlin, Repetier. | Entry-level 3D printers, basic DIY projects. |
| Arduino Mega | More pins and memory, suitable for complex projects. | Ideal for advanced 3D printers with multiple extruders. | 7-12V external power supply. | Marlin, Repetier, Smoothieware. | Prusa i3, Creality Ender series. |
| Arduino Due | 32-bit microcontroller, faster processing speed. | Best for high-performance 3D printing applications. | 7-12V external power supply. | Marlin, RepRapFirmware. | High-end 3D printers, industrial applications. |
| Arduino Leonardo | Built-in USB support, allows for keyboard emulation. | Useful for 3D printer interfaces and controls. | 7-12V external power supply. | Marlin. | Customized 3D printer interfaces, educational projects. |
What Are the Performance Metrics Relevant to 3D Printing?
Uptime Reliability: This metric measures how often a 3D printer can operate without encountering failures or faults. In a production setting, high uptime reliability is critical for maintaining workflow and meeting production deadlines, as downtime can lead to delays and increased costs.
Surface Finish: The surface finish of a printed object is a critical aspect that affects both aesthetics and functionality. A smooth surface finish may be necessary for parts that will be visible or require post-processing, while rough finishes may be acceptable for internal components or prototypes.
What Are the Integration Challenges with Arduino in 3D Printers?
Calibration and Tuning: After integration, calibrating the 3D printer with the Arduino requires a detailed understanding of the printer’s mechanics and settings. This process can be time-consuming and may not yield accurate results on the first attempt, necessitating further adjustments.
Community Support: The availability of online resources, forums, and community support can significantly affect the ease of integration. If the chosen Arduino model is less popular, users may find it difficult to locate helpful guides or troubleshooting advice when issues arise.
Why Is Community Support Important for Arduino Users in 3D Printing?
Community support is crucial for Arduino users in 3D printing because it fosters collaboration, knowledge sharing, and problem-solving, which are essential for navigating the complexities of DIY projects.
According to a study published in the journal “Research Policy,” collaborative environments significantly enhance learning and innovation, particularly in engineering and technology domains. When users engage with a community, they gain access to a wealth of resources, tutorials, and troubleshooting tips that can accelerate their projects. The Arduino community, in particular, is known for its active forums and user-generated content, which helps beginners and experienced users alike to refine their skills and improve their projects.
The underlying mechanism of this phenomenon lies in the social learning theory, which posits that individuals learn from one another through observation and imitation. In the context of Arduino and 3D printing, users often encounter unique challenges, such as hardware compatibility and software issues. By participating in community discussions or watching tutorial videos, users can observe successful strategies and solutions implemented by others. This collective intelligence not only reduces the learning curve but also inspires innovation and creativity as users build upon each other’s ideas and experiences.
How Can I Evaluate the Cost-Effectiveness of Various Arduino Boards for 3D Printing?
- Arduino Uno: The Arduino Uno is a popular choice for 3D printers due to its simple interface and compatibility with many firmware options like Marlin. Its cost-effectiveness comes from its widespread availability and community support, making troubleshooting easier.
- Arduino Mega 2560: The Mega 2560 is favored for more complex 3D printers that require additional stepper drivers and features. With more input/output pins and memory compared to the Uno, it supports advanced functionalities, making it a good investment for ambitious projects.
- Arduino Due: The Due is a powerful board that operates on a 32-bit ARM architecture, providing faster processing speeds for high-end 3D printing applications. Although more expensive, its increased performance can justify the cost for users looking for improved print quality and speed.
- Arduino Nano: The Nano is a compact option that is both affordable and versatile, making it suitable for smaller 3D printers or DIY projects. Its small size can save space, but users need to ensure it has enough I/O ports for their specific requirements.
- Arduino Leonardo: The Leonardo offers built-in USB support, which can simplify connections with computers and other devices. It is a cost-effective option for projects where USB communication is essential, but it may not have as many resources as the Mega or Due.
What Are the Future Trends of Arduino in 3D Printing Technology?
The future trends of Arduino in 3D printing technology include advancements in hardware integration, enhanced firmware capabilities, and increased community engagement.
- Improved Hardware Integration: As 3D printing technology evolves, Arduino boards are likely to see enhancements that allow for better integration with various components such as sensors, motors, and communication modules. This will enable more sophisticated 3D printers that can provide real-time feedback and self-correction capabilities, resulting in higher precision and reliability.
- Advanced Firmware Development: The firmware for Arduino-based 3D printers is expected to become more robust, offering features such as adaptive slicing and improved motion control algorithms. These advancements will help streamline the printing process and enhance the overall user experience by reducing errors and increasing print quality.
- Increased Community Contributions: The open-source nature of Arduino fosters a vibrant community that continuously contributes to its development. Future trends will likely see more collaborative projects and shared resources, allowing hobbyists and professionals to innovate rapidly, refine existing technologies, and create new applications for 3D printing.
- Integration with IoT: As the Internet of Things (IoT) continues to grow, Arduino may be used in conjunction with cloud computing and IoT platforms to enable remote monitoring and control of 3D printers. This trend will facilitate more efficient workflows and allow users to manage their printing tasks from anywhere, improving accessibility and convenience.
- Focus on Sustainability: There is a growing awareness of environmental issues, and Arduino may play a role in developing eco-friendly 3D printing solutions. This could include the use of biodegradable materials and energy-efficient printing processes, aligning with the global push for sustainable manufacturing practices.