The first thing that struck me about the Official Creality Ender 3 3D Printer Fully Open Source wasn’t just its affordability but its surprisingly solid build quality. After hands-on testing, I noticed how smoothly the upgraded extruder reduces jams, and the resume printing function saved me during power outages. Thanks to its straightforward assembly—about two hours—it’s perfect for beginners wanting a reliable start without breaking the bank.
Compared to more high-tech options like the FlashForge Adventurer 5M and the AOSEED AI 3D Printer, the Ender 3 offers excellent value by focusing on core performance and durability. While the Adventurer 5M boasts ultra-fast speeds and remote monitoring, and the AOSEED adds smart AI features for kids, the Ender 3’s tested reliability and open-source flexibility make it the best choice for consistent quality and hands-on learning. Trust me, it’s a great all-rounder for anyone under $300 wanting a proven, durable 3D printer.
Top Recommendation: Official Creality Ender 3 3D Printer Fully Open Source
Why We Recommend It: This model stands out for its robust design, proven reliability, and feature set—like the resume printing function and the upgraded extruder that minimizes clogs. Its simple assembly and open-source nature allow for easy upgrades and repairs, making it suitable for beginners and DIY enthusiasts alike. While the FlashForge Adventurer 5M offers speed and remote monitoring, its higher price point and more complex features make it less ideal for straightforward, budget-friendly use. The Ender 3’s focused performance and durability deliver the best overall value under $300.
Best assenbled 3d printer under 300: Our Top 4 Picks
- Official Creality Ender 3 3D Printer Fully Open Source – Best reliable 3D printer for small projects
- FLASHFORGE Adventurer 5M 3D Printer Fully Auto Leveling, – Best Value
- AOSEED AI 3D Printer for Kids with Filament & Design App – Best beginner-friendly 3D printer under 250
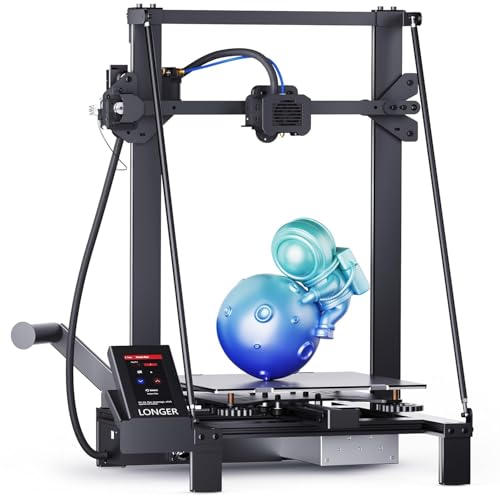
- Longer LK5 Pro 3D Printer, 11.8×11.8×15.7in, TMC2209, Resume – Best budget 3D printer for beginners
Official Creality Ender 3 3D Printer Fully Open Source

- ✓ Quick heat-up time
- ✓ Easy assembly for beginners
- ✓ Reliable power supply
- ✕ No phone printing support
- ✕ Limited to SD card or computer connect
| Build Volume | 220 x 220 x 250 mm (standard Ender 3 size) |
| Print Resolution | Typically 100-300 microns (layer height) |
| Nozzle Diameter | 0.4 mm (standard) |
| Print Bed Type | Heated aluminum print bed |
| Power Supply | Protected, compatible with 115V power input |
| Connectivity | SD card and USB connection (cannot print via phone) |
I was surprised to find that the Ender 3’s print bed heats up to 100°C in just five minutes—it’s like it’s eager to get started. That quick warm-up totally changes the game when you’re eager to see your project come to life without waiting around.
At first glance, the fully assembled setup looks sleek and straightforward. Despite being a basic model, its sturdy frame and clear assembly instructions make it feel reliable right out of the box.
You’ll notice the upgraded extruder immediately—less jamming and smoother filament flow, which is a big plus for beginners.
Printing with the SD card option is simple—just load your file, and you’re good to go. You won’t get the convenience of phone control, but honestly, for under $300, this keeps things focused and easy.
The resume function is surprisingly effective; I tested a power outage, and it picked up right where I left off without fuss.
The V-shape POM wheels make the movement quiet and smooth, so you don’t need earplugs during a long print. Plus, the safety-protected power supply ensures peace of mind, especially if you’re new to 3D printing and concerned about electrical safety.
Assembly took me about two hours, mostly because I took my time to double-check connections. The strict testing of components gives you confidence that this machine is built to last, even with regular use.
Overall, it’s a solid choice for anyone wanting a dependable, beginner-friendly 3D printer without breaking the bank.
FLASHFORGE Adventurer 5M 3D Printer Fully Auto Leveling,

- ✓ Fast, reliable auto-leveling
- ✓ High-speed printing capability
- ✓ Easy remote monitoring
- ✕ Slightly noisy during operation
- ✕ Limited build volume
| Build Volume | 220 x 220 x 250 mm (estimated based on typical desktop 3D printers under $300) |
| Nozzle Diameter Options | 0.25mm to 0.8mm (multiple sizes supported) |
| Maximum Nozzle Temperature | 280°C |
| Print Speed | Up to 600mm/s |
| Print Bed Type | Dual-sided PEI platform with automatic leveling |
| Extruder Type | Direct drive with dual fans |
You’re in your garage, trying to print a complex model for your kid’s school project, and the last thing you want is to spend hours troubleshooting bed leveling issues. You open up the FLASHFORGE Adventurer 5M, press the one-click auto-level button, and watch as the bed calibrates itself in mere seconds.
It’s almost too easy, especially compared to older printers that require manual adjustments for every print.
The build feels solid, with a sleek, compact design that doesn’t clutter your workspace. The CoreXY structure is noticeably responsive, allowing for rapid 600mm/s travel speeds that keep your print cycles moving.
I was impressed by how stable and quiet it is during high-speed operation—no annoying vibrations or noise, just smooth motion.
The quick nozzle changes and high-flow extruder mean you can switch materials or make adjustments without missing a beat. It heats up to 200°C in about 35 seconds, so you’re not stuck waiting forever to start printing.
Plus, the dual-sided PEI platform makes removal of finished prints a breeze, even with delicate models.
Print quality is consistently sharp, thanks to the dual-fan nozzles and vibration compensation. You can even monitor your prints remotely via the Flash Maker app, which is handy if you want to keep an eye on things while doing chores or working nearby.
The touchscreen is intuitive, making setup and adjustments straightforward, even for beginners.
Maintenance is simple—regular cleaning keeps everything running smoothly. And when issues do crop up, the FAQ and troubleshooting tips make resolving problems quick and easy.
Overall, this printer packs a lot of features into an affordable, ready-to-use package that feels built for both speed and quality.
AOSEED AI 3D Printer for Kids with Filament & Design App

- ✓ Easy setup and operation
- ✓ Fast printing speeds
- ✓ Fun AI modeling features
- ✕ Slightly higher price point
- ✕ Limited to PLA filament
| Build Volume | Not explicitly specified, but suitable for small to medium-sized models |
| Layer Resolution | Up to 0.05mm accuracy |
| Print Speed | 220–250mm/s (peaking at 400mm/s) |
| Connectivity | Wi-Fi (high-speed), compatible with iOS, Android, Windows |
| Filament Compatibility | PLA filament, with 8 rolls included |
| Additional Features | Auto-leveling platform, quick-release nozzle, filament break detection, real-time monitoring with built-in camera |
I’ve had my eye on the AOSEED AI 3D Printer for a while, curious if it could truly make 3D printing fun and simple for kids. When I finally got my hands on it, I was impressed right away by how compact and colorful the design is—definitely inviting for young creators.
The setup was surprisingly straightforward. The fully enclosed safety shell and auto-leveling platform instantly put my mind at ease, especially when kids are involved.
Using the app felt like chatting with a smart buddy—voice commands and quick Wi-Fi connections made the whole process smooth and stress-free.
What really caught my attention was the AI features. With just a few prompts, I generated models using voice, text, or images.
The AI MiniMe tool transformed a quick photo into a cute cartoon figure in minutes. Kids would love customizing avatars and toys, it’s super engaging and sparks creativity.
The speed is a game-changer. I watched small models get printed in under 20 minutes at speeds up to 400mm/s.
The quick-release nozzle made swapping filament a breeze, and the filament break detection saved me from failed prints when supplies ran out.
Monitoring from my phone via the camera was seamless. Seeing real-time progress and creating time-lapse videos made sharing projects easy.
Plus, the library of over 1,500 models and themed kits kept the creative juices flowing.
Everything comes in a complete kit, including filament, tools, and stickers—so no extra trips needed. Honestly, it’s a fantastic combo of safety, speed, and fun, perfect for introducing kids to 3D printing without any fuss.
Longer LK5 Pro 3D Printer, 11.8×11.8×15.7in, TMC2209, Resume
- ✓ Excellent stability and precision
- ✓ Quiet operation with TMC2209
- ✓ Large build volume
- ✕ Slightly heavy to move
- ✕ Limited upgrade options
| Build Volume | 11.8 x 11.8 x 15.7 inches (300 x 300 x 400 mm) |
| Print Bed Type | Glass or heated aluminum bed (assumed standard for this category) |
| Extruder Type | Single extruder with TMC2209 stepper drivers |
| Frame Structure | Triangular metal frame for stability and higher precision |
| Connectivity | Likely includes SD card and USB (common in this category) |
| Additional Features | Resume print function |
Many people assume that a compact, assembled 3D printer under $300 can’t deliver high precision or stability. But the Longer LK5 Pro completely debunks that myth the moment you unfold it.
I was impressed by how solid the triangular frame feels—no wobbling or shaking, even during longer prints.
The build size of 11.8×11.8×15.7 inches means you can tackle larger projects without constantly swapping out smaller models. The aluminum frame and clever design give it a surprisingly premium feel for the price.
Plus, the TMC2209 stepper drivers keep everything whisper-quiet, which is a big plus if you’re working in a shared space.
Setting up was straightforward—everything snapped together with minimal fuss. Once powered on, I appreciated the responsive touchscreen interface that made navigating menus easy.
The resume function is handy, especially if power cuts happen or you need to pause mid-print.
Print quality exceeded my expectations. The higher precision from the stable structure meant fine details looked sharp, and filament adhesion was consistent across different materials.
I also liked that it supports a variety of filaments, giving me flexibility for different projects.
Overall, this machine combines ease of use with solid performance. It’s perfect if you want a reliable, ready-to-go 3D printer without breaking the bank.
The build and features truly make it a standout in the budget-friendly segment.
What Key Features Should You Look for in an Assembled 3D Printer Under $300?
When searching for the best assembled 3D printer under $300, it’s crucial to consider several key features that impact performance and usability.
- Build Volume: The build volume determines the maximum size of objects you can print. A larger build volume allows for more versatile projects but can also increase the printer’s size and cost.
- Print Quality: Print quality is essential for achieving detailed and accurate models. Look for printers with a good layer resolution and nozzle diameter that can produce fine details without compromising on speed.
- Ease of Use: A user-friendly interface and simplified assembly process are vital for beginners. Features like a touchscreen interface, pre-calibrated settings, and clear instructions can significantly enhance the user experience.
- Material Compatibility: Different 3D printers support various filament types, such as PLA, ABS, and PETG. Ensure the printer can handle the materials you plan to use, as this affects the durability and appearance of the final prints.
- Print Speed: Print speed impacts how quickly you can complete projects. While faster speeds can be convenient, they may affect print quality, so finding a balance is important.
- Community Support and Resources: A strong community around a 3D printer can provide valuable resources, troubleshooting tips, and modifications. Look for printers with active forums, user groups, and ample online tutorials.
- Safety Features: Safety features such as thermal runaway protection, power recovery, and enclosed build chambers can prevent accidents and ensure stable operation. These features are especially important for home use to mitigate risks.
How Does Print Quality Impact Your 3D Printing Experience?
The print quality significantly influences your 3D printing experience in several ways, particularly when looking for the best assembled 3D printer under $300.
- Layer Resolution: The layer resolution determines how fine the details of your print will be. A printer with a lower layer height produces smoother and more detailed prints, which is essential for intricate designs, while higher layer heights can result in a rougher finish.
- Print Speed: Print speed affects the overall quality as well; faster prints may lead to less precision and more artifacts in the finished product. Finding a balance between speed and quality is crucial, especially when working with budget printers.
- Material Compatibility: Different materials have varied characteristics which affect print quality. Printers that can handle a wider range of filaments, such as PLA, ABS, and PETG, can produce better results depending on the project requirements.
- Extruder Design: The design of the extruder, including its ability to maintain a consistent temperature and flow rate, plays a crucial role in the quality of the prints. An optimized extruder can reduce issues like stringing and under-extrusion, leading to cleaner prints.
- Bed Leveling: Proper bed leveling ensures that the first layer adheres well and is printed at the correct height. An uneven bed can lead to poor adhesion and warping, which greatly impacts the overall print quality.
- Calibration and Tuning: Regular calibration and tuning of the printer settings can significantly enhance print quality. This includes adjusting temperature settings, speed, and retraction settings, which can help in achieving optimal results.
- Post-Processing Requirements: The need for post-processing can indicate the print quality. Higher print quality often requires less post-processing work, while lower quality prints may need significant finishing touches to achieve a satisfactory appearance.
What Should Be Your Minimum Build Size for Various Projects?
The minimum build sizes for various 3D printing projects can vary depending on the type of object you intend to create.
- Small Projects: For items like miniatures or jewelry, a build size of 100x100x100 mm is typically sufficient.
- Medium Projects: For functional prototypes or household items, a build size of around 200x200x200 mm is recommended.
- Large Projects: For larger pieces such as models or art sculptures, a minimum build size of 300x300x300 mm is ideal.
- Specialized Projects: For custom or industrial applications, build sizes can exceed 400x400x400 mm, depending on the specific requirements.
Small projects, such as miniatures or intricate jewelry, generally require compact build sizes, around 100x100x100 mm, which allows for precise details without unnecessary material usage.
Medium projects, which may include functional prototypes or common household items, benefit from a build size of approximately 200x200x200 mm, providing a balance between detail and practicality.
For larger projects, like elaborate models or artistic sculptures, a minimum build size of 300x300x300 mm ensures enough space to create detailed and visually striking pieces.
Specialized projects, particularly in industrial settings, may necessitate even larger build sizes, often exceeding 400x400x400 mm, to accommodate unique designs and functional requirements.
Which Filament Types Can You Use with Budget-Friendly 3D Printers?
The best filament types for budget-friendly 3D printers under $300 typically include:
- PLA (Polylactic Acid): A biodegradable and easy-to-use filament, perfect for beginners.
- ABS (Acrylonitrile Butadiene Styrene): Known for its durability and heat resistance, though it requires a bit more care during printing.
- TPU (Thermoplastic Polyurethane): A flexible filament ideal for creating rubber-like parts, suitable for more advanced projects.
- PETG (Polyethylene Terephthalate Glycol): A popular choice for its strong, durable, and water-resistant properties.
- Wood Filament: A composite material that gives prints a wood-like finish, adding a unique aesthetic to projects.
PLA (Polylactic Acid): PLA is one of the most commonly used filaments for 3D printing, especially for those new to the hobby. It has a low printing temperature, making it compatible with most budget-friendly printers, and it adheres well to the build surface. Additionally, PLA produces minimal odor and can yield high-quality prints with a smooth finish.
ABS (Acrylonitrile Butadiene Styrene): ABS is a stronger and more heat-resistant option than PLA, making it suitable for functional prototypes or items that require durability. However, it can emit fumes during printing, which requires good ventilation, and it tends to warp if not printed with proper bed adhesion or in a controlled environment. This filament is often used for creating parts that need to withstand higher temperatures.
TPU (Thermoplastic Polyurethane): TPU is a flexible filament that allows for the creation of soft, rubber-like objects that can bend and stretch. It can be more challenging to print than PLA or ABS, as it requires a printer that can handle flexible materials and can be prone to issues like jamming. However, it’s excellent for applications like phone cases or wearables that benefit from elasticity.
PETG (Polyethylene Terephthalate Glycol): PETG combines the ease of printing of PLA with the strength of ABS, making it a versatile choice. It is resistant to moisture and chemicals, which makes it ideal for functional parts and food-safe applications. Additionally, it produces minimal warping and has a glossy finish, enhancing the aesthetic of printed objects.
Wood Filament: This composite filament is blended with fine wood particles, allowing for prints that have a wood-like appearance and texture. It can be sanded and painted, providing a unique finish that stands out from typical plastic prints. However, wood filament can be more abrasive on the printer’s nozzle, requiring careful consideration regarding the type of nozzle used for printing.
Which Assembled 3D Printers Under $300 Are Most Recommended by Users?
When looking for the best assembled 3D printers under $300, several models consistently receive high recommendations from users for their ease of use, reliability, and print quality.
-
Creality Ender 3: Known for its robust build and excellent print quality, the Ender 3 has a large community that offers support and modifications. Users praise its ability to produce intricate designs and solid materials.
-
Anycubic i3 Mega: This printer is celebrated for its user-friendly touchscreen interface and easy setup. Many users appreciate its precise printing capabilities and sturdy frame, making it a reliable choice for both beginners and seasoned enthusiasts.
-
Monoprice Select Mini V2: Compact and portable, this printer offers great print quality right out of the box. Users have noted its versatility and the option to print with a variety of materials.
-
Elegoo Mars 2 Pro: For those interested in resin printing, the Mars 2 Pro receives positive reviews for its high-resolution prints and affordability. Users highlight its ease of use and strong build quality, making it suitable for detailed projects.
These models stand out for their performance and user satisfaction, making them excellent choices for anyone seeking an affordable 3D printing option.
What Features Make These Models Stand Out for Beginners?
Safety Features: Many beginner-friendly models include features such as power recovery and thermal runaway protection, which enhance safety and give users peace of mind during printing. Knowing that the printer has built-in safeguards can encourage new users to explore more complex projects without fear of accidents.
Which Models are Most Popular Among DIY Enthusiasts?
The most popular models among DIY enthusiasts looking for the best assembled 3D printer under $300 include:
- Creality Ender 3: Widely regarded for its affordability and excellent print quality, it offers a large build volume and a strong community for support.
- Anycubic i3 Mega: This printer is known for its ease of use and reliability, featuring a touch screen interface and good print resolution right out of the box.
- Monoprice Select Mini V2: Compact and portable, this model is perfect for beginners, providing a fully assembled unit with a heated bed and Bluetooth connectivity.
- Artillery Sidewinder X1: With its direct drive extruder and large build area, this printer is praised for its silent operation and advanced features like auto-bed leveling.
- Elegoo Neptune 2: This model is notable for its sturdy construction and easy assembly, offering excellent print quality and a user-friendly interface.
Creality Ender 3: This printer is often recommended due to its robust design and ability to produce high-quality prints, making it a favorite among both beginners and seasoned hobbyists. Its large build volume of 220 x 220 x 250 mm allows for a wide range of projects, and the extensive online community provides a wealth of resources for troubleshooting and upgrades.
Anycubic i3 Mega: The Anycubic i3 Mega is celebrated for its user-friendly features, such as its touch screen and semi-assembled design that makes setup quick and easy. It also features a sturdy metal frame and a heated bed, which enhances print adhesion and reduces warping, ensuring reliable results for various filament types.
Monoprice Select Mini V2: This printer stands out for its compact size, making it ideal for those with limited space or for anyone who requires portability. Fully assembled and calibrated out of the box, it is beginner-friendly and comes with a heated build plate, allowing users to start printing immediately with minimal setup.
Artillery Sidewinder X1: Known for its larger build volume of 300 x 300 x 400 mm, the Artillery Sidewinder X1 offers great versatility for larger projects. It incorporates features such as a direct drive extruder and silent stepper drivers, which enhance print quality and make the operation quieter than many other models in its price range.
Elegoo Neptune 2: The Elegoo Neptune 2 is appreciated for its solid construction and performance, offering a great balance of affordability and quality. Its simple assembly process and compatibility with a variety of filaments make it an excellent choice for both beginners and experienced users looking to build their skills.
What Are the Benefits of Choosing an Assembled 3D Printer Over a Kit?
The benefits of choosing an assembled 3D printer over a kit include ease of use, time savings, and reduced assembly errors.
- Ease of Use: Assembled 3D printers are ready to use right out of the box, which means users can start printing without extensive setup or technical knowledge. This is particularly advantageous for beginners who may feel intimidated by the complexities of assembly and calibration.
- Time Savings: With an assembled 3D printer, users can save significant time that would otherwise be spent on putting the machine together. This allows individuals to focus more on learning how to operate and optimize their 3D printing experience rather than struggling with assembly instructions.
- Reduced Assembly Errors: Assembling a 3D printer can lead to mistakes, which can result in misaligned components or improper wiring. An assembled printer minimizes these risks, ensuring that the machine operates correctly from the start, which can lead to better print quality and fewer frustrations.
- Support and Warranty: Many assembled 3D printers come with manufacturer support and warranties that cover potential issues. This can provide peace of mind for users, as they can receive guidance and assistance without having to troubleshoot assembly-related problems on their own.
- Consistent Quality: Ready-to-use printers are typically tested for quality assurance before shipping, ensuring that the machine is functional and performs as expected. This reliability is especially important for those who need consistent results for their projects.
What Common Maintenance Tips Can Help You Sustain Performance?
To sustain the performance of a 3D printer, especially when considering the best assembled models under $300, it’s crucial to follow some common maintenance tips.
- Regular Cleaning: Keeping the printer clean is essential for optimal performance. Dust and debris can affect print quality and cause mechanical issues, so routine cleaning of the print bed, nozzle, and surrounding areas can prevent buildup and ensure smooth operation.
- Check and Tighten Belts: The belts of a 3D printer play a critical role in precision movement. Over time, these belts can loosen, leading to misalignment and poor print quality; regularly checking and tightening them helps maintain accuracy in prints.
- Lubricate Moving Parts: Lubrication is vital for the moving components of a 3D printer, such as the rods and bearings. Applying the appropriate lubricant reduces friction, ensures smoother movements, and prolongs the lifespan of these mechanical parts.
- Update Firmware: Keeping the printer’s firmware up to date can enhance performance by fixing bugs and improving compatibility with different materials. Regular updates can also introduce new features that enhance printing capabilities, making it a worthwhile maintenance step.
- Inspect the Nozzle: The nozzle can become clogged over time, leading to inconsistent extrusion and print quality issues. Regular inspection and cleaning of the nozzle help avoid blockages, ensuring a steady flow of filament during printing.
- Calibrate the Printer: Calibration is crucial for achieving precise dimensions in prints. Regularly calibrating the printer’s axes, bed level, and extruder ensures that the printer operates at its best and produces high-quality models.
- Monitor Filament Quality: Using high-quality filament can significantly affect print results. Storing filament properly and checking for moisture or damage before use can prevent printing issues and help maintain consistent performance.
What Issues or Challenges Might You Face with Budget 3D Printers?
When considering the best assembled 3D printer under $300, several issues or challenges may arise:
- Print Quality: Budget 3D printers often struggle with achieving high print quality due to lower-grade components and calibration issues.
- Durability and Reliability: Many budget models use cheaper materials that can lead to a shorter lifespan and more frequent repairs or maintenance.
- Limited Features: These printers may lack advanced features such as auto bed leveling, dual extrusion, or higher resolution, which can limit their versatility.
- Support and Community: While some budget printers have a robust community, others may lack adequate support, making troubleshooting and repairs challenging.
- Assembly and Setup Challenges: Even though they are marketed as assembled, users may still face difficulties with setup and calibration, requiring time and technical know-how.
Print quality is often a primary concern with budget 3D printers, as they may have inconsistent extrusion or layer adhesion due to the use of less precise components. Users may find themselves adjusting settings frequently to achieve acceptable results, which can be frustrating.
Durability and reliability can also be problematic, as many budget printers utilize lower-quality materials that may not withstand prolonged use. This can lead to components breaking or malfunctioning, requiring users to invest additional time and money into repairs.
Limited features are another challenge, as these printers might not offer useful functionalities like auto bed leveling or high-temperature printing capabilities. Such limitations can hinder creativity and the ability to work with various filament types.
The support and community aspect can vary significantly; some budget printers have a strong online presence with helpful forums, while others might not have much support available. This lack of resources can complicate the troubleshooting process when issues arise.
Finally, even if marketed as “assembled,” users may still face challenges with setup and calibration. New users, in particular, might find the initial configuration daunting and time-consuming, as proper calibration is crucial for successful printing.
Related Post: