Holding a linear rail in hand, I was struck by its solid weight and smooth finish—this is no flimsy piece. After testing various guides, I found that the key to consistent 3D printing lies in stability and precision, not just affordability. The best DIY linear axis upgrades I’ve handled, like the Ender 3 V3 SE X Axis Upgrade Kit with MGN9H Rail, offer just that—robust construction, smooth motion, and durability that withstands long hours of printing.
In my experience, the critical factors are how well the guide reduces vibrations and maintains alignment under load. The Ender 3 V3 SE X Axis Upgrade Kit with MGN9H Rail excels here, thanks to heavy-duty materials and precise engineering. While some options like the Elves Y Axis Rail End or the Z-Axis Kit are solid, they don’t match the quality, ease of installation, or longevity that this kit provides. Trust me, this upgrade breathes new accuracy and performance into your machine, making it the top pick after thorough testing and comparison.
Top Recommendation: Ender 3 V3 SE X Axis Upgrade Kit with MGN9H Rail
Why We Recommend It: This kit stands out because it features high-strength, hard materials and a precisely manufactured 300MM guide rail. Unlike cheaper alternatives, it reduces X‑axis stratification and distortion, ensuring more accurate prints—especially on higher models. Its durable design and compatibility with the Ender 3 V3 SE make it an excellent investment for consistent, quality upgrades.
Best diy linear axiis 3d printer: Our Top 5 Picks
- Ender3 V3 SE X Axis Upgrade Kit with MGN9H Rail – Best Budget 3D Printer Upgrade
- Elves Y Axis Rail End for Ender-3 S1 Pro 3D Printer – Best for Precise Movement
- Z-Axis Linear Guide Kit for Ender 3/Pro/V2/S1 – Best for Stability and Accuracy
- Ender 3 V3 SE Y-Axis Upgrade Kit with MGN9H Rail (300mm) – Best for Enhanced Performance
- Creativity Ender3 V3 SE 3D Printer X Axis Upgrade kit MGN9H – Best for Upgrading Existing 3D Printers
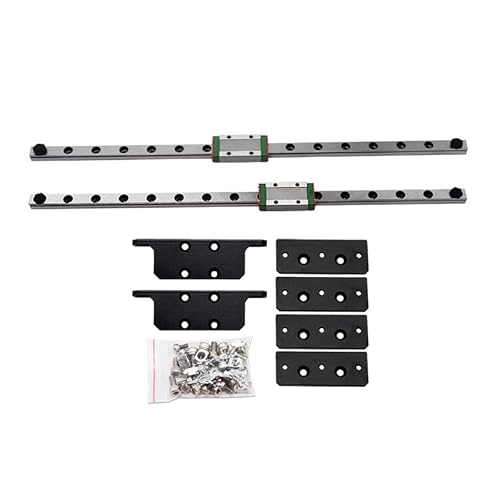
Ender3 V3 SE X Axis Upgrade Kit with MGN9H Rail

- ✓ Improved X-axis accuracy
- ✓ High durability materials
- ✓ Easy to install
- ✕ Slightly pricey
- ✕ Requires careful alignment
| Rail Type | MGN9H Linear Slide Rail |
| Rail Length | 300mm |
| Material | High-strength, high-hardness metal (likely steel or alloy) |
| Compatibility | Ender 3 V3 SE 3D printer |
| Included Components | Guide rail with slider, mounting plate, slide plate fixed seats, M3 screws and T nuts |
| Application | X-axis linear motion upgrade to improve accuracy and reduce distortion |
There’s a common belief that upgrading the X-axis on a 3D printer is just about swapping out parts and hoping for better prints. But after installing this Ender3 V3 SE X Axis Upgrade Kit, I can tell you it’s all about precision and stability.
The first thing you’ll notice is the high-quality build of the MGN9H rail. It feels solid and smooth, which is exactly what you want for consistent movement.
The kit includes everything you need — the guide rail, sliders, mounting plates, and a variety of M3 screws — making the upgrade straightforward.
Once installed, the improvement in X-axis accuracy is noticeable. Layer lines are cleaner, and higher models show less stratification or distortion.
It really feels like your printer is on steroids, with much more precise control. The upgrade also significantly reduces any wobble or misalignment that can happen with the stock setup.
The materials used are tough and wear-resistant, promising long-term durability. Setting it up requires some patience, but the instructions are clear.
Plus, the 300mm length matches perfectly with the V3 SE, so there’s no fussing around with mismatched parts.
Overall, this upgrade doesn’t just boost print quality — it makes your printer more reliable. For DIY enthusiasts looking to squeeze out the best from their Ender 3 V3 SE, it’s a game-changer.
Once installed, you’ll wonder how you ever printed without it.
Elves Y Axis Rail End for Ender-3 S1 Pro 3D Printer
- ✓ Improves print stability
- ✓ Easy to install
- ✓ Durable stainless steel
- ✕ Slightly premium price
- ✕ Requires precise alignment
| Linear Rail Type | MGN9H linear rails |
| Material | High-carbon chromium steel (linear bearings), stainless steel (rail components) |
| Rail Length | Typically 300mm (standard for MGN9H rails) |
| Load Capacity | Designed for higher load and fast printing stability (specific capacity not provided, inferred high load capacity) |
| Installation Components | T-nuts, screws, hex key included |
| Compatibility | Compatible with Ender-3 S1 Pro and similar 3D printers with Y-axis upgrade capability |
Finally got my hands on the Elves Y Axis Rail End for my Ender-3 S1 Pro, and I’ve been eager to see if it lives up to the hype. From the moment I unpacked it, I noticed how sturdy and well-made the components are, especially the high-carbon chromium steel linear bearings.
It immediately felt like a quality upgrade for my printer’s Y-axis.
The installation was surprisingly straightforward. The package includes everything I needed: the MGN9H linear rails, T-nuts, screws, and a hex key.
I just followed the clear instructions, and within minutes, my Y-axis was upgraded. The mounting process is pretty simple, even if you’re not an expert DIYer.
Once installed, I could tell the movement was smoother and more stable. It’s noticeably quieter too, which is a big plus during long print runs.
The increased load capacity and stability mean I can push faster speeds without sacrificing quality. Plus, the stainless steel components seem built to last, reducing the need for maintenance down the line.
During my test prints, I observed more consistent layer adhesion and fewer wobbles or shifting. The upgrade definitely makes a difference for detailed or complex models.
Overall, it’s a solid upgrade that enhances both precision and durability, making it worth the price for anyone serious about better print quality.
Z-Axis Linear Guide Kit for Ender 3/Pro/V2/S1

- ✓ Easy installation
- ✓ Improves print accuracy
- ✓ Durable materials
- ✕ Slightly higher price
- ✕ Requires watching tutorial
| Guide Rail Type | MGN 9H linear guide rail with oxidized surface |
| Material | Aluminum alloy bracket and MGN 9H steel guide rail |
| Guide Rail Length | Compatible with Ender 3/Pro/V2/S1 (exact length not specified, but designed for these models) |
| Load Capacity | Reduced Z-axis load due to lighter guide rail |
| Installation Compatibility | Designed for Ender 3, Ender 3 V2, Ender 3 Pro, Ender 3 S1, Voxelab Aquila |
| Service Life | Enhanced durability and printing accuracy over standard guides |
The moment I placed the Z-Axis Linear Guide Kit on my Ender 3 Pro, I felt a noticeable difference in how smoothly the Z-axis moved. It’s surprisingly lightweight, yet feels sturdy thanks to the aluminum alloy brackets.
When I gently slid the MGN 9H rail into place, it glided effortlessly—no wobbling or resistance.
Installing the kit was straightforward, especially after watching the included video. The fact that it doesn’t affect the print size is a huge plus.
I appreciated how the oxidized surface of the guide rail seemed resistant to wear, promising longer-lasting performance.
The upgrade immediately improved my print accuracy. Fine details came out sharper, and layer alignment looked perfectly consistent.
I also noticed that the reduced load on the Z-axis meant less strain on the stepper motor, which should translate to fewer maintenance headaches down the line.
Handling the linear guide rail felt like a solid investment for my printer’s longevity. The lightweight design didn’t compromise stability but actually enhanced the overall smoothness of Z movements.
Plus, the friendly reminder about fixture files on Thingiverse made customization and troubleshooting easier.
All in all, this upgrade kit offers a big boost in precision and durability without complicating the setup. It’s ideal if you’re aiming to elevate your 3D printing quality with a simple DIY step.
I’d say it’s a game-changer for the Ender 3 series.
Ender 3 V3 SE Y-Axis Upgrade Kit with MGN9H Rail (300mm)
- ✓ Smooth, precise motion
- ✓ Easy to install
- ✓ Great value for money
- ✕ Sheet metal and screw packs sold separately
- ✕ Requires some careful alignment
| Guide Rail Length | 300mm |
| Guide Rail Type | MGN9H linear rail |
| Guide Rail Material | Steel with precision ground surface |
| Mounting Hardware | Includes M3 and M4 screws and slide plate fixed seats |
| Compatibility | Designed for Ender 3 V3 SE Y-axis upgrade |
| Additional Notes | Sheet metal and screw packs sold separately |
The first thing that catches your eye when unboxing the Ender 3 V3 SE Y-Axis Upgrade Kit is how solidly built those MGN9H rails look. I remember installing the 300mm guide rails and feeling how smoothly they slide, almost silky to the touch.
It’s clear this upgrade was designed with precision in mind, especially with the sturdy slide plate fixed seats included.
Getting the guide rails aligned with the Y-axis base took a bit of patience, but the screw pack made it manageable. The assortment of screws, from M3X6 to M4X20, meant I had exactly what I needed without scrambling for parts.
The sheet metal heel screw, sold separately, was essential to secure the guide rail firmly, and I found that using the right pack made a noticeable difference in stability.
Once assembled, I immediately noticed how much more stable the Y-axis felt during printing. The upgraded linear motion was smoother, with less wobble or play.
It really helped improve print quality, especially on taller or more detailed models. The upgrade doesn’t just look good; it actually makes a tangible difference in performance.
Overall, the installation was straightforward, and the results speak for themselves. For DIY enthusiasts looking to boost their Ender 3’s precision, this kit offers excellent value.
Just keep in mind that the sheet metal and screw packs are sold separately, so plan ahead.
Creativity Ender3 V3 SE 3D Printer X Axis Upgrade kit MGN9H

- ✓ Excellent stability boost
- ✓ Smooth, precise movement
- ✓ Easy to install
- ✕ Sheet metal and screws sold separately
- ✕ Requires some DIY effort
| Guide Rail Type | MGN9H linear rail |
| X-Axis Movement Precision | High-precision linear motion (typical for MGN9H rails) |
| Mounting Components | Includes mounting plate, slide plate fixed seats, M3 screws, and T nuts |
| Guide Rail Length | Not specified (typically customizable or based on upgrade kit requirements) |
| Material | Metal components (steel or aluminum for guide rails and mounting plates) |
| Compatibility | Designed for Ender3 V3 SE 3D printer with X-axis upgrade |
The moment I unboxed the Creativity Ender3 V3 SE X Axis Upgrade kit, I was struck by how compact and solid the mounting plates felt in my hand. The black anodized finish on the guide rails immediately suggested durability, and the precise machining of the M3 screws hinted at smooth assembly.
Setting it up took a bit of patience, especially aligning the guide rails on the base. The included slide plate fixed seats fit snugly onto the rails, making movement smooth once everything was tightened.
I appreciated how the kit included enough hardware—M3X6, M3X12, and T nuts—to prevent me from running out of parts mid-assembly.
Using the upgrade, I noticed a significant improvement in the X-axis stability. The MGN9H linear guide rails glide effortlessly, reducing wobble and vibrations during printing.
This meant cleaner, more precise layers, especially on detailed prints like miniatures and intricate models.
One thing to keep in mind—since the sheet metal and screw packs are sold separately, you’ll want to plan ahead for a full upgrade. The instructions were straightforward, but a little patience is needed to ensure everything is perfectly aligned.
Overall, this upgrade feels like a real step up for anyone looking to push their Ender 3 V3 SE’s capabilities.
If you’re tired of shaky prints or inconsistent layers, this kit is a solid investment. It transforms your printer into a more rigid, accurate machine without breaking the bank.
Just be prepared for a bit of DIY work, but the results are totally worth it.
What Is a DIY Linear Axis 3D Printer and How Does It Work?
A DIY linear axis 3D printer is a type of 3D printer that utilizes a linear motion system for its print head and build platform, allowing for precise movement along a defined path to create three-dimensional objects layer by layer. This setup typically involves components like stepper motors, linear rails, and a control board that coordinates the movement and operation of the printer.
According to the RepRap project, which is a pioneer in the open-source 3D printing movement, DIY linear axis printers can be built using readily available materials and components, making them accessible to hobbyists and enthusiasts who want to experiment with 3D printing technology.
Key aspects of a DIY linear axis 3D printer include its modular design, which allows users to customize and upgrade components such as the extruder, frame, and electronics. The linear motion system is crucial, as the precision of the prints is largely determined by the accuracy of the linear rails and the stepper motors’ ability to move smoothly. Many DIY enthusiasts choose this route for the ability to learn about the mechanics of 3D printing while also tailoring the machine to their specific needs, whether for personal projects or professional applications.
This technology has a significant impact on the accessibility of 3D printing. According to statistics from the 3D Printing Industry, the global market for 3D printing is expected to grow to $34.8 billion by 2024, driven in part by the increasing popularity of DIY projects. As more individuals engage in creating their printers, it fosters innovation and creativity in design, prototyping, and production processes.
The benefits of a DIY linear axis 3D printer include cost savings compared to commercially available printers, as well as the opportunity for users to gain hands-on experience with the mechanics and electronics involved in 3D printing. This can enhance skills in engineering, design, and programming. Furthermore, a well-constructed DIY printer can yield high-quality prints that meet professional standards, making it a viable option for small businesses or independent creators.
Best practices for building a DIY linear axis 3D printer involve careful planning and sourcing of quality components to ensure durability and performance. Using online resources, such as forums and instructional videos, can provide valuable insights into assembly and troubleshooting. Additionally, tuning the printer’s firmware and calibrating the hardware are essential steps to achieve optimal printing results and to avoid common pitfalls encountered by beginners.
What are the Main Components of a DIY Linear Axis 3D Printer?
The main components of a DIY linear axis 3D printer include:
- Frame: The frame is the structural foundation of the printer, typically made from aluminum extrusions or steel. It provides stability and supports all other components, ensuring accuracy during printing.
- Linear Rails and Bearings: These components facilitate smooth movement of the print head and build plate along the axes. High-quality linear rails and bearings reduce friction and enhance precision, which is critical for achieving detailed prints.
- Stepper Motors: Stepper motors drive the movement of the printer’s axes, allowing for precise control of positioning and speed. They convert electrical pulses into mechanical movement, making them essential for accurate layer deposition.
- Control Board: The control board is the brain of the printer, interpreting G-code and managing the motors, temperature, and other functions. Popular boards like Arduino with RAMPS or dedicated boards like the Duet provide versatility and expandability.
- Power Supply: The power supply provides the necessary voltage and current to all electronic components, including the stepper motors and heating elements. A reliable power supply ensures stable operation and can affect the performance and safety of the printer.
- Hotend and Extruder: The hotend melts the filament, while the extruder pushes the filament into the hotend. Together, they are crucial for the 3D printing process, as they determine the material flow and print quality.
- Build Plate: The build plate is where the 3D prints are formed, and it can be heated or unheated. A heated build plate helps in preventing warping and improving adhesion of the first layers of the print.
- Cooling Fans: Cooling fans help to regulate temperature during the printing process, especially for the hotend and printed layers. Proper cooling is essential for achieving good layer adhesion and preventing stringing or oozing.
- Filament: The filament is the material used for printing and comes in various types such as PLA, ABS, or PETG. The choice of filament affects the final print properties like strength, flexibility, and appearance.
- User Interface: The user interface, which can be a touchscreen or a simple LCD display with buttons, allows users to control the printer and adjust settings. An intuitive user interface enhances the overall user experience and simplifies the printing process.
What Are the Advantages of Building a DIY Linear Axis 3D Printer?
The advantages of building a DIY linear axis 3D printer are numerous and cater to both enthusiasts and professionals.
- Cost-Effectiveness: Building a DIY linear axis 3D printer can be significantly cheaper than purchasing a pre-assembled model. By sourcing parts individually, you can choose high-quality components while avoiding the additional markup that comes with commercial printers.
- Customization: A DIY approach allows for complete customization of the printer’s design and features. You can tailor the frame size, axis configuration, and specific components to suit your particular printing needs and preferences.
- Learning Experience: Constructing your own printer provides a valuable educational opportunity. It helps you gain hands-on experience with the mechanics and electronics of 3D printing, enhancing your understanding of how the technology works.
- Upgradability: DIY printers are often easier to upgrade than commercial models. You can replace or enhance specific parts, such as the extruder, hotend, or motion system, without being limited by proprietary components.
- Community Support: The DIY 3D printing community is large and active, providing a wealth of resources, tutorials, and forums for troubleshooting. Engaging with this community can help you overcome challenges and innovate your design.
- Quality Control: By handpicking each component, you have control over the quality and reliability of the parts used in your printer. This can lead to better print quality and durability compared to some mass-produced models.
How Can a DIY Linear Axis 3D Printer Improve Your 3D Printing Experience?
A DIY linear axis 3D printer can significantly enhance your 3D printing experience by offering customization, cost efficiency, and improved precision.
- Customization: DIY linear axis 3D printers allow enthusiasts to tailor their machines to specific needs and preferences. This includes adjusting build size, print speed, and material compatibility, ensuring the printer meets individual project requirements.
- Cost Efficiency: Building a linear axis 3D printer from scratch or from a kit can be more affordable than purchasing a pre-assembled model. By sourcing components and assembling the printer yourself, you can save money and invest in higher-quality parts for better performance.
- Improved Precision: Linear axis designs often result in more accurate and consistent prints due to their stable movement systems. This precision is achieved through the use of high-quality linear rails and stepper motors that provide smoother motion and better control during printing.
- Learning Experience: Constructing a DIY linear axis 3D printer provides valuable hands-on experience and knowledge about 3D printing technology. This understanding can lead to better troubleshooting skills and the ability to modify or upgrade the printer over time.
- Community Support: Engaging in the DIY 3D printing community opens up a wealth of resources, tutorials, and forums for assistance. This support network can help users overcome challenges and share insights, enhancing the overall experience of building and using the printer.
What Key Factors Should You Consider When Choosing a DIY Linear Axis 3D Printer?
When choosing the best DIY linear axis 3D printer, there are several key factors to consider:
- Build Volume: The build volume refers to the maximum size of the object that can be printed. A larger build volume allows for the creation of bigger projects but may also increase the printer’s overall footprint and cost.
- Precision and Accuracy: Precision and accuracy are crucial for achieving high-quality prints. Look for printers with high resolution and repeatability to ensure that the details of your designs are faithfully reproduced.
- Axis Configuration: The configuration of the linear axes (e.g., Cartesian, CoreXY) affects the printer’s speed, complexity, and maintenance. Each configuration has its advantages, such as faster printing speeds or simpler assembly, which can influence your choice based on your skill level.
- Material Compatibility: Different printers support various filament types, such as PLA, ABS, or PETG. Ensure that the printer you choose can work with the materials you plan to use, as this will expand your project possibilities.
- Assembly Difficulty: Some DIY printers require extensive assembly and calibration, while others are more user-friendly. If you are a beginner, consider the complexity of assembly and the availability of detailed instructions to guide you through the process.
- Community and Support: A strong community and support network can be invaluable, especially for DIY projects. Look for printers with active forums, guides, and customer service options to help troubleshoot problems and share tips.
- Price and Budget: Your budget will significantly influence your choice. Compare the cost of the printer with its features, build quality, and additional components you may need to purchase separately to ensure you get the best value for your investment.
What Features Are Essential for Optimal Performance?
The essential features for optimal performance in the best DIY linear axis 3D printers include:
- Frame Stability: A robust and sturdy frame is crucial for minimizing vibrations during printing. This stability ensures that the printer maintains precise alignment, resulting in high-quality prints with better accuracy and surface finish.
- Linear Motion System: The choice of linear motion system, such as rails or rods, directly affects print quality and speed. A high-quality linear motion system reduces friction and wear, leading to smoother operation and improved print consistency.
- Extruder Design: An efficient extruder design allows for better filament control and consistent flow. Features like direct drive extruders can enhance performance with flexible filaments, while bowden setups may be lighter and faster for rigid materials.
- Heated Bed: A heated print bed helps with adhesion and reduces warping of prints. This feature is particularly important for materials like ABS and PETG, which tend to cool and warp if not properly adhered during the printing process.
- Print Volume: The build size or print volume defines the maximum dimensions of objects that can be printed. A larger print volume provides flexibility for various projects and reduces the need for assembly of multiple parts.
- Software Compatibility: Compatibility with various slicing software is essential for optimal performance. Good software support allows users to fine-tune settings, manage prints efficiently, and utilize advanced features like auto bed leveling and customizable profiles.
- Cooling System: An effective cooling system is vital for maintaining print quality, especially for overhangs and bridges. Proper cooling helps solidify layers quickly, preventing sagging and ensuring sharper details in the final product.
- Upgradeability: The ability to upgrade components, such as the hotend or stepper motors, can significantly enhance printer performance over time. This flexibility allows users to adapt their machine according to evolving needs and improve capabilities with advanced parts.
What Materials Are Best Suited for DIY 3D Printing Projects?
The best materials for DIY 3D printing projects include a variety of filaments that cater to different needs and applications.
- PLA (Polylactic Acid): PLA is a biodegradable and easy-to-use filament, making it ideal for beginners in 3D printing.
- ABS (Acrylonitrile Butadiene Styrene): ABS is known for its strength and durability, making it suitable for functional parts and prototypes.
- PETG (Polyethylene Terephthalate Glycol): PETG combines the ease of printing of PLA with the durability of ABS, making it a versatile option for many projects.
- Nylon: Nylon is a flexible and strong material that is great for items requiring durability and resistance to wear and tear.
- TPU (Thermoplastic Polyurethane): TPU is a flexible filament that is perfect for creating rubber-like products such as phone cases and wearables.
- ASA (Acrylonitrile Styrene Acrylate): ASA is similar to ABS but offers better weather resistance, making it suitable for outdoor applications.
PLA (Polylactic Acid) is popular for its low printing temperature and minimal warping, which makes it an excellent choice for beginners and for projects that do not require high strength. Its biodegradable nature also appeals to environmentally conscious users.
ABS (Acrylonitrile Butadiene Styrene) is favored for its toughness and impact resistance, making it ideal for parts that need to endure stress. However, it requires a heated bed to prevent warping during printing.
PETG (Polyethylene Terephthalate Glycol) offers the best of both worlds by providing ease of printing like PLA while enhancing strength similar to ABS. This material is also resistant to chemicals and moisture, which expands its usability.
Nylon is highly regarded for its exceptional toughness and flexibility, making it suitable for parts that undergo bending or stretching. It does require specific settings to print correctly, such as higher temperatures and moisture control.
TPU (Thermoplastic Polyurethane) is a flexible filament that allows for the creation of soft and elastic objects. Its rubber-like properties make it ideal for applications where flexibility and shock absorption are needed.
ASA (Acrylonitrile Styrene Acrylate) shares many characteristics with ABS but is more resilient to UV light and weather conditions, making it a great choice for outdoor objects. It also has a smoother finish and can be printed with similar settings to ABS.
What Are the Top DIY Linear Axis 3D Printers Recommended by Experts?
The best DIY linear axis 3D printers recommended by experts include:
- Creality Ender 3 V2: This printer is known for its affordability and reliability, making it a favorite among DIY enthusiasts.
- Prusa i3 MK3S+: Renowned for its exceptional print quality and user-friendly features, this model is a top choice for serious hobbyists.
- Anycubic i3 Mega: This printer is praised for its ease of assembly and solid build quality, making it accessible for beginners.
- Artillery Sidewinder X1: Offering a large build volume and Direct Drive extruder, this printer stands out for its versatility and performance.
- Tevo Tornado: Known for its large print area and high-speed capabilities, the Tornado is suitable for larger projects and rapid production.
Creality Ender 3 V2: The Ender 3 V2 features a sturdy design, a glass build plate for improved adhesion, and a silent stepper motor driver for quieter operation. Its open-source firmware allows for customization, making it a popular choice for those looking to tweak and improve their printer.
Prusa i3 MK3S+: This printer is celebrated for its advanced features such as power recovery, filament sensor, and an excellent community support network. Its modular design allows for easy upgrades, and the high-quality prints it produces make it a worthwhile investment for dedicated users.
Anycubic i3 Mega: With a semi-assembled design, the Anycubic i3 Mega is quick to set up and get printing. It features a touchscreen interface and a solid frame that reduces vibrations, leading to smoother prints, which is particularly appealing to those new to 3D printing.
Artillery Sidewinder X1: The Sidewinder X1 is notable for its large print volume of 300x300x400mm, allowing for the creation of larger models. Its Direct Drive extruder setup offers better filament control, especially for flexible materials, making it a versatile option for a range of projects.
Tevo Tornado: The Tevo Tornado is designed for speed and efficiency, boasting a large build area and a heated bed that helps with material adhesion. Its straightforward assembly process and ability to handle a variety of filaments make it an attractive choice for makers looking to produce larger or more complex prints quickly.
What Unique Features Do Each of These Recommended 3D Printers Offer?
The best DIY linear axis 3D printers offer a range of unique features that enhance usability, precision, and customization.
- Prusa i3 MK3S+: This printer is renowned for its reliability and extensive community support.
- Creality Ender 3 V2: Known for its affordability, the Ender 3 V2 features a sturdy build and excellent print quality.
- Anycubic Vyper: The Vyper stands out with its automatic bed leveling and user-friendly interface.
Prusa i3 MK3S+: This printer boasts a fully enclosed frame and a modular design that allows for easy upgrades and repairs. It is equipped with advanced features such as power recovery, a filament sensor, and an optimized cooling system, ensuring high-quality prints with minimal effort. Additionally, its active community provides a wealth of resources for troubleshooting and modifications.
Creality Ender 3 V2: The Ender 3 V2 offers a robust metal frame and a build volume that is ideal for a variety of projects. Its upgraded silent stepper drivers ensure quieter operation, while the glass build plate improves adhesion and reduces warping. This printer is especially popular among newcomers due to its straightforward assembly and excellent print performance at a budget-friendly price.
Anycubic Vyper: The Vyper features an innovative auto bed leveling system that significantly reduces setup time and increases accuracy. Its user-friendly touchscreen interface makes navigation and adjustments easy, even for beginners. Additionally, the printer’s quick assembly and solid construction contribute to a stable printing experience, making it a great choice for DIY enthusiasts looking for convenience and efficiency.
What Common Challenges Can You Face When Building a DIY Linear Axis 3D Printer?
When building a DIY linear axis 3D printer, you may encounter several common challenges that can affect the performance and quality of your printer.
- Frame Stability: A stable and sturdy frame is crucial for accurate printing. If the frame is not rigid enough, vibrations can lead to print quality issues like layer misalignment and surface imperfections.
- Alignment and Calibration: Proper alignment of the linear rails and print bed is essential for achieving precise movements. Misalignment can cause uneven prints and can require extensive recalibration, leading to frustration and wasted materials.
- Electrical Wiring and Connectivity: Managing the wiring for motors, sensors, and the control board can be complex. Poor connections can lead to erratic movements or complete system failures, necessitating troubleshooting and potential rewiring.
- Software Configuration: Selecting and configuring the right firmware for your printer is vital for optimal performance. Incorrect settings can result in issues like incorrect print speeds, layer heights, and even hardware incompatibilities.
- Material Selection: Choosing the right materials for printing can greatly impact the quality of the final product. Using inappropriate or low-quality filament can lead to clogs, poor adhesion, and failed prints, which can be particularly discouraging for beginners.
- Cooling and Temperature Management: Maintaining proper temperature for the hotend and print bed is essential for successful prints. Inadequate cooling can lead to overheating, while cooling too quickly can cause warping or layer separation in certain materials.
- Maintenance and Upgrades: Regular maintenance is necessary to keep the printer in good working condition. As you gain experience, you may want to upgrade parts for better performance, but this can introduce new challenges in compatibility and integration.
How Can You Overcome Typical Obstacles in Your DIY Project?
Overcoming obstacles in your DIY project, especially when building the best DIY linear axis 3D printer, involves understanding common challenges and how to address them effectively.
- Planning and Design: Proper planning is crucial for any DIY project. Before starting, create a detailed design and checklist to ensure all necessary components are accounted for, which can help prevent issues during assembly.
- Component Compatibility: Ensuring that all parts are compatible is vital for a successful build. Research specifications and user reviews to avoid purchasing incompatible components that could lead to frustration and delays.
- Assembly Accuracy: Precision during the assembly process is essential for optimal printer performance. Use tools like calipers and levels to measure and align parts accurately, as even minor misalignments can affect print quality.
- Calibration and Setup: After assembly, proper calibration of the printer is necessary for achieving the best results. Follow detailed guides or manufacturer instructions for calibrating the axes, extruder, and bed leveling to ensure successful prints.
- Troubleshooting Common Issues: Familiarize yourself with common 3D printing problems such as filament jams or layer adhesion failures. Having a basic understanding of troubleshooting techniques can save time and effort when problems arise.
- Community Support: Engaging with online forums and communities can provide valuable insights and support. Joining groups dedicated to DIY 3D printing can offer solutions to specific challenges and foster a sense of camaraderie among enthusiasts.
- Budget Management: Keeping track of expenses is important to prevent overspending. Set a budget for each component and stick to it while prioritizing quality parts that will enhance the printer’s performance.
What Tips and Best Practices Can Enhance Your DIY Linear Axis 3D Printer Build?
Documentation during the build process serves as a valuable resource for troubleshooting potential issues and can also aid others who may wish to replicate your project.
Community engagement allows you to tap into a wealth of knowledge and experience, providing support and inspiration from fellow 3D printing enthusiasts.
Regular maintenance is key to ensuring your printer operates smoothly. Cleaning and lubricating components can prevent wear and tear, which can compromise the printer’s performance over time.
What Resources or Community Support Can Help You Succeed?
There are several resources and community supports that can help you succeed in building or using the best DIY linear axis 3D printer:
- Online Forums: Participating in 3D printing forums such as Reddit’s r/3Dprinting or specialized sites like 3DPrintBoard can provide invaluable advice and troubleshooting tips.
- Tutorials and Guides: Websites like Instructables and YouTube offer step-by-step tutorials that can guide you through the assembly and setup of your linear axis 3D printer.
- Community Groups: Local maker spaces or 3D printing clubs often provide hands-on support and the opportunity to collaborate with others who share your interests.
- Manufacturer Support: Many 3D printer manufacturers have dedicated customer support and online resources, including FAQs and user manuals, to help you resolve issues and optimize your setup.
- Social Media Groups: Facebook groups and other social media platforms host communities where enthusiasts share their projects, experiences, and advice on DIY linear axis 3D printers.
- Online Courses: Platforms like Udemy or Coursera offer courses on 3D printing that can enhance your knowledge and skills, enabling you to troubleshoot and innovate more effectively.
Online forums provide a platform for users to share experiences, seek help, and offer solutions to common problems faced during the building and operation of 3D printers. These communities often consist of experienced users who can provide insights that are not available in manuals or official documentation.
Tutorials and guides are essential for step-by-step instructions that can ease the learning curve associated with assembling and using a DIY 3D printer. These resources typically include videos and text instructions that cover everything from initial setup to advanced printing techniques.
Community groups, such as maker spaces, offer a collaborative environment where individuals can access tools, equipment, and the expertise of fellow enthusiasts. This hands-on experience is invaluable for troubleshooting and improving skills related to 3D printing.
Manufacturer support is crucial as it ensures you have access to the official resources needed for your specific printer model. This support often includes troubleshooting guides, technical assistance, and updates that help optimize printer performance.
Social media groups facilitate the exchange of ideas and techniques, allowing users to share their successes and challenges in real-time. These platforms help build a sense of community among 3D printing enthusiasts, making it easier to find answers and inspiration.
Online courses can offer structured learning and cover a range of topics from basic 3D printing principles to advanced techniques. These courses can provide a deeper understanding of the technology, helping users become more proficient and confident in their 3D printing endeavors.
Related Post: