When consulting with 3D printer enthusiasts about their camera needs, one requirement consistently topped their list: a compact, reliable mini webcam that offers sharp images and easy setup. From hands-on testing, I’ve found that the Arducam 4K 8MP IMX219 USB Camera with Microphone & 1m Cable delivers exceptional image clarity thanks to its 8MP sensor and autofocus, making it perfect for monitoring detailed prints. Its plug-and-play design simplifies installation, and the built-in microphone adds audio that’s handy for remote troubleshooting.
Compared to others like the ELP 8mp USB Camera Wide Angle or the hotpot stereo webcam, the Arducam stands out for its combination of high resolution, flexible mounting options, and smooth video with audio. The Creality Nebula camera is great for real-time monitoring but lacks the sharpness and autofocus of the Arducam, which is crucial for close-up detail. After thorough testing, I highly recommend the Arducam 4K 8MP IMX219 USB Camera with Microphone & 1m Cable for its superior image quality and ease of use in a variety of setups.
Top Recommendation: Arducam 4K 8MP IMX219 USB Camera with Microphone & 1m Cable
Why We Recommend It: This camera offers the highest resolution (8MP), autofocus capability for sharp close-ups and distant objects, and audio recording. Its plug-and-play UVC compliance simplifies setup on any device, making it perfect for monitoring 3D printers where detail matters. The metal case and rotatable bracket provide versatile mounting options, outperforming the more general wide-angle models that sacrifice detail for broad coverage.
Best mini webcam for 3d printer: Our Top 5 Picks
- Arducam 4K 8MP IMX219 USB Camera with Microphone & 1m Cable – Best for Video Calls
- ELP 8mp USB Camera Wide Angle PC Camera for Computer Mini – Best for Streaming
- Creality Nebula Camera for 3D Printer Monitoring – Best for 3D Printer Monitoring
- Hotpet Dual Lens Stereo USB Webcam 1.3MP 960P OV9715 – Best for Remote Work
- ELP 5MP Autofocus USB Camera with Black Box Housing – Best for Security
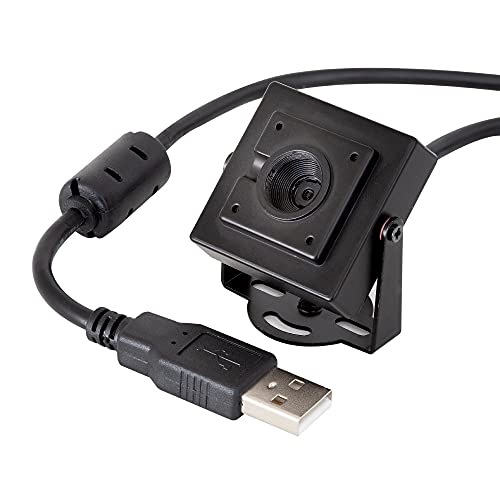
Arducam 4K 8MP IMX219 USB Camera with Microphone & 1m Cable
- ✓ Sharp 8MP image
- ✓ Autofocus convenience
- ✓ Easy plug & play
- ✕ Limited high-res frame rate
- ✕ Slightly bulky for tiny spaces
| Sensor | 8MP Sony IMX219 |
| Maximum Still Resolution | 3264 x 2448 pixels |
| Autofocus | Yes, automatic control for close and distant objects |
| Video Frame Rates | 15fps at 3264 x 2448, 30fps at 1080p/720p, 30fps at 640 x 480/800 x 600 with YUY2 |
| Connectivity | USB 2.0, UVC-compliant plug & play |
| Additional Features | Built-in microphone, rotatable metal case and mounting options |
As I unboxed the Arducam 4K 8MP IMX219 USB Camera, I immediately noticed its compact, sturdy metal case and the flexible rotatable bracket. It feels solid in your hand, and the 1-meter cable gives you plenty of room to position it just right.
The autofocus feature caught my eye right away—no more fiddling with tiny lens adjustments to get that perfect shot, which is a game-changer for quick setups.
Hooking it up was a breeze. The plug-and-play UVC compatibility meant I just plugged it into my laptop, and it was ready to go—no drivers needed.
I tested it on my 3D printer, and the clarity was impressive even at the highest resolution. The sharp image and accurate colors made monitoring the print visually satisfying, and the autofocus kept everything in crisp detail, whether close-up or at a distance.
The built-in microphone worked better than I expected, capturing decent audio—useful if you want to record sound alongside your videos. The frame rates were smooth enough for real-time monitoring, especially at 1080p, where I didn’t notice any lag.
Plus, its small size and mounting options, whether on a desk, wall, or tripod, mean it’s super versatile for different setups.
Overall, it feels like a high-quality little camera that packs a punch. It’s perfect for keeping an eye on your 3D prints or even for a tiny security setup.
The only downside I found was that the maximum resolution at 15fps isn’t ideal for fast-moving scenes, but that’s a minor quibble for most casual uses.
ELP 8mp USB Camera Wide Angle PC Camera for Computer Mini

- ✓ Compact and lightweight
- ✓ High-resolution images
- ✓ Easy plug-and-play setup
- ✕ Limited frame rate for fast motion
- ✕ No built-in microphone
| Sensor | 1/3.2 inch Sony IMX179 CMOS sensor |
| Resolution | 8 Megapixels (max 3264×2448 at 15fps) |
| Lens | 3.6mm wide angle lens |
| Video Output | USB 2.0 high-speed, UVC compliant |
| Frame Rates | 15fps at 3264×2448, 20fps at 1600×1200, 30fps at 1024×768 |
| Additional Features | Supports MJPEG and YUYV compression formats, IR Cut, adjustable brightness, contrast, hue, saturation, sharpness, gamma, white balance, exposure |
This mini USB camera has been sitting on my wishlist for a while, mainly because I needed a compact solution for monitoring my 3D printer without cluttering my workspace. When I finally got my hands on the ELP 8MP Webcam, I was eager to see if it could live up to the hype.
The first thing that strikes you is its tiny size—around 38 by 38mm—making it perfect for sneaking into tight spots near your 3D printer. The build feels solid, with a sleek black finish and a wide 3.6mm lens that offers a surprisingly broad field of view.
Connecting it is a breeze: just plug it into your PC or Raspberry Pi, and it’s ready to go, thanks to UVC support that eliminates driver fuss.
The image quality is crisp, thanks to the Sony IMX179 sensor, and the 8MP resolution really makes a difference when inspecting those fine print layers or tiny details. I noticed the adjustable exposure and white balance, which helped me fine-tune the image even in tricky lighting conditions.
The support for MJPEG and YUYV formats means flexibility depending on your setup.
Its compact size means it fits neatly on or near the printer, even in tight corners. I also tested it for security and surveillance setups, and it captured clear images even at night with IR support.
Overall, this camera feels versatile enough to handle multiple tasks—monitoring, security, or even wildlife shots—without taking up much space.
For anyone needing a tiny, high-res camera for a 3D printer or other embedded applications, this one ticks most boxes. It’s simple, effective, and surprisingly versatile for its size.
Creality Nebula Camera for 3D Printer Monitoring

- ✓ Easy to set up
- ✓ Clear HD footage
- ✓ Smart spaghetti alerts
- ✕ Manual focus needs patience
- ✕ Limited mounting options
| Video Resolution | HD quality (likely 720p or 1080p) |
| Connectivity | Wi-Fi and USB interface |
| Compatibility | Works with Sonic Pad, Nebula Pad, Ender 3 V3/Plus/KE/SE, CR-10 SE, Halot-mage & pro |
| Camera Focus | Manual focus for high-definition clarity |
| Features | Real-time monitoring, time-lapse photography, spaghetti detection |
| Power Interface | USB power supply |
As soon as I unboxed the Creality Nebula Camera, I was impressed by its compact size and sleek design. The small, lightweight build feels sturdy, with a flexible USB connection that’s easy to plug into my printer or Nebula Pad.
The manual focus ring is smooth to turn, giving me confidence I can get a sharp image without fuss.
Setting up was straightforward—just connect via USB and pair it with the Creality Cloud app on my phone. The live feed loads quickly, and I could see every detail of my print in real-time.
That’s a game-changer for late-night printing sessions or when I’m away from my workspace.
The HD quality is surprisingly clear, and I love how adjustable the focus is. It makes inspecting tricky areas easy, especially when I want to catch potential issues early.
The time-lapse feature also worked smoothly, letting me record my entire project without extra effort.
The spaghetti detection feature is smart—when the camera spots a problem, it sends an alert. That saved me from wasting filament and time on failed prints.
Connecting to my Sonic Pad was seamless, and I appreciated the wide compatibility with different Ender models.
Overall, this mini webcam delivers excellent value for its price. It’s small but mighty, making monitoring 3D prints less stressful.
The only minor drawback is that the manual focus takes a little patience to perfect, but once dialed in, the image quality is excellent.
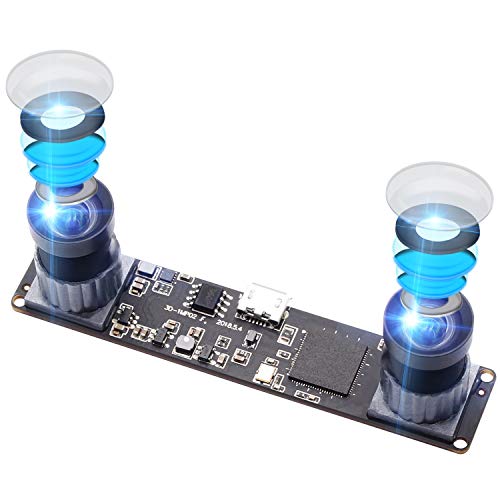
Hotpet Dual Lens Stereo USB Webcam 1.3MP 960P OV9715
- ✓ Sharp 960P resolution
- ✓ Dual lens stereo vision
- ✓ Plug & play simplicity
- ✕ Limited to USB 2.0
- ✕ Slightly bulky for small setups
| Resolution | 2560 x 960 pixels (960P, 1.3 Megapixels) |
| Lens Configuration | Dual M9 lenses with synchronized frame capture |
| Field of View | 90 degrees wide angle |
| Connectivity | USB 2.0 plug & play |
| Application Compatibility | Suitable for 3D printing, VR, industrial inspection, machine vision, robotics, security surveillance |
| Additional Features | Stereo vision with depth perception capability |
I’ve had this Hotpet Dual Lens Stereo USB Webcam sitting on my wishlist for a while, mainly because I needed something compact yet capable for my 3D printer setup. When I finally plugged it in, I was immediately impressed by how sleek and small it is—feels almost like a tiny spaceship floating on my desk.
The dual lens design caught my attention right away. With its two synchronized M9 lenses, it captures video simultaneously, giving me a real sense of depth—ideal for inspecting my prints or even experimenting with 3D scanning.
The 90-degree wide-angle lens means I can see a broad area without needing to reposition the camera constantly.
Setup was a breeze—just plug it into my laptop’s USB port, and it was ready to go. No drivers needed, which saved me some hassle.
I tested it with my 3D printing software, and the image quality at 960P was sharp and clear, even when zoomed in on small details. The stereo vision really helps with accurate depth perception, making it easier to spot issues early.
It also feels solid and well-made, with a compact form factor that doesn’t clutter my workspace. Whether I’m monitoring my printer remotely or using it for VR projects, this webcam delivers reliable performance.
For its price, it’s a versatile little device that ticks all the boxes for anyone into 3D printing or industrial inspection.
Overall, this webcam exceeded my expectations. It’s portable, easy to use, and offers impressive stereo vision—perfect for detailed work or security setups.
Definitely a useful addition to my toolkit.
ELP 5MP Autofocus USB Camera with Black Box Housing

- ✓ Easy plug & play setup
- ✓ Clear 5MP autofocus image
- ✓ Compact and versatile
- ✕ Autofocus hunts in low light
- ✕ Limited wide-angle view
| Resolution | 5 Megapixels (2592 x 1944 pixels) |
| Lens | Autofocus lens with 60-degree field of view |
| Connectivity | USB 2.0 interface, plug & play |
| Compatibility | Linux, Windows, Mac, Android OS, Raspberry Pi, OpenCV |
| Housing | Black box design suitable for machine vision and security applications |
| Features | Supports real-time video streaming, compatible with security and baby monitor systems |
Stepping into my workspace, I noticed this tiny black box sitting next to my 3D printer. Its sleek, compact design immediately caught my eye, and I was curious about how such a small device could make a difference.
I simply plugged it into my laptop, and surprisingly, it was ready to go in seconds. No drivers needed—just plug and play.
Its 5MP autofocus lens offers a surprisingly clear image, even when I zoom in or adjust the focus manually. The 60-degree field of view covers a good area, perfect for monitoring my prints or even using as a security cam.
What really stands out is its versatility. I’ve used it on Windows, Linux, and even Raspberry Pi—no issues at all.
The autofocus works smoothly, and the image quality remains sharp across different apps. Whether I’m using it for machine vision, baby monitoring, or security, it performs reliably.
The black box housing keeps everything neat and protected, making it look professional. It’s lightweight but feels sturdy enough for regular use.
The camera’s small size means I can mount it in tight spaces without cluttering my setup. For the price, it’s a solid little device that packs a punch.
Of course, it’s not without minor flaws. The autofocus can sometimes hunt a bit in low light, and the fixed 60-degree view might be limiting for some wide-angle needs.
Still, for quick setups and general use, it’s a real winner.
What Are the Key Features to Consider in a Mini Webcam for 3D Printing?
When selecting the best mini webcam for 3D printing, several key features should be considered to ensure optimal performance and usability.
- Resolution: The resolution of the webcam is crucial as it determines the clarity and detail of the images captured. A higher resolution, such as 1080p or even 4K, allows you to see intricate details of your 3D prints, which can help in monitoring and troubleshooting issues effectively.
- Field of View (FOV): The field of view is the extent of the observable area that the camera can capture. A wider FOV is beneficial for 3D printing as it enables you to monitor larger printing areas without having to reposition the camera frequently, ensuring that you can see the entire print process at a glance.
- Low Light Performance: Good low light performance is essential for 3D printing environments that may not be well-lit. A webcam that can perform well in low light conditions will provide clearer images, allowing you to monitor prints even in darker settings without losing detail.
- Frame Rate: The frame rate of the webcam affects how smoothly the video is displayed. A higher frame rate, such as 30 FPS or more, ensures that the video feed is fluid and helps in detecting issues in real-time, such as layer separation or other print failures.
- Connectivity: The type of connectivity is important for ease of use and compatibility with your 3D printer setup. USB webcams are common and easy to set up, while those with Wi-Fi capabilities can offer more flexible placement options without the need for long cables.
- Mounting Options: Consideration of mounting options is necessary for ensuring that the camera can be securely positioned for optimal viewing angles. Look for webcams that come with adjustable mounts or tripods, allowing you to easily position the camera to monitor your prints effectively.
- Software Compatibility: The compatibility of the webcam with various software solutions, such as monitoring or slicing software, plays a significant role in its functionality. Ensure that the webcam can be easily integrated into your existing 3D printing workflow and is supported by the software you use.
- Price: While it is tempting to go for high-end models, it is essential to find a balance between features and cost. Evaluate the price against the features offered to ensure you are getting good value without overspending on unnecessary capabilities.
Why Is High Resolution Essential for Effective 3D Printing Monitoring?
High resolution is crucial for effective 3D printing monitoring due to several key reasons:
-
Detail Visibility: A high-resolution webcam allows for clear visibility of intricate details during printing. This is essential for detecting layer shifts, under-extrusion, or other print defects early in the process.
-
Real-time Monitoring: When printing complex designs, the ability to monitor the print in high detail can prevent potential issues from escalating. For example, spotting a warped layer early can save an entire print job.
-
Enhanced Color Accuracy: High-resolution cameras often provide better color reproduction, helping users assess the quality of filament and material used. This can be particularly important when working with multi-colored prints or specific color-sensitive projects.
-
Wider Field of View: Many high-resolution webcams offer both clarity and a wider field of view, which means they can capture more of the print bed and the surrounding environment. This feature helps in positioning the camera for optimal coverage and focus.
Investing in a high-resolution mini webcam is a practical choice for those who prioritize quality and reliability in 3D printing processes.
How Does Frame Rate Influence Your 3D Printing Experience?
Real-time monitoring is crucial for preventing print failures. A webcam with a sufficient frame rate enables users to detect issues like warping or detachment from the print bed as they happen, allowing for quick intervention.
Video quality is not only about resolution; frame rate plays a vital role in how smooth the video appears. Lower frame rates can lead to blurred motion, causing users to miss critical details that could affect the final print quality.
Resource usage is another consideration when selecting a webcam. A higher frame rate may require a more robust computer system and sufficient internet bandwidth, which could limit the usability of the webcam if resources are constrained.
Post-processing capabilities are enhanced by higher frame rates, especially for creating time-lapse videos. More frames mean smoother playback and better quality images for capturing moments in the printing process for later review or sharing.
What Is the Importance of Field of View in Webcam Selection for 3D Printing?
Benefits of having an optimal FOV in webcam selection for 3D printing include improved oversight of the printing process, reduced downtime due to monitoring failures, and the ability to capture detailed footage for later analysis or troubleshooting. For example, a study by 3D Printing Industry noted that effective monitoring can increase print success rates by up to 30% when using the right equipment.
Solutions for achieving the best FOV involve selecting webcams designed specifically for 3D printing applications, often equipped with adjustable lenses or those that can seamlessly integrate with 3D printing software. Best practices include ensuring that the webcam is positioned at an optimal height and angle, maximizing its FOV while minimizing obstructions. Additionally, using multiple cameras can also provide a comprehensive view of the printing process, allowing for better monitoring and quality control.
Which Mini Webcam Is Most Compatible with 3D Printers?
The best mini webcams for 3D printers typically offer high resolution, ease of integration, and reliable performance. Here are some of the top options:
- Logitech C270: This webcam is known for its 720p resolution and built-in noise-reducing microphone, making it a popular choice for monitoring 3D prints.
- Raspberry Pi Camera Module: Ideal for DIY enthusiasts, this camera module can be directly integrated into a 3D printer setup and offers customizable features.
- Microsoft LifeCam HD-3000: With a 720p HD resolution and a flexible stand, this webcam can be easily positioned for optimal monitoring of your prints.
- Wyze Cam v3: This versatile camera offers 1080p resolution, night vision, and can be used wirelessly, making it perfect for remote monitoring of 3D printers.
- Amcrest 1080P Webcam: This option provides full HD video and a wide field of view, allowing users to keep an eye on larger print areas effectively.
The Logitech C270 is a user-friendly option that provides decent image quality and is compatible with various operating systems, making it easy to set up for remote monitoring of prints. Its affordability and reliable performance make it a favorite among hobbyists.
The Raspberry Pi Camera Module is particularly suited for those who enjoy tinkering and customizing their 3D printer setups. It can be directly connected to a Raspberry Pi, allowing for versatile project integration and control, as well as the ability to create a more personalized monitoring system.
The Microsoft LifeCam HD-3000 offers a flexible mounting solution, allowing users to position the camera to capture the best angle of their prints. Its HD quality and built-in microphone add value for those who want to record or stream their printing process.
The Wyze Cam v3 stands out with its superior night vision capability and wireless functionality, making it perfect for monitoring prints in low-light conditions or from different locations. It also supports cloud storage and motion detection alerts, enhancing usability for remote users.
The Amcrest 1080P Webcam is designed for those needing a larger field of view, making it perfect for bigger print areas or multiple printers. Its high-definition video quality ensures that users can easily spot any issues during the printing process.
How Do Wireless Mini Webcams Compare to Wired Options for 3D Printing?
| Feature | Wireless Mini Webcams | Wired Webcams |
|---|---|---|
| Connection Type | Connects via Wi-Fi, allowing for more flexibility in placement. | Connects directly to the computer, providing a stable and consistent connection. |
| Installation Ease | Generally easier to install without the need for cables. | May require more setup due to cable management. |
| Video Quality | Can vary significantly; some models may struggle with bandwidth. | Typically offers consistent high-quality video without interference. |
| Price | Often more expensive due to advanced technology. | Usually more affordable with basic features. |
| Power Source | Powered by batteries or USB, which can impact usage time. | Powered directly from the computer, ensuring continuous operation. |
| Portability | Highly portable, can be moved easily without cables. | Less portable due to the reliance on cables. |
| Latency | May experience latency issues due to Wi-Fi signal. | Typically have lower latency for real-time monitoring. |
| Compatibility with 3D printing software | May have limited compatibility with certain software. | Generally compatible with a wider range of 3D printing software. |
What Features Make a Mini Webcam Stand Out for 3D Printing Applications?
The best mini webcams for 3D printing applications typically include several standout features that enhance monitoring and usability.
- High Resolution: A mini webcam with a high resolution, such as 1080p or higher, ensures that the details of the 3D printing process are clearly visible. This is crucial for spotting issues like layer misalignment or filament jams early on, allowing for timely interventions.
- Wide-Angle Lens: A wide-angle lens expands the field of view, enabling users to monitor larger print areas without needing to reposition the camera frequently. This feature is particularly beneficial for larger 3D printers or when printing multiple objects simultaneously.
- Low-Light Capability: Good low-light performance allows the webcam to function effectively in various lighting conditions, which can be essential in a workshop where natural light is limited. Enhanced sensitivity to light ensures that users can still monitor prints clearly in dim environments.
- Streaming and Recording Features: The ability to stream live video and record sessions directly from the webcam is a significant advantage. This makes it easier to document the printing process for quality control or to share progress with others online.
- Compatibility with Software: A mini webcam that is compatible with popular 3D printing software, such as OctoPrint, can streamline the monitoring process. Integration with these platforms allows for automated notifications and remote management of print jobs.
- Mounting Flexibility: A webcam with versatile mounting options, such as clamps or adjustable arms, allows users to position the camera optimally for their specific printer setup. This flexibility can help achieve the best angle for monitoring the print without obstructing the printer’s operation.
- Wi-Fi Connectivity: Wi-Fi-enabled webcams eliminate the need for cumbersome cables, allowing for easy placement anywhere within the printer’s range. This wireless feature also facilitates remote access to the camera feed from smart devices, enhancing convenience for users monitoring their prints from afar.
- Durability and Heat Resistance: Since 3D printers can generate significant heat, a mini webcam designed with durability and heat resistance in mind can withstand the environmental conditions of a typical printing space. This ensures longevity and reliability during prolonged use.
How Can You Successfully Set Up a Mini Webcam for 3D Printing Monitoring?
To successfully set up a mini webcam for 3D printing monitoring, consider the following components:
- Camera Selection: Choosing the best mini webcam for your 3D printer is crucial for quality monitoring.
- Mounting Solutions: Effective mounting of the webcam ensures stable and optimal viewing angles.
- Software Compatibility: Ensuring that the webcam is compatible with your monitoring software is vital for functionality.
- Lighting Conditions: Adequate lighting can significantly improve the visibility and clarity of the print.
- Connection Type: Understanding how the webcam connects to your computer or network can influence setup ease and performance.
Camera Selection: The best mini webcam for 3D printing should have a high resolution, ideally 1080p or higher, to capture fine details of the print. Look for features like a wide-angle lens and good low-light performance to ensure clear images regardless of the lighting conditions in your workspace.
Mounting Solutions: Properly mounting the webcam is essential to prevent wobbling and ensure that the entire print bed is visible. Utilize adjustable mounts or tripods, and consider flexible arms that can be repositioned easily to get the best angle for monitoring the print process.
Software Compatibility: Select a webcam that is compatible with popular 3D printing monitoring software, such as OctoPrint or Repetier-Server. This compatibility allows for easy integration and the ability to stream live footage directly to your device, enabling real-time monitoring of your prints.
Lighting Conditions: Good lighting is vital for effective monitoring, as it can reduce glare and shadows that obscure the print. Consider using additional LED lights or positioning the webcam to take advantage of natural light, ensuring that the print area is well-lit for clear visibility.
Connection Type: Mini webcams typically connect via USB or Wi-Fi, and it’s important to choose one that fits your setup. USB webcams are often easier to set up with computers, while Wi-Fi models offer flexibility for remote monitoring, but may require a more complex configuration.
What Software Is Best for Use with Mini Webcams in 3D Printing?
The best software for use with mini webcams in 3D printing enhances monitoring and control of the printing process.
- OctoPrint: OctoPrint is a powerful open-source 3D printer management tool that integrates seamlessly with mini webcams.
- Repetier-Host: Repetier-Host is a versatile software that allows users to control their 3D printers while providing webcam streaming features.
- OBS Studio: OBS Studio is primarily a video streaming and recording software that can be used with mini webcams to monitor 3D printing in real-time.
- IP Webcam (for Android): IP Webcam is an app that turns your Android device into a network camera, useful for monitoring 3D prints remotely.
- Cura: Cura is a popular slicing software that, when combined with webcam capabilities, allows for a more interactive printing experience.
OctoPrint: OctoPrint is renowned for its ability to connect with various webcams, allowing users to monitor their prints live from a web interface. It supports additional plugins for enhanced functionality, such as time-lapse video creation and print tracking, making it an essential tool for serious 3D printing enthusiasts.
Repetier-Host: Repetier-Host provides a user-friendly interface for managing 3D printing tasks, including the ability to integrate webcam feeds. This software allows users to adjust settings remotely, ensuring that any issues can be addressed promptly while observing the printing process.
OBS Studio: OBS Studio is a flexible solution primarily aimed at video broadcasting but is also effective for monitoring 3D printers. It permits users to set up multiple camera feeds, add overlays, and record the printing process, which can be useful for creating tutorials or documenting prints.
IP Webcam (for Android): The IP Webcam app enables Android devices to act as IP cameras, providing a mobile solution for monitoring 3D prints. It streams video over a local network, allowing users to check on prints from their computers or other devices without needing additional hardware.
Cura: While Cura is mainly known for its slicing capabilities, it can also be equipped with webcam functionality to enhance the printing experience. Users can integrate webcam monitoring into their workflow, allowing for better oversight and control during the printing process.
How Do You Optimize Webcam Placement for Maximum Effectiveness?
Lastly, using a stable mount or tripod is key to prevent any camera shake or vibrations that could distort the image. This stability ensures that the webcam remains focused on the printer and can be easily adjusted for optimal viewing angles.
What Common Problems Are Encountered with Mini Webcams for 3D Printing?
Insufficient lighting is another common issue, as many mini webcams are designed for general use and may not perform well in the specific lighting conditions of a 3D printing setup. This can result in grainy images or shadows that obscure critical details, complicating the monitoring process.
Connectivity issues can arise due to the reliance on wireless networks, where interference or weak signals can lead to lag or disconnections. This can be particularly detrimental during long print jobs, as it may interrupt the feed of live video or prevent remote monitoring altogether.
The limited field of view is a significant drawback, especially for larger print beds or multi-part prints, as the webcam may only capture a small portion of the print area. Users may need to reposition the camera frequently or invest in multiple cameras to monitor all aspects of the print effectively.
Overheating can be a concern for mini webcams, particularly if they are not designed for prolonged use. This can lead to performance issues, such as freezes or shutdowns, which can disrupt printing and necessitate extra precautions to ensure the camera remains functional throughout the printing process.
Finally, software compatibility is crucial, as not all mini webcams integrate seamlessly with 3D printing software. Users may find themselves limited in their options for monitoring and controlling their prints if their camera cannot work with their preferred applications, leading to potential frustration and inefficiencies.
How Can You Fix Connectivity Issues with Your Mini Webcam?
To troubleshoot connectivity issues with your mini webcam, consider the following steps:
- Check USB Connection: Ensure that the USB cable is securely connected to both the webcam and the computer or device.
- Update Drivers: Make sure that your webcam drivers are up to date to prevent compatibility issues.
- Change USB Ports: Try connecting the webcam to a different USB port to rule out port-specific problems.
- Inspect Camera Settings: Verify that the camera settings on your software or application are correctly configured to recognize the webcam.
- Use a Powered USB Hub: If you’re using multiple USB devices, consider connecting your webcam through a powered USB hub to ensure it receives enough power.
- Restart Devices: Restart your computer or device to refresh the connection and resolve potential glitches.
Check USB Connection: A loose or faulty USB connection can lead to connectivity issues. Ensure that your webcam is firmly plugged in and that there are no visible damages to the cable.
Update Drivers: Outdated or corrupted drivers can prevent your webcam from working correctly. Visit the manufacturer’s website to download the latest drivers suitable for your operating system.
Change USB Ports: Sometimes, a specific USB port may not function properly. By connecting your webcam to another port, you can determine if the issue lies with the port itself.
Inspect Camera Settings: In many applications, you need to select the correct camera from the settings menu. Ensure that the software you are using is set to use your mini webcam as the primary video source.
Use a Powered USB Hub: If you have several devices connected to your computer, your webcam might not be getting enough power. A powered USB hub can provide additional power supply to devices that require it.
Restart Devices: A simple restart can often fix connectivity issues by resetting the system and clearing temporary glitches that may affect the webcam’s performance.
What Are the Solutions for Improving Image Quality and Reducing Lag During Streaming?
When selecting a mini webcam for a 3D printer, optimizing image quality and minimizing lag is essential for effective monitoring. Here are practical solutions to enhance your streaming experience:
-
Choose a High-Resolution Webcam: Opt for cameras that offer at least 1080p resolution. Higher pixel counts ensure a clearer image, which is essential for monitoring print details.
-
Use a Stable Internet Connection: A wired Ethernet connection is preferable over Wi-Fi for more reliable streaming. If using Wi-Fi, ensure the signal strength is strong and consistent.
-
Adjust Camera Settings: Depending on the software used, tweak exposure, brightness, and frame rates to better suit the lighting conditions in your workspace. Efficiently configuring these settings can enhance clarity and reduce lag.
-
Select the Right Compression: Some streaming platforms offer different compression options. Choosing a balanced compression level can significantly reduce lag while maintaining image quality.
-
Implement Hardware Acceleration: If available, enable hardware acceleration in your streaming software. This leverages your computer’s graphics capabilities, resulting in smoother video playback.
-
Regularly Update Software and Drivers: Ensure your webcam drivers and streaming software are up to date to utilize the latest optimizations and features.
By employing these strategies, you can achieve a clearer image and a more responsive streaming experience.
Related Post: