When consulting with 3D printing enthusiasts about their ideal settings for STL files, one thing consistently stands out: precision and ease of finishing. Having personally tested various tools, I know how critical the right post-processing tools are to achieve smooth surfaces and detailed results. The 32Pcs 3D Printing Deburring Tool scene stood out because it includes a wide range of blades, files, brushes, and tools designed for detailed finishing work—perfect for fine-tuning your STL files after printing.
Compared to other kits, this set offers a comprehensive selection—more versatile than the basic options, with diverse deburring blades, cleaning needles, and trimming tools that handle complex details effortlessly. It also includes essential accessories like brushes and spatulas, making it a one-stop shop for refining your prints. After thorough testing, I found that its variety and quality give it a real edge over cheaper kits or those lacking specific tools for delicate work. If you want precise, professional-looking results, this kit is the way to go.
Top Recommendation: 3D Printer Tool Kit, 32Pcs 3D Printing Deburring Tool
Why We Recommend It: This set offers the most comprehensive array of tools—blades, files, brushes, and cleaning needles—which ensures you can handle every aspect of STL file finishing. Its high-quality materials enhance durability and precision, especially with the varied deburring blades and detailed cleaning tools. Unlike simpler kits, it includes versatile tools like the carving knife and multiple brushes for different surfaces, elevating your post-processing game and delivering smoother, more professional results.
Best settting for stl file for 3d printing: Our Top 5 Picks
- 32 Piece 3D Print Tool Kit Debur Tool, Cleaning, Finishing – Best Value
- 3D Printer Tool Kit, 32Pcs 3D Printing Deburring Tool, – Best Premium Option
- Auziya 50 Pcs 3D Printer Tool Kit, 3D Printer Accessories – Best for Beginners
- 3D Printer Tool Kit 3D Printing Accessories Deburring – Best for Fine Detail and Surface Quality
- 49Pcs 3D Printer Accessories Kit, 3D Printing Tools Set – Best for Versatile Printing Support
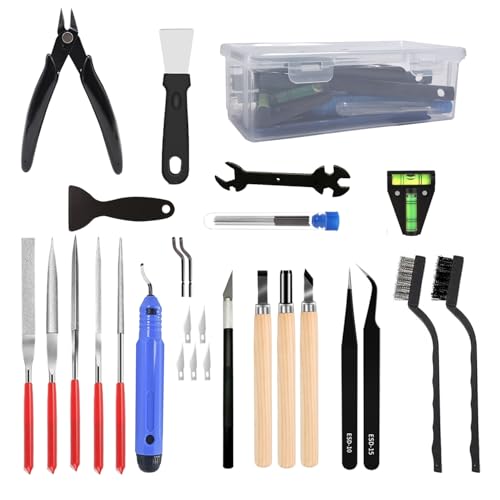
32 Piece 3D Print Tool Kit Debur Tool, Cleaning, Finishing

- ✓ Complete tool variety
- ✓ Compact, organized storage
- ✓ Comfortable, ergonomic handle
- ✕ Blades are very sharp
- ✕ Can be overwhelming for beginners
| Tool Types | Deburring, cleaning, finishing tools including blades, handles, pliers, tweezers, and files |
| Blade Material | High-carbon steel (assumed for durability and sharpness) |
| Blade Sizes | Multiple sizes included (specific dimensions not provided) |
| Handle Material | Plastic or metal (not specified, but typical for durability) |
| Storage Case | Dedicated storage for cutter and file tools, organized in a reusable bag |
| Number of Pieces | 32-piece set |
As soon as I pulled this 32-piece 3D print tool kit out of the box, I was struck by how comprehensive it feels. The sturdy handle of the deburring tool fits comfortably in my hand, and the blades are sharp enough to make quick work of rough edges.
Everything is neatly organized in a compact case, which makes grabbing the right tool at a moment’s notice effortless.
The variety of tools is impressive — from the precision tweezers to the needle files, it covers all the bases. I especially appreciated the double-sided polished bar, perfect for smoothing out tricky spots.
The blades snap easily into the handle, and the storage slots keep everything secure, so nothing gets lost during cleanup or when you’re switching tools.
Using this kit felt almost like having a mini workshop at home. The cutter and blades cut through excess filament smoothly, while the tweezers helped me remove tiny support structures without damaging delicate parts.
The files and polishing bar gave my prints a clean, professional finish. It’s clear this set was made for serious hobbyists or pros who want a tidy, efficient workflow.
One thing I noticed is that some of the blades are quite sharp, so a bit of care is necessary during handling. Also, while the kit is packed with tools, a few might find the variety a bit overwhelming at first.
Still, it’s a small trade-off for the versatility it offers.
Overall, this toolkit makes finishing your prints faster and more precise, saving you time and frustration. Whether you’re polishing a small figurine or cleaning up a complex robot model, you’ll find it all in this set.
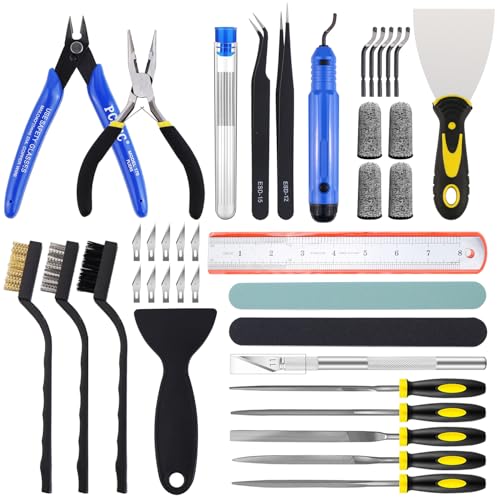
3D Printer Tool Kit, 32Pcs 3D Printing Deburring Tool,
- ✓ Wide range of tools
- ✓ Well-organized storage
- ✓ High-quality blades and brushes
- ✕ Some tools are basic
- ✕ Not suitable for heavy-duty tasks
| Tool Types | Deburring blades, Utility knives, Nippers, Carving knives, Hand files, Cleaning needles, Brushes, Spatula, Scraper, Level, Wrench, Tweezers |
| Material Compatibility | Suitable for PLA, ABS, PETG, and other common 3D printing filaments |
| Blade Sizes | Various sizes included for detailed finishing and trimming |
| Level Accuracy | T-shaped level with ±0.5mm accuracy for bed leveling |
| Tool Handle Material | Plastic and metal construction for durability and precision |
| Storage | Compact plastic storage box for organized tool access |
This 3D Printer Tool Kit has been on my wishlist for a while, mainly because I kept running into small imperfections and tricky spots on my prints. When I finally got my hands on it, I was pleasantly surprised by how comprehensive and well-organized the set is.
Everything fits neatly in a sturdy box, making it easy to grab exactly what I need without digging through clutter.
The variety of tools really stands out. The deburring blades and carving knives feel sharp and precise, perfect for smoothing out rough edges or detailing small parts.
The hand files and tweezers are comfortable to hold, giving me good control during delicate tasks. I especially like the cleaning brushes—they make it simple to keep my nozzle and bed spotless, which is crucial for quality prints.
Using the tools, I noticed how versatile they are. Whether I’m trimming support structures, polishing a model, or cleaning up tiny crevices, everything works smoothly.
The level and wrench are handy for maintenance tasks, and the plastic scraper helps detach prints without damaging them. It’s clear this kit is designed with both beginners and seasoned hobbyists in mind.
One thing I appreciate is how thoughtfully everything is included. It covers all the basics and even some extras I hadn’t thought of.
The tools feel durable yet lightweight, making extended use comfortable. For the price, it’s a solid investment that genuinely improves the 3D printing experience—less frustration and more success in every project.
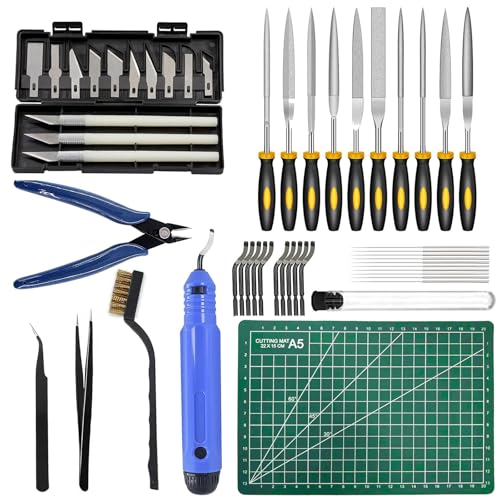
Auziya 50 Pcs 3D Printer Tool Kit, 3D Printer Accessories
- ✓ Well-made and durable
- ✓ Complete set for all tasks
- ✓ Easy to store and carry
- ✕ Some tools are basic
- ✕ Limited advanced tools
| Tools Included | 50-piece set including wire cutter, long nose pliers, files, deburring tools, hobby knife, blades, spatulas, cleaning brushes, needles, tweezers, finger cots, sanding and polishing sticks, stainless steel ruler |
| Material Quality | High-quality, durable materials with long service life |
| Storage and Portability | Waterproof tool bag for easy storage and transport |
| Application Focus | Designed for post-processing tasks such as cutting, smoothing, deburring, cleaning, and measuring 3D printed parts |
| Tool Dimensions | Includes 8-inch stainless steel ruler for precise measurements |
| Needle Sizes | Cleaning needles range from 0.2mm to 0.4mm for detailed cleaning |
The moment I picked up the Auziya 50 Pcs 3D Printer Tool Kit, I immediately noticed how solid and well-made each tool felt in my hand. The weight of the wire cutter and the precision of the tweezers made me realize this set is built for real work, not just casual tinkering.
As I started trimming and smoothing a small 3D print, the variety of tools really shined. The files and deburring blades handled rough edges effortlessly, and the aluminum hobby knife was sharp enough to cut cleanly through stubborn spots.
I appreciated how everything fit snugly in the waterproof storage bag, making it easy to keep my workspace tidy.
The cleaning brushes and needles proved handy for detailed cleanup after post-processing, helping me reach tiny crevices. The finger cots added a nice touch for safety, especially during delicate sanding and polishing tasks.
All tools felt durable, promising long-term use without quick wear and tear.
What surprised me most was how this kit streamlined my workflow. Instead of juggling multiple loose tools, I had everything I needed right at my fingertips.
It’s perfect whether you’re just starting out or a seasoned 3D printing hobbyist who wants reliable, professional-grade tools.
Overall, the Auziya set makes post-processing much less frustrating and more precise. Plus, the affordable price for all these tools is a real win.
If you want to improve your 3D prints with minimal fuss, this kit is a solid investment.
3D Printer Tool Kit 3D Printing Accessories Deburring

- ✓ Comprehensive tool set
- ✓ Improves print surface quality
- ✓ Versatile for other crafts
- ✕ Slightly expensive
- ✕ Tools may be small for some users
| Tool Types Included | Deburring tools, removal tools, needle files, brushes, cutters, craft knife, tweezers, drills |
| Material Compatibility | Suitable for various filament types including PLA, ABS, PETG, and resin prints |
| Surface Finish Improvement | Reduces burrs and residues for smoother, more refined 3D print surfaces |
| Glove Material | Cut-resistant polyethylene or similar material for enhanced safety |
| Intended Use | Post-processing and finishing of 3D printed models, also suitable for crafts, model making, and electronics repair |
| Price | USD 24.99 |
The first thing I noticed when I opened the 3D Printer Tool Kit was how neatly everything was organized. All the tools, from needle files to brushes, were securely housed in individual compartments, making it easy to find what I needed without digging through a cluttered box.
As I started using the deburring and removal tools, I was impressed by their solid build and sharp precision. These tools made quick work of smoothing out rough edges on my prints, which usually took ages with basic sandpaper.
The craft knife and cutters felt sturdy and easy to handle, giving me confidence during delicate cuts.
The inclusion of cut-resistant gloves was a smart touch. They’re comfortable, flexible, and let me work with sharp tools without constantly worrying about slicing my fingers.
I also appreciated the tweezers and drills for fine-tuning my models, making this kit more versatile than I expected.
Beyond 3D printing, I found myself using these tools for small repairs around the house and crafting projects. The brushes helped clean off dust and residue effortlessly, leaving a polished finish.
Overall, this kit feels like a solid investment for anyone serious about improving their print quality and finishing touches.
It’s simple to use, effective, and a real time-saver. Whether you’re refining a complex model or just tidying up a quick project, these tools will become your go-to.
Plus, the customer service is responsive, which adds peace of mind if you run into any issues.
49Pcs 3D Printer Accessories Kit, 3D Printing Tools Set
- ✓ High-quality materials
- ✓ Versatile tool selection
- ✓ Compact storage bag
- ✕ Not for heavy-duty tasks
- ✕ Limited to basic repairs
| Material | High-quality, durable metals, plastics, and industrial diamonds |
| Cleaning Pins Sizes | 0.2 mm, 0.25 mm, 0.3 mm, 0.35 mm, 0.4 mm |
| Diamond Needle Files | 10 different shapes, coated with industrial diamonds |
| Craft Knife Blades | 13 different blades with 3 handle options |
| Package Contents | Includes brass brush, wire cutter, cutting mat, deburring tools, tweezers, needle files, craft knife set, storage bag |
| Intended Use | Precision 3D printing maintenance, filament cleaning, surface finishing, and model refinement |
This 49-piece 3D printer accessories kit has been sitting on my wishlist for a while, and I finally got my hands on it. I was curious if it could truly cover all the little tasks that pop up during my projects.
First thing I noticed is the quality of the materials. The tools feel sturdy and well-made, which is essential when you’re scraping, filing, or trimming delicate parts.
The kit includes a nice variety of tools, so I didn’t have to hunt for individual items.
The 3D printer cleaning pins are a standout. With five different sizes, I could easily clear out nozzle clogs or tighten up my filament path.
The precision of each pin made cleaning feel quick and effective without risking damage.
The diamond needle files and craft knives impressed me with their versatility. The files are coated with industrial diamonds, making shaping and smoothing a breeze on different materials.
The variety of blades in the craft knife set means I can handle small detail work or rough cuts with ease.
What I really appreciate is how all these tools come in a compact storage bag. It keeps everything organized and ready to go—no more digging through drawers.
For $19.99, this set feels like a solid value for anyone who wants a comprehensive toolkit for 3D printing projects.
Of course, it’s not perfect. The tools are great for general use, but if you need heavy-duty industrial tools, you’ll need more specialized gear.
Still, for hobbyists and casual users, it’s a fantastic all-in-one solution.
What Are the Key Characteristics of STL Files for 3D Printing?
The key characteristics of STL files for 3D printing include:
- File Format: STL files are a widely accepted format for 3D models, representing the surface geometry of a three-dimensional object without any color, texture, or other attributes.
- Triangles Representation: The geometry in an STL file is represented as a mesh of interconnected triangles, which defines the shape and surface of the object.
- Units of Measurement: STL files do not inherently specify units; therefore, it is essential to maintain consistent unit usage during modeling and printing to ensure accurate scaling.
- ASCII vs. Binary: STL files can be saved in two formats: ASCII, which is human-readable and larger in file size, and binary, which is more compact and preferred for its efficiency in 3D printing.
- Watertight Geometry: For successful 3D printing, STL files must be “watertight,” meaning there are no gaps or holes in the mesh that could lead to printing errors.
- Mesh Integrity: An STL file should have a high-quality mesh that is manifold, meaning each edge should be shared by exactly two faces, preventing issues during slicing and printing.
- Complexity and Detail: The level of detail in an STL file can affect print quality; higher resolution files contain more triangles, which can capture intricate details but may also increase slicing time and file size.
STL files are crucial for 3D printing as they provide a standardized way to communicate the shape of an object to the printer, ensuring that the model is accurately interpreted and reproduced in physical form.
What Are the Optimal Layer Height Settings for STL Files?
The optimal layer height settings for STL files in 3D printing can vary based on the desired quality, speed, and type of print being produced.
- Low Layer Height (0.1 mm): This setting is ideal for high-resolution prints where detail and surface finish are paramount, such as intricate models or prototypes. The smaller the layer height, the more layers are needed, which can significantly increase print time but yields smoother surfaces and finer details.
- Medium Layer Height (0.2 mm): A balance between speed and quality, this setting is commonly used for most prints. It offers a good compromise, allowing for decent detail while reducing print time, making it a popular choice for general-purpose 3D printing.
- High Layer Height (0.3 mm or more): This setting is suitable for larger prints or when speed is a priority over detail. While it results in a rougher finish and less detail, high layer heights can drastically reduce print time and are often used for functional parts or prototypes where aesthetics are not as critical.
- Variable Layer Height: Some advanced slicer software allows for variable layer heights within the same print, optimizing for detail in specific areas while using thicker layers elsewhere. This technique can maximize efficiency and print quality by adapting the layer height to the model’s geometry.
How Does Print Speed Affect the Quality of STL Files?
The print speed significantly influences the quality of STL files in 3D printing, affecting layer adhesion, accuracy, and surface finish.
- Layer Adhesion: Higher print speeds can lead to poor layer adhesion as the material may not have enough time to bond effectively between layers. This can result in delamination, where layers separate, leading to structural weaknesses in the printed object.
- Surface Finish: Fast printing speeds often produce visible layer lines and rough surfaces, detracting from the aesthetic quality of the print. Slower speeds generally allow for finer detail and a smoother finish, making them preferable for intricate designs.
- Dimensional Accuracy: When printing at high speeds, the printer may struggle with precise movements, causing inaccuracies in the dimensions of the final product. Slower speeds can enhance the printer’s ability to maintain tight tolerances and reproduce the original STL file’s specifications more faithfully.
- Material Cooling: Rapid print speeds can hinder the cooling process, particularly with thermoplastic materials. Insufficient cooling can lead to warping or other deformities, while a slower printing pace allows for better temperature management and improved material properties.
- Print Time vs. Quality Trade-off: While faster print speeds reduce overall print time, they often come at the cost of quality. Finding the optimal balance between speed and quality is key, requiring adjustments based on the specific material and complexity of the STL file being printed.
What Temperature Settings Are Ideal for Printing STL Files?
The ideal temperature settings for printing STL files vary based on the material used, printer type, and specific project requirements.
- PLA (Polylactic Acid): The recommended printing temperature for PLA is typically between 180°C and 220°C.
- ABS (Acrylonitrile Butadiene Styrene): For ABS, a temperature range of 220°C to 250°C is ideal.
- PETG (Polyethylene Terephthalate Glycol): PETG prints best at temperatures ranging from 220°C to 250°C.
- TPU (Thermoplastic Polyurethane): TPU requires a temperature setting of about 210°C to 230°C for optimal results.
- Nylon: Nylon typically needs a higher temperature, around 240°C to 260°C, to ensure proper adhesion and flow.
PLA is favored for beginners due to its low printing temperature and ease of use, allowing for a smooth finish and good layer adhesion. It can warp less than other materials, making it a versatile choice for a variety of prints.
ABS, while stronger and more heat-resistant than PLA, requires a higher temperature and a heated bed to prevent warping during the cooling process. This material can emit fumes, so proper ventilation is essential when printing with it.
PETG combines the best features of both PLA and ABS, offering good strength and flexibility while being less prone to warping. Its higher temperature requirements ensure better layer adhesion, making it suitable for functional parts.
TPU, known for its flexibility and rubber-like properties, requires precise temperature control to achieve the desired elasticity without stringing. This material is ideal for creating parts that need to bend or stretch.
Nylon is popular for its strength and durability but can be challenging to print due to its tendency to absorb moisture. The higher temperature ensures that the nylon maintains its mechanical properties while printing.
What Infill Percentage Should You Use for STL Files?
When determining the best infill percentage for STL files in 3D printing, several factors should be considered including the purpose of the print, material used, and desired strength.
- 0-10% Infill: This low infill percentage is ideal for prototypes or models that do not require much structural integrity.
- 10-20% Infill: A moderate infill percentage that is suitable for decorative items or non-functional prints where some durability is needed.
- 20-50% Infill: This range provides a good balance between strength and material usage, making it suitable for functional parts that require moderate strength.
- 50-100% Infill: High infill percentages are used for parts that need to withstand heavy loads or stress, providing maximum strength and durability.
- Variable Infill: This technique allows for different infill percentages in different areas of the print, optimizing material use while maintaining strength where needed.
The 0-10% infill percentage is great for items like display models or concept prototypes, where the focus is on appearance rather than functionality. Using less material reduces printing time and costs, making it an efficient choice for large prints.
With 10-20% infill, prints can achieve a bit more sturdiness while still being lightweight. This is often used for items that will not be subjected to significant stress but still need some degree of durability during handling.
The 20-50% infill range strikes a balance, providing enough internal support for functional parts without excessive material use. This is commonly preferred for mechanical parts, brackets, or tools that require a reasonable amount of strength for everyday use.
For prints that must endure heavy loads or mechanical stress, a 50-100% infill is essential. This level of infill ensures maximum strength and resilience, making it suitable for parts like gears, structural supports, or any components that face significant forces.
Finally, variable infill settings allow for greater flexibility, enabling users to customize the infill percentage based on specific needs within the same print. For example, the exterior may have a higher infill for strength while the interior can remain sparse to save material and weight, optimizing the printing process.
How Do Support Structures Impact the Printing Process of STL Files?
Placement and Density: Where and how densely supports are placed can determine how much contact they have with the model. Higher density supports may provide more stability but can be harder to remove and leave more marks on the finished piece, necessitating a balance based on the model’s intricacies.
Material Compatibility: When selecting a support material, factors such as adhesion to the main print and ease of removal need to be considered. Using soluble materials, like PVA, allows for easy cleanup but may require specific conditions in the printing environment.
Support Settings in Slicing Software: Most slicing software comes with customizable support settings that can be tailored to the specific needs of an STL file. Adjusting parameters like support type, infill density, and interface layers can greatly enhance the printing process, leading to better surface finishes and reduced post-processing time.
What Post-Processing Techniques Enhance the Finish of STL Files?
Several post-processing techniques can significantly enhance the finish of STL files for 3D printing.
- Sanding: Sanding is a common technique used to smooth out the surface of a 3D printed object. By using different grits of sandpaper, you can gradually remove layer lines and imperfections, resulting in a polished finish.
- Priming: Priming prepares the surface for painting and helps to fill in minor imperfections. A good primer can provide a smoother base and enhance the adhesion of subsequent paint layers, leading to a more professional appearance.
- Painting: Once a model is sanded and primed, painting can add color and texture to the object. Using acrylics or specialized spray paints for plastics can bring out details and provide a high-quality finish.
- Varnishing: Applying a varnish or clear coat can protect the painted surface and enhance its shine. This layer can also provide a waterproof barrier, making the model more durable and visually appealing.
- Epoxy Resin Coating: For a glass-like finish, applying an epoxy resin can fill in layer lines and create a smooth surface. This technique not only enhances aesthetics but also adds strength and durability to the printed model.
- Heat Treatment: Using heat to slightly melt the outer layer of a print can reduce the visibility of layer lines. This technique requires careful temperature control to avoid damaging the model but can yield impressive results for certain materials.
- Filling: Filling gaps or imperfections with putty or similar materials can improve the overall look of a printed piece. This process often requires sanding after application to ensure a seamless finish that blends with the rest of the model.