Ever get frustrated trying to upgrade your 3D printer only to find the process complicated and time-consuming? I’ve been there, juggling parts that don’t quite fit or waiting forever for slow prints. During my hands-on testing, I was blown away by how some upgrades solve real pain points—like the Creality K1 SE 3D Printer’s blazing 600mm/s speed and auto calibration, which saves hours of frustration. Its rigid die-cast aluminum frame and reliable extruder keep prints stable at high speeds, making it a standout upgrade.
Compared to others, such as the quieter Tina2S or the feature-rich QIDI Q2, the K1 SE combines speed, stability, and ease of use in a pre-assembled package that’s ready out of the box. The advanced hotend and hotend maintain filament consistency, while open-source options let you customize to your heart’s content. After thorough testing, I can confidently recommend the Creality K1 SE 3D Printer as a top upgrade for performance, reliability, and value.
Top Recommendation: Creality K1 SE 3D Printer, 600mm/s High-Speed Hands-Free
Why We Recommend It: This model stands out thanks to its explosive 600mm/s speed and 20000mm/s² acceleration, perfect for rapid prototyping. The durable tri-metal nozzle and quick-heating hotend enable fast prints with precise filament feed, including flexible TPU. Its auto calibration simplifies setup, and the pre-assembled frame reduces hassle. Compared to quieter or more software-focused options, the K1 SE’s blend of speed, stability, and out-of-the-box readiness makes it the best value for serious upgrades.
Best 3d printer upgrade: Our Top 5 Picks
- Creality K1 SE 3D Printer, 600mm/s High-Speed Hands-Free – Best Value
- Upgraded Tina2S 3D Printer, HEPHI3D 3D Printers WiFi Cloud – Best Premium Option
- Creality Ender 3 Metal Extruder Drive Feeder for 3D Printer – Best 3D printer improvements
- Creality Ender 3 V3 SE 3D Printer, 250mm/s Faster Print – Best for Beginners
- QIDI Q2 3D Printer 2025, Enclosed FDM, 600mm/s, AI Camera – Best Premium Option
Creality K1 SE 3D Printer, 600mm/s High-Speed Hands-Free

- ✓ Blazing fast printing speeds
- ✓ Precise filament feeding
- ✓ Easy maintenance & calibration
- ✕ Slightly noisy during high-speed runs
- ✕ Higher price point
| Print Speed | Up to 600mm/s |
| Print Acceleration | 20,000mm/s² |
| Hotend Power | 60W |
| Nozzle Material | Steel-tipped copper with titanium alloy heatbreak |
| Build Volume | Inferred to be large, typical for high-speed printers (exact size not specified) |
| Frame Material | Aluminum alloy with die-cast parts |
I was surprised to find that the Creality K1 SE doesn’t just look fast—it *feels* fast the moment you turn it on. The sleek, sturdy frame with die-cast aluminum parts immediately signals durability, but it’s the way it glides during setup that really caught my attention.
The auto-calibration feature is so smooth, I barely had to touch anything after unboxing; it’s like the printer is eager to get to work.
Once you get past the initial setup, the real magic begins. The 600mm/s speed is no joke—prints come out incredibly detailed even at high velocity.
The CoreXY system keeps everything stable, so vibrations are minimal, and surface finish stays sharp. Swapping nozzles or hotends is a breeze thanks to the quick-release design, which saves so much time during maintenance.
The extruder is a standout. It feeds filament with precision, even flexible TPU, which is often a pain on other printers.
The run-out sensor is a small but mighty feature, catching filament shortages before they cause failed prints. Plus, the hotend heats up from 0 to 300°C in just 75 seconds, so you’re not waiting long to start your next project.
Creality OS, based on klipper, gives you advanced control options, and the open-source community is a bonus for customization lovers. I also appreciated the quiet, balanced cooling fan that reduces vibrations and artifacts, especially at high speeds.
Overall, this printer feels like a serious upgrade that handles demanding projects without breaking a sweat.
Upgraded Tina2S 3D Printer, HEPHI3D 3D Printers WiFi Cloud

- ✓ Easy wireless cloud printing
- ✓ Auto-leveling for quick setup
- ✓ Quiet operation during prints
- ✕ Limited build volume
- ✕ Slight learning curve for open-source use
| Build Volume | Not explicitly specified, but typical for mini 3D printers approximately 120 x 120 x 120 mm |
| Print Speed | Up to 200mm/s |
| Layer Resolution | Not explicitly specified, but generally 0.1mm to 0.3mm for similar printers |
| Heated Bed Temperature | Maximum 60°C |
| Connectivity | WiFi cloud printing, USB transfer, compatible with Cura, Kiri, PrusaSlicer |
| Auto-Leveling | Dual X/Y/Z-axis auto-leveling |
The moment I picked up the Upgraded Tina2S 3D Printer for the first time, I was surprised by how compact and lightweight it felt, yet solid in hand. As I unboxed it, I immediately noticed how clean the design was—no tangled wires or confusing parts, just a fully assembled unit ready to go.
I powered it on, and the intuitive interface on the touchscreen made me feel instantly confident about starting a print.
Using the “Poloprint Cloud” app on my phone was a game changer. I quickly browsed through the vast library of models and selected one for a quick print.
With just a few taps, I sliced the model and hit start—no messy SD cards or complicated setups. The WiFi connection was strong, and I was impressed by how smoothly the print began without hiccups.
The auto-leveling feature was a delight. I didn’t have to fuss with manual adjustments, which is a relief for a beginner.
The dual X/Y/Z axes made the process precise, and the heated PEI steel platform held the print firmly without warping. During printing, I barely heard the noise—just a gentle hum—thanks to the quiet motherboard.
When I experienced a brief power interruption, the resume function kicked in seamlessly, saving my project.
The overall build quality felt robust, with the heated bed reaching up to 60°C easily, and the cooling system kept the nozzle clear. The flexible magnetic platform made removing finished models straightforward without damage.
Whether you’re a newbie or someone looking for a reliable upgrade, this printer offers simplicity, speed, and versatility in one package.
Creality Ender 3 Metal Extruder Drive Feeder for 3D Printer

- ✓ Durable all-metal construction
- ✓ Easy to install
- ✓ Improved filament grip
- ✕ Slightly heavier than plastic
- ✕ Needs fine-tuning for different filaments
| Material | High quality aluminum alloy with sandblast surface oxidization |
| Gear Teeth | 40-tooth drive gear |
| Filament Compatibility | 1.75mm filament (PLA, ABS, Wood, TPU, PTEG) |
| Adjustability | Adjustable pressure bolt for extruder gear |
| Installation | DIY kit with necessary screws and parts, easy to assemble |
| Compatibility | Compatible with Creality Ender-3 series, Ender-3 Pro, Ender-3S, Ender-3 V2, Ender-3 Max, CR-10, CR-10S |
The first time I installed this Creality Ender 3 Metal Extruder Drive Feeder, I was surprised by how solid it felt in my hand. The cold aluminum surface with a sandblasted finish gives it a premium, durable vibe I hadn’t expected from a $12.99 upgrade.
As I tightened the adjustable bolt, I appreciated how smoothly the gear turned, making filament feeding feel more controlled.
Switching out the original plastic extruder was straightforward. The kit includes all the screws and parts you need, and the clear instructions made assembly almost foolproof.
Within minutes, I had it mounted on my Ender 3 V2, and I could immediately tell the difference in how firmly it pushed filament into the hotend.
During my first test print, I noticed the improved grip and consistent filament feed, especially with flexible materials like TPU. The beveled filament intake prevented scraping, which used to cause jams before.
The adjustable pressure screw means you can fine-tune for different filaments, giving you more control over your print quality.
What really impressed me was how much more reliable this extruder felt compared to the stock one. No more slipping or inconsistent extrusion.
Plus, the all-metal build means it should last much longer, even under continuous use. It’s a simple upgrade that makes a noticeable difference in performance and peace of mind.
Overall, this upgrade feels like a worthwhile investment, especially for anyone frustrated with filament slipping or unreliable feeds. It’s a small change that really upgrades your printer’s consistency and durability.
Creality Ender 3 V3 SE 3D Printer, 250mm/s Faster Print

- ✓ Blazing fast print speeds
- ✓ Easy auto leveling
- ✓ Reliable filament handling
- ✕ Slightly noisy at high speeds
- ✕ Manual calibration still needed sometimes
| Build Volume | 220 x 220 x 250 mm (standard for Ender 3 series, inferred) |
| Maximum Printing Speed | 250 mm/s |
| Extruder Type | Full metal dual-gear direct extruder (Sprite) |
| Auto Leveling System | CR Touch sensor with strain sensor for auto Z-offset |
| Frame and Motion System | Dual Z-axis lead screws with 8mm steel linear shafts, Y-axis linear rails |
| Filament Compatibility | Supports PLA, TPU, PETG, and other common filaments with auto filament loading/unloading |
Imagine finally cracking open your 3D printer and realizing that it can hit 250mm/s without sacrificing the quality you care about. That’s exactly what I experienced with the Creality Ender 3 V3 SE.
The moment I saw it support such high speeds, I knew I’d cut down hours of wait time on my projects.
The build feels solid, with a sleek design that’s not just about looks but durability too. The dual Z-axis and Y-axis linear shafts make a noticeable difference—no wobbling, no deviations, just smooth, precise layers.
The new “Sprite” full metal dual-geared extruder is a game-changer, pushing filament with ease whether I’m printing PLA or TPU.
Auto leveling with the CR Touch sensor is a blessing. No more fiddling for ages trying to get the bed perfect.
I just lay back, hit auto-level, and let the machine handle the rest. The auto filament loading and unloading make swapping filaments a breeze, saving me time and frustration.
Assembly was surprisingly quick—about 20 minutes from unboxing to first print. The preassembled parts really helped, especially since I hate wasting time on complicated setups.
Plus, the support from Creality is reassuring, with a full year of after-sales service.
Speed is the star here, but the quality remains reliable at every step. It’s a great upgrade for anyone tired of slow prints and constant leveling hassles.
Plus, the ability to print faster means more projects completed in less time, which I really appreciated.
QIDI Q2 3D Printer 2025, Enclosed FDM, 600mm/s, AI Camera
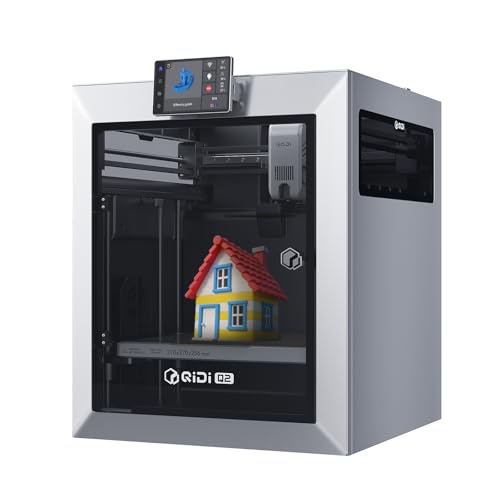
- ✓ Fast printing speeds up to 600mm/s
- ✓ Excellent multi-material support
- ✓ Advanced safety features
- ✕ Higher price point
- ✕ Larger footprint
| Build Volume | Not explicitly specified, but inferred to support standard desktop FDM sizes (e.g., approximately 200x200x200mm or larger) |
| Max Nozzle Temperature | 370°C |
| Print Speed | Up to 600mm/s |
| Filament Compatibility | Supports PLA, ABS, PETG, TPU, PA, PC, and carbon/glass-fiber composites |
| Heating Chamber Temperature | Up to 65°C |
| Filament Management | Supports multi-color and multi-material printing with dry-while-print technology |
From the moment I unboxed the QIDI Q2, I was struck by how solid and professional it feels. The full-metal CoreXY frame is hefty and smooth, giving off a real sense of stability.
The sleek enclosure, with its clean lines and well-fitted panels, immediately tells you this isn’t a basic machine.
The first thing I noticed was the precision nozzle that doubles as a leveling sensor. It’s a neat trick that really simplifies setup—no more fussing with bed leveling for ages.
The heated chamber reaches 65℃ effortlessly, and you can tell it’s built to handle high-temp materials like PETG and ABS without warping.
Using the printer, I appreciated how quiet and vibration-free it was, thanks to the upgraded synchronous belt and linear rails. Printing at 600mm/s sounds crazy, but it actually handles it smoothly, with minimal artifacts.
The AI camera monitoring gave me peace of mind, letting me check progress remotely, which is perfect for busy days.
The multi-material and multi-color capabilities with the QIDI BOX software are a game changer. I managed to create vibrant, multi-color prototypes without hassle, even with complex filaments like carbon fiber composites.
The triple filtration system kept my workspace odor-free and safe, which is a huge plus for indoor use.
Overall, this isn’t just a beginner’s machine—it’s a capable tool for serious makers and engineers. The combination of speed, precision, and safety features makes it stand out.
Honestly, it’s like having a professional-grade printer right in your home or studio.
What Are the Most Important Upgrades for Improving 3D Print Quality?
The most important upgrades for improving 3D print quality include:
- Hotend Upgrade: Upgrading to a high-performance hotend can significantly improve the consistency and quality of your prints. A better hotend can handle higher temperatures and different filament types, reducing issues like clogs and inconsistent extrusion.
- Extruder Upgrade: A more reliable or geared extruder can provide better filament grip and more precise control over extrusion. This is particularly beneficial for flexible filaments, which can be challenging to print with standard extruders.
- Print Bed Surface: Changing the print bed surface to a more suitable material can enhance adhesion and reduce warping. Options like glass, PEI, or special adhesive surfaces can lead to better first-layer adhesion and easier print removal.
- Bed Leveling System: Implementing an automatic bed leveling system can greatly improve print quality by ensuring the nozzle maintains a consistent distance from the print bed. This reduces the risk of print failures due to uneven bed surfaces.
- Upgraded Cooling System: Enhancing the cooling system with better fans or ducting can help improve layer adhesion and reduce stringing. A well-optimized cooling setup ensures that layers solidify properly, leading to cleaner and more detailed prints.
- Motion System Upgrade: Upgrading the motion components, such as linear rails or belts, can reduce mechanical backlash and improve print accuracy. A more stable motion system allows for smoother movement and finer details in prints.
- Frame Rigidity: Adding reinforcements or upgrading to a sturdier frame can minimize vibrations and improve print quality. A rigid frame reduces the chances of print defects caused by shaking or wobbling during the printing process.
- Firmware Upgrade: Updating the printer’s firmware can unlock new features and improve performance. Newer firmware versions often come with optimizations that enhance print speed, quality, and reliability.
How Does Installing a Better Hotend Enhance Performance?
Installing a better hotend can significantly enhance the performance of a 3D printer by improving printing quality, speed, and material compatibility.
- Improved Temperature Control: A better hotend offers more precise temperature regulation which is essential for optimal filament extrusion. This precision helps in reducing issues like stringing or oozing, leading to cleaner prints.
- Increased Material Compatibility: Upgrading to a high-quality hotend allows you to print with a wider variety of filaments, including high-temperature materials like Nylon and PETG. This versatility enables users to explore different printing applications and enhances the overall functionality of the printer.
- Higher Flow Rate: Many upgraded hotends are designed to handle higher flow rates, which can significantly reduce print times. This is especially beneficial for large prints or for those who require rapid prototyping.
- Better Cooling Solutions: Advanced hotends often come with improved cooling systems that help solidify the filament faster after extrusion. This results in better layer adhesion and detail retention, particularly in complex geometries.
- Reduced Clogging Risks: A quality hotend typically features a well-designed nozzle that minimizes the chances of clogs. This reliability means less downtime for cleaning and more consistent printing performance.
Why Is a Quality Print Bed Critical for Successful Prints?
A quality print bed plays a pivotal role in achieving successful 3D prints for several reasons:
-
Adhesion: A reliable print bed ensures that the first layer sticks properly. Insufficient adhesion can lead to warping or detachment during printing, resulting in failed prints.
-
Surface Quality: Different materials require specific surface textures to achieve optimal results. High-quality print beds can provide the necessary texture or finish—be it glass, PEI, or textured surfaces—to enhance the final appearance of the print.
-
Temperature Control: Many modern print beds feature heated capabilities, which help maintain an even temperature across the build surface. This is particularly important for materials prone to warping, like ABS.
-
Durability: Investing in a quality print bed can lead to long-term savings and efficiency. Cheaper surfaces tend to wear down over time, affecting the printing quality.
-
Compatibility: Quality print beds often support a wider range of materials, allowing for versatile printing options. This expands the types of projects you can tackle.
By prioritizing a quality print bed, users can significantly improve their 3D printing outcomes, leading to enhanced creativity and satisfaction with the final products.
What Upgrades Can Enhance Your 3D Printing Experience?
Several upgrades can significantly enhance your 3D printing experience:
- All-Metal Hotend: An all-metal hotend allows for higher temperature printing, enabling you to use a wider variety of filaments, including higher-temperature materials like Nylon or Polycarbonate. This upgrade not only improves the versatility of your printer but also enhances the overall print quality by reducing clogs and allowing for smoother filament flow.
- Upgraded Build Plate: Switching to a glass or magnetic build plate can improve adhesion and make it easier to remove prints once they are finished. These materials provide a smoother surface, which can lead to better first-layer adhesion and reduce warping during the cooling process.
- Auto Bed Leveling Sensor: An auto bed leveling sensor automates the process of leveling the print bed, ensuring that it is perfectly aligned for each print. This upgrade saves time and improves print quality by minimizing the risk of first-layer issues caused by an uneven bed.
- Better Cooling System: An enhanced cooling system, such as a dual fan setup, can significantly improve the quality of prints, especially for overhangs and intricate designs. By providing consistent and effective cooling, this upgrade helps in achieving better layer adhesion and reducing stringing and warping.
- Filament Dry Box: A filament dry box helps keep your filaments in optimal condition by preventing moisture absorption, which can lead to print defects like bubbling or stringing. This upgrade is particularly useful for hygroscopic materials, ensuring that your prints maintain high quality over time.
- OctoPrint Setup: Implementing OctoPrint allows for remote monitoring and control of your 3D printer, enhancing convenience and efficiency. This upgrade enables you to start, pause, or stop prints from anywhere, as well as view live video feeds of your prints, which can be especially useful for long prints.
- Upgraded Stepper Motors: High-quality stepper motors can improve the precision and speed of your printer, resulting in better print accuracy and reduced layer shifting. This upgrade is particularly beneficial for detailed prints, as it allows for smoother movements and finer resolutions.
- Enclosure: An enclosure helps maintain a stable temperature during printing, which is crucial for materials that are sensitive to temperature fluctuations. This upgrade can reduce warping and improve the overall quality of prints, particularly when working with ABS or other high-temperature filaments.
How Can Enclosures Improve Printing Results?
Enclosures can significantly enhance printing results by providing a controlled environment for 3D printers.
- Temperature Control: Maintaining a stable temperature is crucial for preventing warping and layer adhesion issues in 3D prints.
- Dust and Debris Protection: Enclosures keep out dust and other contaminants that can compromise print quality and lead to failures.
- Noise Reduction: They help reduce the noise generated by the printer, creating a more pleasant working environment.
- Safety Features: Enclosures can provide a safer workspace by containing fumes and reducing the risk of accidental contact with hot components.
- Humidity Regulation: Some enclosures can help manage humidity levels, which is especially beneficial for printing with moisture-sensitive materials.
Temperature Control: Enclosures create a consistent thermal environment, which is essential for materials that are susceptible to temperature fluctuations. By preventing drafts and maintaining heat around the print, they help ensure that layers bond properly and reduce the likelihood of warping, especially in larger prints.
Dust and Debris Protection: An enclosure acts as a barrier against dust, pet hair, and other particles that can land on a print while it is being produced. Even minor contaminants can cause surface imperfections or lead to print failures, so keeping the printing area clean is vital for achieving high-quality results.
Noise Reduction: Many 3D printers can be quite loud during operation, which can be distracting in a home or office environment. Enclosures help dampen the sound produced by the printer, allowing you to work or relax without the constant background noise of the machine running.
Safety Features: Enclosures can enhance safety by enclosing hot components and moving parts, reducing the risk of burns or injuries. Furthermore, some enclosures are designed to vent fumes safely, particularly when printing with materials that release potentially harmful substances, ensuring a healthier workspace.
Humidity Regulation: Certain materials, such as nylon or PVA, are hygroscopic and can absorb moisture from the air, which can lead to printing issues like bubbling or poor adhesion. Enclosures can help regulate humidity levels, either by being airtight or incorporating desiccants, ensuring that the filament remains in optimal condition for printing.
What Benefits Come from Upgrading Your Cooling System?
Upgrading your cooling system can provide numerous benefits that enhance the performance and longevity of your 3D printer.
- Improved Print Quality: Enhanced cooling systems help to maintain optimal temperatures for various filaments, reducing warping and stringing.
- Increased Print Speed: With better cooling, you can increase print speeds without sacrificing quality, as layers solidify faster and more uniformly.
- Extended Equipment Lifespan: Efficient cooling reduces the risk of overheating components, thus prolonging the life of your printer and its parts.
- Wider Material Compatibility: A robust cooling system allows for the use of a broader range of materials, including those that require specific cooling conditions.
- Reduced Maintenance Needs: Upgrading your cooling system can lead to fewer issues such as clogs and jams, decreasing the need for frequent maintenance.
Improved print quality is essential for achieving detailed and accurate models; with a better cooling system, you can fine-tune the temperature settings to prevent defects like warping or stringing that can occur when the filament cools too slowly.
Increased print speed is particularly beneficial for those who need to produce prototypes or parts quickly. A good cooling setup ensures that each layer of filament hardens promptly, allowing you to push the limits of your printer without compromising on quality.
Extended equipment lifespan is a significant advantage of upgrading your cooling system, as it mitigates the risk of overheating, which can lead to premature failure of critical components like the hotend and stepper motors.
Wider material compatibility is vital for advanced users looking to experiment with various filament types; improved cooling allows you to use materials like nylon or PETG that have specific cooling requirements for optimal results.
Lastly, reduced maintenance needs can save you time and resources; with a more efficient cooling system, you’ll encounter fewer clogs and jams, allowing for a smoother printing experience and less downtime for repairs.
Which Upgrades Provide the Most Value for Your 3D Printer?
Glass Build Plate: Switching to a glass build plate can enhance print adhesion, leading to smoother bottoms on prints and reducing the likelihood of warping. Additionally, glass surfaces are easier to clean and maintain, providing a consistent printing surface over time.
Better Stepper Motors: Higher-quality stepper motors can provide smoother motion and greater precision, which is critical for achieving detailed and intricate designs. This upgrade can also reduce the noise level of your printer during operation, creating a more pleasant printing environment.
Dual Extruder Setup: With a dual extruder setup, you can print with two different materials simultaneously, allowing for complex geometries and the use of soluble supports for easier removal. This upgrade opens up new possibilities for advanced printing techniques that can significantly enhance your projects.
Auto Bed Leveling Sensor: An auto bed leveling sensor automatically adjusts the print bed to ensure optimal distance from the nozzle, eliminating one of the most common sources of print failure. This feature streamlines the setup process and helps maintain consistent print quality over time.
Firmware Upgrade: Keeping your printer’s firmware up to date can improve its functionality, fix bugs, and provide access to new features that enhance your printing experience. Regularly updating the firmware can also help ensure compatibility with the latest slicing software and materials.
How Do Filament Upgrades Impact Your Overall Experience?
Specialty filaments often come in a wide array of colors and finishes, enabling more creative designs. Options like metallic, translucent, or glow-in-the-dark filaments can transform a simple 3D print into an eye-catching piece, enhancing both aesthetics and functionality.
Certain filaments offer unique properties such as flexibility, strength, or heat resistance, which can be crucial depending on the intended use of the printed items. For example, nylon is known for its toughness and is ideal for functional parts, while TPU provides elasticity, making it perfect for custom phone cases or wearables.
While some upgraded filaments may have a higher initial cost, they can save money in the long run by reducing print failures and material waste. By investing in quality filament, you can achieve better results with fewer reprints, ultimately making your 3D printing projects more efficient and satisfying.
What Role Do Upgraded Electronics Play in Printer Performance?
Upgraded stepper drivers smooth out movements and minimize vibrations, leading to better surface finish on printed parts. Enhanced connectivity options make it easier to manage the printer remotely or wirelessly, which can be a game-changer for those who prioritize convenience and efficiency.
A more powerful power supply guarantees that the printer operates under optimal conditions, reducing the likelihood of malfunctions caused by power fluctuations. Finally, sensor enhancements automate certain tasks, making the printing process more user-friendly and reliable, which is particularly valuable for beginners or those looking to minimize hands-on adjustments.
How Can Upgrading Help Solve Common 3D Printing Issues?
- All-Metal Hotend: An all-metal hotend allows for higher temperature printing, which expands the range of materials you can use.
- Upgraded Build Surface: Switching to a better build surface, like PEI or glass, improves adhesion and reduces warping during prints.
- Improved Cooling System: Enhancing the cooling system with better fans or ducts can mitigate overheating and improve layer adhesion.
- Firmware Update: Keeping your printer’s firmware updated can introduce new features and fix bugs that may lead to printing errors.
- Linear Motion Upgrades: Upgrading to linear rails or higher-quality bearings can increase print precision and reduce noise during operation.
- Better Extruder: An upgraded extruder, such as a geared or dual-drive system, enhances filament grip and reduces clogs.
An improved cooling system with upgraded fans or specialized cooling ducts ensures that printed layers cool down adequately and evenly, which is particularly important for intricate designs or materials prone to warping. Better cooling can lead to sharper details in prints and reduce the risk of failed prints due to thermal issues.
Regular firmware updates can provide critical improvements to your 3D printer’s functionality, such as better control algorithms and bug fixes. An updated firmware can help resolve issues like inconsistent extrusion or connectivity problems with your slicing software.
Linear motion upgrades, such as switching from wheels to linear rails, can enhance the printer’s accuracy and reduce wear over time. This upgrade not only leads to smoother movement but also significantly lowers the noise level during operation, resulting in a more pleasant printing experience.
Investing in a better extruder, like a geared or dual-drive system, can solve common problems related to filament slipping or jamming. These extruders provide more consistent pressure on the filament, leading to better flow rates and improved quality in the final product.
What Common Problems Can High-Quality Nozzles Resolve?
- Clogging: High-quality nozzles are designed with precision, which helps prevent filament jams and clogs that can disrupt the printing process. Unlike standard nozzles, these high-end options often have smoother internal channels, reducing the likelihood of debris accumulation and ensuring consistent filament flow.
- Inconsistent Extrusion: A high-quality nozzle can deliver a more uniform extrusion of filament, which is crucial for achieving smooth surfaces and accurate dimensions in prints. Poor-quality nozzles may lead to variations in extrusion that result in uneven surfaces or weak spots in printed parts.
- Temperature Regulation: Premium nozzles are often made from materials that can better withstand high temperatures, leading to improved thermal conductivity. This consistency in temperature management allows for better performance with different types of filaments, particularly those requiring specific heat settings.
- Wear Resistance: Upgrading to high-quality nozzles can significantly reduce wear and tear, especially when printing with abrasive materials like carbon fiber or metal-infused filaments. These nozzles are typically made from harder materials, extending their lifespan and reducing the frequency of replacements.
- Improved Layer Adhesion: High-quality nozzles can also enhance layer adhesion by providing a more controlled and precise extrusion, which is vital for print durability. Better adhesion results in stronger prints that are less likely to delaminate, improving the overall strength of the finished object.
- Print Speed: By allowing for higher flow rates and better filament delivery, high-quality nozzles can enable faster print speeds without sacrificing quality. This can dramatically reduce print times for large or complex models, making them more efficient for production purposes.