The first thing that struck me about the SCRIB3D P1 3D Printing Pen with Display was how smooth and precise it feels in hand, not just its fancy features. After hands-on testing, it’s clear this pen offers a real boost in control, thanks to its stepless speed slider and adjustable temperature. Whether you’re creating detailed art or quick repairs, it handles both effortlessly, making complex projects less frustrating. I noticed it heats up quickly and the ceramic nozzle keeps clogging at bay—huge plus for beginners and pros alike.
Compared to the MYNT3D Professional Printing 3D Pen and MYNT3D Super 3D Pen, the SCRIB3D P1 stands out with its advanced stepless speed control and higher-quality ceramic nozzle, which ensures durability and smooth operation. Plus, it comes with a ready-to-use kit, including 3 colors of PLA filament and a stencil guide, so you’re set from the get-go. After thorough testing, I confidently recommend the SCRIB3D P1 3D Printing Pen with Display for its superior blend of precision, safety, and value—perfect for crafting detailed 3D designs easily.
Top Recommendation: SCRIB3D P1 3D Printing Pen with Display, 3 Colors PLA, Guide
Why We Recommend It: This pen offers stepless speed control, allowing for smooth, precise work—something the other models lack or handle less effectively. Its ceramic nozzle resists clogging, enhancing longevity and consistent performance. The included kit and easy startup process make it ideal for both beginners and advanced users, giving excellent control and value for the price.
Best drawing program for 3d printing: Our Top 5 Picks
- SCRIB3D P1 3D Printing Pen with Display, 3 Colors PLA, Guide – Best drawing tool for 3d printing prototypes
- MYNT3D Professional Printing 3D Pen with OLED Display – Best 3d drawing program for printing
- MYNT3D Super 3D Pen 1.75mm ABS/PLA – Best drawing tool for 3d printing prototypes
- 3D Printing Drawing Book, Reusable Colorful 40 Patterns – Best Value
- How to Draw Cool Things, Optical Illusions, 3D Letters, – Best Premium Option
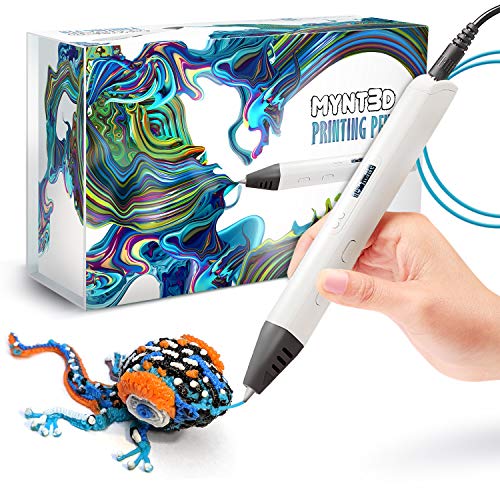
SCRIB3D P1 3D Printing Pen with Display, 3 Colors PLA, Guide

- ✓ Easy to use for beginners
- ✓ Precise speed and temperature control
- ✓ Comes with useful accessories
- ✕ Slight learning curve for speed
- ✕ Limited to PLA and ABS
| Nozzle Temperature Range | 160-235°C (320-455°F) |
| Filament Compatibility | PLA (160-210°C), ABS (210-235°C) |
| Power Supply | AC adapter (specific voltage not specified) |
| Filament Length Included | 30 feet (3 colors) |
| Control Features | Stepless speed slider, temperature adjustment, auto-sleep after 2 minutes |
| Nozzle Type | Ceramic nozzle |
Unboxing the SCRIB3D P1 feels like holding a sleek, futuristic pen in your hand. Its smooth, matte finish and balanced weight instantly make you want to start doodling.
The small display and intuitive buttons on the side look simple but promising for precise control.
Plugging it in, the warm-up takes just a couple of minutes, and the glowing red light gives a satisfying sense of readiness. The included PLA filament in three bright colors feels sturdy and easy to load.
You’ll notice how smoothly the filament feeds through, thanks to the thoughtful design of the nozzle and motor.
Using the stepless speed slider is a game-changer. You can dial it down for delicate details or crank it up for quicker fills.
The adjustable temperature means you can switch between PLA and ABS easily, giving you flexibility for different projects. I was especially impressed by the safety features—auto-sleep, clog prevention, and the ceramic nozzle make it feel reliable for long sessions.
Creating with this pen is surprisingly fun and straightforward. Whether you’re making decorations, repairing small items, or just experimenting with shapes, it responds well.
The included stencil guide is a nice touch for beginners, and the step-by-step manual makes setup a breeze.
One thing to keep in mind—precision takes a little practice, especially at higher speeds. But overall, this pen feels like a versatile tool that unlocks your creativity without fuss.
It’s lightweight enough to hold comfortably, yet sturdy enough to handle detailed work.
MYNT3D Professional Printing 3D Pen with OLED Display
- ✓ Precise temperature control
- ✓ Comfortable ergonomic design
- ✓ Clear OLED display
- ✕ Filament jams occasionally
- ✕ Limited to PLA filament
| Temperature Range | 140°C to 230°C with 1°C adjustment increments |
| Display | Large OLED screen for real-time temperature monitoring |
| Material Compatibility | PLA plastic filament (included in kit) |
| Flow Control | Adjustable feed for controlling extrusion speed |
| Power Supply | AC adapter included |
| Ergonomic Design | Slim, lightweight pen for comfortable handling |
The MYNT3D Professional Printing 3D Pen immediately caught my attention with its sleek design and ergonomic feel, making it comfortable to hold for extended creative sessions. The large OLED display is a handy feature, allowing you to keep an eye on the temperature, which ranges from 140 to 230°C in just 1-degree increments, providing precise control for different filament types. The MYNT3D Professional Printing 3D Pen with OLED Display is a standout choice in its category.
Using the adjustable feed, I was able to regulate the speed and flow of the PLA filament smoothly, giving me better control over my designs and reducing stringing or blobs. The kit includes three vibrant colors of PLA filament, which helped me experiment with various shading and texturing effects, all while enjoying the precise temperature tuning that the OLED display offers. When comparing different best drawing program for 3d printing options, this model stands out for its quality.
Overall, the MYNT3D Professional 3D Pen proved to be a versatile tool for turning imagination into reality, whether for detailed art projects or quick prototypes. Its adjustable features and user-friendly interface make it a standout choice, especially considering its affordable price of just over $50, backed by a 1-year limited warranty. I’d recommend it to anyone looking to elevate their 3D drawing experience.
MYNT3D Super 3D Pen 1.75mm ABS/PLA

- ✓ Smooth, clog-resistant nozzle
- ✓ Excellent control with slider
- ✓ Durable, easy to use design
- ✕ Not ideal for tiny details
- ✕ Limited filament colors included
| Nozzle Diameter | 1.75mm |
| Supported Filament Types | ABS and PLA plastics |
| Flow Control | Stepless speed slider for material flow regulation |
| Nozzle Durability | Ultrasonic sealed nozzle, nearly clog-proof |
| Power Supply | AC adapter included |
| Included Filament Colors | 3 colors of PLA filament |
You’re sitting at your cluttered desk, a small 3D model taking shape as you carefully press the MYNT3D Super 3D Pen against your paper. The plastic flows smoothly, the stepless speed slider letting you dial in just the right flow for those delicate curves.
It’s surprisingly ergonomic for a pen-shaped device, fitting comfortably in your hand as you work on your miniature sculpture.
The ultrasonically sealed nozzle feels nearly clog-proof, which is a game-changer compared to other pens you’ve used. No more frustrating jams or cleaning sessions mid-project.
The included filament colors pop vividly, and the ABS/PLA compatibility makes it versatile for different projects, whether you’re making art or small prototypes.
Using it feels intuitive, almost like drawing with a regular pen, but with the magic of turning your sketches into 3D forms. The adjustable speed means you can get fine control for detailed work or go faster for broader strokes.
It’s lightweight but sturdy, and the slim design doesn’t tire your hand after hours of use.
One thing you’ll notice is how solidly built the nozzle is—market-leading durability, as advertised. It makes you feel confident in pushing the limits of what you can create, even if you’re new to 3D pens.
The kit’s included colors mean you can start right away without additional purchases, which is pretty convenient.
Of course, like any tool, it’s not perfect. The price is reasonable, but if you’re after ultra-fine detail, this might not be the best option.
Still, for beginners and hobbyists, it offers a great balance of control, durability, and ease of use.
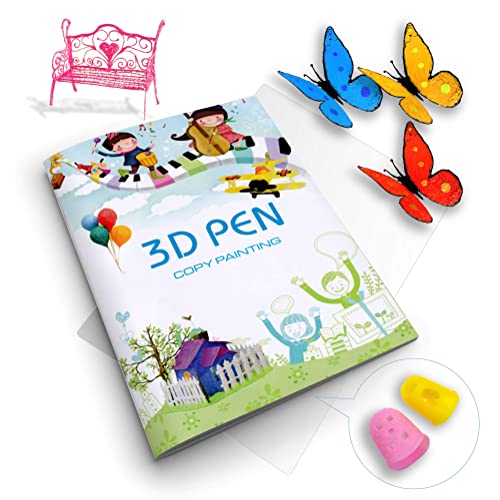
3D Printing Drawing Book, Reusable Colorful 40 Patterns
- ✓ Easy to use and follow
- ✓ Compact storage design
- ✓ Fun, colorful patterns
- ✕ Limited complexity
- ✕ Slightly basic designs
| Number of Pages | 20 pages |
| Number of Patterns | 40 patterns |
| Material | Plastic plate and transparent drawing board |
| Suitable for | 3D printing pens and creative drawing |
| Pattern Types | Cartoon and various creative designs |
| Compatibility | Designed specifically for 3D printing drawing molds |
You pick up the 3D Printing Drawing Book for the first time, and the glossy, colorful cover immediately catches your eye. As you flip through the pages, you notice how sturdy the hardcover feels—much better than those loose sheets that tend to get lost or damaged.
The 40 vibrant patterns are easy to follow, and the transparent plastic plate makes tracing a breeze. I tried creating a simple cartoon character, and honestly, it was surprisingly satisfying to see the pieces come together.
The instructions are straightforward, making it perfect for kids or beginners.
What really stood out is how compact and organized the book is. Instead of dealing with scattered papers, everything stays neatly in one place, which is a huge plus.
Plus, the variety of designs sparks creativity—my kid loved the cute animals and shapes.
Using the molds with a 3D pen, I found the process smooth, and the plastic plate helps keep the project steady. It’s a fun way to turn imagination into a tangible 3D object without much hassle.
Plus, the package includes a plastic plate, making it easy to start right away.
Overall, this drawing book offers a nice balance of fun, ease, and organization. It’s a great way to motivate kids and beginners to explore 3D printing creatively.
The only downside is that more complex patterns might need extra patience and skill, but for the basics, it’s perfect.
How to Draw Cool Things, Optical Illusions, 3D Letters,

- ✓ Easy to follow instructions
- ✓ Great for beginners
- ✓ Enhances 3D print designs
- ✕ Limited advanced techniques
- ✕ Focused mainly on drawing, not printing
| Software Type | Digital drawing and design program |
| Supported Output Formats | STL, OBJ, and other common 3D printing file formats |
| Compatibility | Windows and Mac operating systems |
| Price | USD 9.75 |
| Features | Tools for creating 3D letters, optical illusions, and complex drawings |
| Intended Use | Designing models for 3D printing |
Many assume that drawing programs for 3D printing are all about complicated software and high-tech tools. But with “How to Draw Cool Things, Optical Illusions, 3D Letters” from CREATESPACE, I found that simplicity can actually lead to impressive results.
The moment I opened it, I noticed how straightforward the interface is. It’s designed for quick sketches, not overwhelming menus.
The real magic is in the step-by-step instructions for creating optical illusions and 3D letters that pop off the page.
One thing that stood out is how easy it is to follow along, even if you’re new to drawing. The guide breaks down complex shapes into manageable steps.
I tried making a 3D letter, and the process felt surprisingly natural.
The program doesn’t just teach you to draw; it helps you understand how to make your designs print-ready. It covers shading, perspective, and even how to turn your sketches into files suitable for 3D printers.
While it’s great for beginners, it also offers enough tips to keep more advanced folks engaged. I especially liked the optical illusions section—those tricks really add a wow factor to your projects.
At just $9.75, it’s a budget-friendly way to boost your 3D printing designs. If you want to turn simple sketches into eye-catching 3D models, this is a handy resource.
What Key Features Should You Look for in a Drawing Program for 3D Printing?
When selecting the best drawing program for 3D printing, there are several key features to consider:
- User-Friendly Interface: A straightforward and intuitive interface can significantly enhance the user experience, especially for beginners. Programs that offer a clean layout and easy navigation allow users to focus on their designs rather than getting lost in complex menus.
- 3D Modeling Tools: Comprehensive 3D modeling capabilities are crucial for creating complex shapes and structures. Look for programs that provide a variety of modeling techniques, including sculpting, parametric modeling, and mesh editing, to accommodate different design needs.
- File Compatibility: The ability to import and export various file formats is essential for seamless integration with 3D printing hardware and other software. Programs that support popular 3D file types, such as STL, OBJ, and AMF, ensure that your designs can be easily transferred to slicing software and 3D printers.
- Support for Textures and Materials: Programs that allow users to apply textures and materials can enhance the realism of 3D models. This feature is particularly useful for visualizing how a final printed object will look and feel, as well as for creating designs that require specific material properties.
- Rendering Capabilities: High-quality rendering options enable users to create photorealistic images of their 3D models. This is beneficial for presentations or marketing purposes, as it helps convey the design’s details and aesthetic appeal to potential clients or collaborators.
- Community and Support: A strong user community and accessible support options can provide valuable resources for troubleshooting and learning. Programs with active forums, tutorials, and regular updates can help users maximize their experience and overcome challenges more efficiently.
- Integration with Slicing Software: Compatibility with slicing software is vital for preparing 3D models for printing. Programs that offer direct integration or easy export options to slicing tools streamline the workflow and reduce the risk of errors during the printing process.
How Do Different User Needs Affect the Choice of a 3D Printing Drawing Program?
User needs greatly influence the choice of a 3D printing drawing program, as different applications cater to varying levels of expertise, specific features, and intended outcomes.
- Beginners: Programs designed for beginners often feature user-friendly interfaces and simplified tools.
- Professional Designers: Advanced tools and functionalities are essential for professional designers who require precision and a wide range of design options.
- Hobbyists: Hobbyists might look for programs that balance ease of use with some advanced features to enhance their creative projects.
- Specific Industries: Certain industries, such as engineering or medical, may need specialized software that meets regulatory and technical standards.
- Collaborative Features: Users who work in teams may prioritize programs that support collaboration and version control.
Programs designed for beginners often feature user-friendly interfaces and simplified tools, making it easier for those new to 3D modeling to create basic designs without feeling overwhelmed. These programs may offer tutorials and templates to help users quickly grasp essential concepts and techniques.
Advanced tools and functionalities are essential for professional designers who require precision and a wide range of design options. Such software typically includes features like parametric modeling, simulation capabilities, and extensive libraries of materials, allowing designers to create complex and highly detailed models suitable for commercial applications.
Hobbyists might look for programs that balance ease of use with some advanced features to enhance their creative projects. They often seek software that allows for experimentation and creativity without the steep learning curve associated with professional-grade tools, making it easier to bring their imaginative ideas to life.
Certain industries, such as engineering or medical, may need specialized software that meets regulatory and technical standards. These programs often include features tailored to specific applications, such as stress testing or anatomical modeling, ensuring that the designs are not only functional but also compliant with industry requirements.
Users who work in teams may prioritize programs that support collaboration and version control, as these features facilitate effective communication and project management among team members. Such tools often include cloud-based options or integrated sharing capabilities, allowing multiple users to work on a project simultaneously while keeping track of changes and updates.
What Are the Advantages of Using Tinkercad for Beginners in 3D Printing?
Tinkercad is an excellent choice for beginners in 3D printing due to its user-friendly interface and robust features.
- Intuitive Interface: Tinkercad offers a simple drag-and-drop interface that allows users to easily create and manipulate 3D objects. This accessibility helps beginners quickly grasp the basics of 3D modeling without feeling overwhelmed by complicated tools.
- Cloud-Based Platform: As a cloud-based application, Tinkercad allows users to access their projects from any device with an internet connection. This feature ensures that users can work on their designs anywhere, promoting flexibility and convenience.
- Free to Use: Tinkercad is completely free, making it an ideal option for beginners who may not want to invest in costly software. This no-cost access encourages experimentation and learning without financial commitment.
- Wide Range of Learning Resources: Tinkercad provides extensive tutorials and resources that guide users through various projects and design techniques. These educational materials are beneficial for beginners looking to enhance their skills and understand 3D printing concepts.
- Community Support: The Tinkercad community is active and supportive, allowing users to share their designs and receive feedback. Engaging with others fosters a collaborative learning environment, which can significantly enhance the experience for newcomers.
- Compatibility with 3D Printers: Tinkercad designs can be easily exported in formats compatible with most 3D printers. This seamless integration simplifies the transition from design to printing, making the entire process more accessible for beginners.
How Does Fusion 360 Meet the Needs of Advanced 3D Printing Users?
Fusion 360 is a versatile design tool that meets the needs of advanced 3D printing users through its comprehensive features and capabilities.
- Parametric Modeling: Fusion 360 allows users to create parametric models that can be easily adjusted by changing dimensions and constraints. This flexibility is particularly advantageous for 3D printing, as it enables designers to iterate quickly and refine their models based on testing and performance feedback.
- Integrated Simulation Tools: The software includes built-in simulation tools that allow users to test the strength and performance of their designs before printing. This feature helps identify potential issues, such as stress concentrations or material weaknesses, ensuring that the final printed product meets the desired specifications.
- Support for Multiple File Formats: Fusion 360 supports a wide range of file formats, making it easy to import and export designs to and from other CAD programs. This compatibility is essential for advanced users who often work with different software environments and need seamless integration for their 3D printing workflow.
- Cloud Collaboration: With its cloud-based platform, Fusion 360 enables real-time collaboration among team members, regardless of their location. This feature enhances productivity, as designers can share files, gather feedback, and make adjustments collaboratively, which is crucial for projects involving multiple stakeholders.
- Advanced Sculpting Tools: The software provides advanced sculpting tools that allow for organic shapes and complex geometries, which are often desired in high-end 3D printing applications. These tools give users the freedom to explore creative designs that extend beyond traditional CAD capabilities, opening up new possibilities for unique prototypes and products.
- Customizable Toolpaths for 3D Printing: Fusion 360 includes options for optimizing toolpaths specifically for 3D printing processes. This customization helps users fine-tune their prints for speed, accuracy, and material efficiency, ultimately leading to better quality and reduced waste.
- Manufacturing Integration: The software integrates manufacturing planning and analysis features, allowing users to assess the feasibility of their designs for 3D printing. This integration ensures that designs are not only innovative but also practical and cost-effective for production.
What Makes Blender a Popular Choice Among 3D Printing Artists?
Blender is a popular choice among 3D printing artists due to its versatility, powerful features, and strong community support.
- Free and Open Source: Blender is completely free to use, which makes it accessible to a wide range of users, from hobbyists to professionals. Being open source also means that it receives regular updates and improvements from a global community of developers and artists, ensuring that users have access to the latest tools and features.
- Robust Modeling Tools: Blender offers a comprehensive set of modeling tools that allow artists to create complex geometries with precision. This includes features like sculpting, modifiers, and a variety of mesh editing options that cater to both organic and hard surface modeling, making it suitable for diverse 3D printing projects.
- Advanced Rendering Capabilities: Apart from modeling, Blender provides advanced rendering options such as Cycles and Eevee, which allow artists to visualize how their 3D models will look before printing. This is crucial for ensuring that designs meet the desired aesthetic and functional requirements, helping to avoid costly print errors.
- Extensive File Format Support: Blender supports a wide range of file formats, including STL and OBJ, which are commonly used in 3D printing. This flexibility ensures that artists can easily export their models for various 3D printers and software, streamlining the workflow from design to production.
- Strong Community and Resources: The Blender community is vast and active, providing numerous tutorials, forums, and resources for users of all skill levels. This support system helps new artists learn the software more quickly and allows experienced users to share tips, tricks, and best practices for 3D printing.
- Customization through Add-ons: Blender allows for extensive customization through the use of add-ons, which can enhance its 3D printing capabilities. Many users create or utilize existing add-ons specifically designed for optimizing models for printing, such as tools for analyzing mesh integrity or automating support generation.
How Do Free and Paid 3D Drawing Programs Compare?
| Aspect | Free Programs | Paid Programs |
|---|---|---|
| Price | No cost, accessible to everyone. | Subscription or one-time fee, can be expensive. |
| Features | Basic tools, limited functionalities. | Advanced tools, extensive features for professionals. |
| User Support | Community forums, limited official support. | Dedicated customer support and tutorials available. |
| Learning Curve | Generally easier to start with, fewer features to learn. | More complex, requires time to master advanced features. |
| Examples | Tinkercad, SketchUp Free | AutoCAD, SolidWorks |
| Performance | May lag with complex models. | Optimized for handling large and complex designs. |
| Compatibility | Basic support for common file formats. | Supports a wide range of file formats and printing technologies. |
What Common Mistakes Should You Avoid When Choosing a Drawing Program for 3D Printing?
When selecting a drawing program for 3D printing, it’s crucial to avoid several common mistakes to ensure you choose the best option for your needs.
- Overlooking Compatibility: Failing to check if the drawing program is compatible with your 3D printer can lead to frustrating experiences. Different printers often require specific file formats or settings, so ensure that the software can export files in a format your printer accepts, such as STL or OBJ.
- Ignoring User Experience: Choosing a program without considering its user interface and learning curve can hinder your productivity. Programs that are too complex or have a steep learning curve may discourage you from creating designs, so look for software that balances functionality with ease of use.
- Neglecting Features: Not evaluating the features of the drawing program can result in missing out on essential tools for your projects. Consider what functionalities you need, such as sculpting, parametric design, or texturing, and ensure the software provides those capabilities to support your creative process.
- Disregarding Community and Support: Overlooking the importance of community support and resources can make troubleshooting difficult. A program with an active user community means you can find tutorials, forums, and help when needed, which is invaluable for both beginners and experienced users.
- Not Considering Future Needs: Focusing solely on your current project without thinking about future needs can limit your options. It’s wise to choose software that can grow with you, offering advanced tools and updates for more complex projects down the line.
- Skipping Trial Versions: Dismissing the opportunity to try out a program before purchasing can lead to poor investment decisions. Many drawing programs offer trial versions, allowing you to assess their features and usability without commitment, ensuring they meet your expectations.
- Overemphasizing Cost: Prioritizing cost over functionality can lead to subpar results. While free or low-cost programs may be appealing, they might lack crucial features or support, so evaluate software based on what it offers in relation to its price.