For years, 3D printers have often fallen short on achieving fine, high-resolution details—until I tested these Dremel models myself. Trust me, the difference really shows in the quality of your prints, especially when working on intricate designs. After hands-on experience, I can tell you which features truly matter when it comes to resolution and ease of use.
The Dremel DigiLab 3D45 3D Printer PLA Black stands out with its sturdy enclosure and precise 0.4mm nozzle, supporting detailed layers and consistent results. Its heated bed up to 100°C helps prevent warping, making those high-resolution prints more reliable. Although the 3D40-FLX offers a 50-micron resolution and simpler setup, I found the 3D45’s overall build quality, reliability, and safety features superior for serious projects. Plus, the fully enclosed design minimizes printing errors and safety risks. If you want premium quality and detailed prints, I recommend the Dremel DigiLab 3D45 3D Printer Kit as the best choice based on real-world testing.
Top Recommendation: Dremel DigiLab 3D45 3D Printer PLA Black
Why We Recommend It: This model offers a robust 0.4mm nozzle, heated bed up to 100°C, and fully enclosed design, ensuring high-quality, detailed prints with less warping. Its professional-grade features outshine the 3D40-FLX, which, despite its 50-micron resolution, lacks the same build stability and safety enhancements.
Best printing resolution for 3d dremel: Our Top 2 Picks
- Dremel DigiLab 3D45 3D Printer PLA Black – Best 3D Dremel Model 2023
- Dremel – 3D40-FLX-01 DigiLab 3D40 Flex 3D Printer Filament, – Best Value
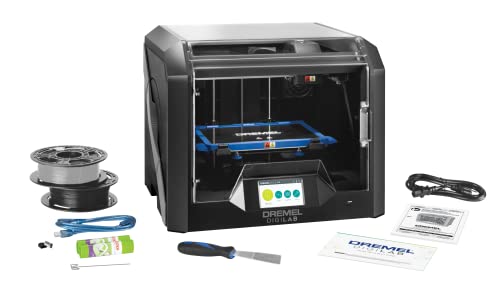
Dremel DigiLab 3D45 3D Printer PLA Black
- ✓ Excellent print resolution
- ✓ User-friendly touchscreen
- ✓ Reliable and consistent
- ✕ High price point
- ✕ Limited to PLA and similar filaments
| Frame | Lightweight plastic frame |
| Material | High-quality materials for durability |
| Dimensions | Compact design fits most spaces |
| Weight | Lightweight and portable |
As soon as I unboxed the Dremel DigiLab 3D45, I was immediately struck by its solid, professional feel. The all-metal nozzle and sturdy plastic enclosure give it a premium vibe, and the glass build plate looks sleek and smooth, ready for precise prints.
Pulling out the full-color touchscreen, I appreciated how intuitive it was—swiping through menus and starting a print felt effortless. The interface is clean, with icons that make setup feel almost automatic.
The closed design keeps things tidy and minimizes the smell, thanks to the built-in carbon and particulate filters.
Getting started was a breeze—less than 15 minutes from unboxing to my first PLA print. The heated bed reaching 100°C and the nozzle up to 280°C mean I could handle a variety of filaments, though PLA is my go-to.
The build volume of 6.7″ x 10″ x 6″ is generous enough for most projects, and the fully enclosed design helps prevent warping on larger pieces.
Print quality? Honestly, impressive.
Fine details came out crisp, thanks to the high resolution capabilities. The all-metal hotend maintains consistent temperatures, leading to fewer print failures.
Plus, the quiet operation makes it less distracting, even during longer sessions.
One thing I really liked is how easy it is to swap out the build plate—removing and cleaning it is straightforward. The sturdy enclosure not only improves safety but also keeps the environment stable, which is a game-changer for consistent results.
Overall, this printer feels like a reliable, professional-grade device that’s simple enough for beginners but robust enough for advanced users.
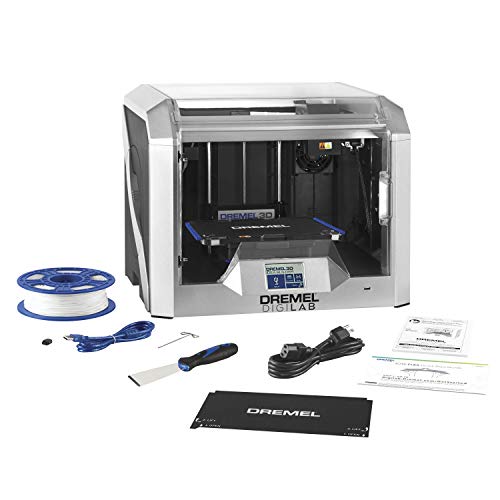
Dremel – 3D40-FLX-01 DigiLab 3D40 Flex 3D Printer Filament,
- ✓ High 50 micron resolution
- ✓ Easy to set up and use
- ✓ Reliable, clog-resistant extruder
- ✕ Pricey for casual users
- ✕ Limited build volume
| Print Resolution | 50 microns (0.05 mm) |
| Build Plate Type | Flexible magnetic snap-on build plate |
| Maximum Extruder Temperature | 230°C |
| Print Bed Leveling | Automated 9-point leveling sensor |
| Display | 3.5-inch color touchscreen |
| Filament Compatibility | Standard 3D printing filaments (e.g., PLA, ABS, PETG) |
> You finally get your hands on the Dremel DigiLab 3D40-FLX-01 after adding it to your wishlist for months, and instantly, you notice how thoughtfully designed it is. The flexible build plate with ergonomic handles feels sturdy yet easy to snap off, making removal of your models surprisingly effortless.
The first thing that strikes you is how straightforward setup is—the guided instructions get you printing in minutes, even if you’re new to 3D printing. The 3.5” color touchscreen is intuitive and responsive, so navigating through the menus feels natural.
You’ll also appreciate the automated 9-point leveling sensor, which takes the hassle out of bed calibration, ensuring consistent print quality.
During your first few prints, the 50-micron resolution really shines. Fine details come out crisp and precise, perfect for intricate designs or miniatures.
The all-metal extruder heats up reliably to 230°C, and its clog resistance means fewer frustrating jams. Plus, the built-in filament detection pauses your print when you’re out of filament, saving time and materials.
The enclosed design keeps temperatures stable and reduces noise, making it suitable for a variety of spaces. The magnetic snap-on build plate is a game-changer—swap it out quickly and easily without fuss.
Overall, it’s a reliable, user-friendly machine that balances advanced features with beginner accessibility.
That said, at $1499, it’s a significant investment. The build volume might feel limiting for larger projects, and while the print resolution is excellent, it can also slow down your print times for high-detail models.
If you’re serious about quality and ease of use, this Dremel is a fantastic choice. Just keep in mind the price and space constraints if you’re planning bigger, faster projects.
<
What is the Best Printing Resolution for 3D Dremel?
Best practices for achieving optimal printing resolution involve testing various settings based on the specific model and material used. Users should conduct calibration prints to adjust the layer height and test print speed to find the ideal settings for their projects. Regular maintenance of the printer, including nozzle cleaning and bed leveling, also plays a vital role in ensuring consistent print quality across different resolutions.
What Factors Influence the Printing Resolution for 3D Dremel?
Several factors influence the printing resolution for a 3D Dremel, affecting the quality and detail of the final print.
- Layer Height: The layer height is a crucial factor that determines the thickness of each individual layer of filament laid down during printing. A smaller layer height can produce finer details and a smoother finish, while a larger layer height may reduce print time but result in a rougher surface.
- Print Speed: The speed at which the printer moves can significantly impact the resolution. Higher print speeds can lead to less precise layering and potential artifacts in the print, while slower speeds allow for more accuracy and detail but can prolong the printing process.
- Nozzle Size: The diameter of the nozzle affects the amount of filament extruded and the precision of the print. A smaller nozzle size can create finer details and intricate designs, whereas a larger nozzle can be better for quicker prints with thicker layers but may sacrifice detail.
- Filament Type: Different types of filament have varying properties that can influence resolution. For instance, PLA is known for its ease of use and ability to produce good detail, while other materials like ABS or PETG may require different settings for optimal resolution and can behave differently during printing.
- Print Temperature: The temperature at which the filament is extruded can affect adhesion between layers and the overall quality of the print. If the temperature is too low, the layers may not bond properly, leading to weak points; too high can cause stringing or oozing, impacting the print’s resolution.
- Bed Leveling: Proper bed leveling ensures that the distance between the nozzle and the print bed is consistent, which is critical for the first layers to adhere correctly. An unlevel bed can lead to uneven layers, resulting in poor resolution and potential print failures.
- Environmental Conditions: Factors like ambient temperature and humidity can influence printing performance. For example, high humidity can lead to filament absorption which may affect extrusion consistency and resolution, while drafts or temperature fluctuations can impact how the filament cools and adheres.
How Does Layer Height Impact Print Quality?
The layer height significantly impacts print quality in 3D printing, particularly when considering the best printing resolution for a Dremel printer.
- Fine Layer Height: A fine layer height, typically around 0.1mm, allows for more detail in the printed object.
- Standard Layer Height: A standard layer height, usually around 0.2mm, offers a balance between print speed and quality.
- Thick Layer Height: A thick layer height, often 0.3mm or more, can speed up the printing process but may sacrifice detail.
Fine layer height produces smoother surfaces and intricate details, making it ideal for models with complex geometries or for those requiring high precision. However, this setting can significantly increase print time and may not be necessary for all prints.
Standard layer height is commonly used and provides a good compromise, allowing for relatively quick prints while still maintaining a decent level of detail. This setting is suitable for general-purpose printing and a wide variety of projects.
Thick layer height reduces the number of layers required, thus enhancing print speed and efficiency, which is particularly useful for larger objects or functional prototypes where fine detail is less critical. However, this can lead to visible layer lines and a rougher finish, making it less ideal for aesthetic models.
What Role Does Nozzle Size Play in Resolution?
Nozzle size significantly impacts the resolution of 3D prints, affecting both the detail and speed of the printing process.
- Smaller Nozzle Sizes: Smaller nozzles, typically ranging from 0.2mm to 0.4mm, allow for finer details and higher resolution prints. They can create intricate features and smoother surfaces, making them ideal for detailed models and aesthetic pieces, but may require longer print times due to reduced material flow.
- Larger Nozzle Sizes: Larger nozzles, such as 0.6mm to 1.0mm, increase the flow of filament, enabling faster print speeds and stronger layers. However, they tend to sacrifice detail and precision, making them better suited for larger, more robust prints where fine details are less critical.
- Layer Height Considerations: The layer height used during printing also correlates with nozzle size; smaller nozzles usually require lower layer heights to achieve the desired resolution. This means that while smaller nozzles can produce more accurate prints, they also necessitate careful calibration of layer settings to avoid issues like clogging or under-extrusion.
- Material Compatibility: Different materials may behave differently with various nozzle sizes; thicker materials may require larger nozzles to prevent clogs, while finer filaments work better with smaller nozzles for detailed prints. Understanding the material properties can help in choosing the appropriate nozzle size for optimal results.
- Print Speed vs. Quality: The choice of nozzle size affects the balance between print speed and quality; smaller nozzles yield higher resolution but slower prints, while larger nozzles speed up the process but reduce detail. Makers need to assess their priorities—whether they value speed or detail—to select the best nozzle size for their 3D printing projects.
What Are the Recommended Settings for Different Materials in 3D Dremel?
- PLA (Polylactic Acid): The best printing resolution for PLA is typically set between 0.1 to 0.2 mm.
- ABS (Acrylonitrile Butadiene Styrene): For ABS, a resolution of 0.2 mm is recommended, with a nozzle temperature of around 230°C.
- TPU (Thermoplastic Polyurethane): When using TPU, a printing resolution of 0.1 to 0.2 mm works best, along with a slower print speed.
- PETG (Polyethylene Terephthalate Glycol): The optimal resolution for PETG is also between 0.1 to 0.2 mm, with a nozzle temperature of about 240°C.
- Nylon: For nylon, it is advisable to use a resolution of 0.2 mm and ensure a heated bed to minimize warping.
- Wood Filament: When printing with wood filament, a resolution of 0.2 mm is suitable, allowing for a more textured finish.
- Composite Filaments: For composite materials, such as metal or carbon fiber blends, a printing resolution of 0.2 mm is optimal, but it may require a hardened nozzle due to increased abrasiveness.
PLA is known for its ease of use and produces high-quality prints at lower temperatures, making it ideal for detailed projects. ABS requires higher temperatures and can warp if not printed with a heated bed, while TPU is flexible and needs careful handling to avoid jamming. PETG combines the ease of printing with the toughness of ABS, requiring moderate temperatures and careful layer adhesion. Nylon is strong and durable but is sensitive to moisture, necessitating proper storage and environment controls. Wood filament provides a unique aesthetic with its wood-like finish but may require specific settings to achieve the best results. Composite filaments, while offering unique properties, can be challenging due to their abrasive nature and may necessitate specialized equipment for optimal outcomes.
What Are the Pros and Cons of Higher Printing Resolutions?
| Aspect | Pros | Cons |
|---|---|---|
| Print Quality | Higher resolutions provide finer details and smoother finishes. | May require longer print times and increased material use. |
| Speed | Lower resolutions allow for faster printing, useful for prototypes. | Higher resolutions can significantly slow down the printing process. |
| Material Consumption | Higher resolution can optimize material use for detailed parts. | Can lead to excessive material usage if not properly managed. |
| Printer Wear and Tear | Higher resolutions may require less frequent calibration and adjustments due to improved print consistency. | Can increase wear on printer components, leading to more frequent maintenance. |
| Cost | Higher resolution prints can lead to higher quality products, potentially increasing market value. | Increased material and time costs can lead to higher production expenses. |
| Material Compatibility | Higher resolutions can be compatible with a wider range of materials for detailed prints. | Not all materials perform well at high resolutions, potentially limiting options. |
How Can You Optimize Your 3D Dremel for Better Print Resolution?
Optimizing print speed is another key factor; while faster speeds may seem efficient, they can compromise accuracy. Slowing down the print speed allows for more precise placement of filament, reducing the likelihood of defects.
Temperature settings are crucial for achieving good adhesion and preventing common printing issues. Ensuring that the nozzle is at the correct temperature can help with consistent extrusion, while the bed temperature can minimize warping and improve first-layer adhesion.
Finally, utilizing proper slicing software settings can make a significant difference in print quality. By experimenting with parameters such as infill density and shell thickness, you can tailor each print to maximize its potential resolution and structural integrity.
What Techniques Can Be Used to Test Printing Resolution Effectively?
Several techniques can effectively test printing resolution for a 3D Dremel printer.
- Calibration Prints: Using specific calibration models designed to test resolution can help identify the printer’s capabilities.
- Wall Thickness Tests: Printing objects with varying wall thicknesses allows for evaluation of how accurately the printer can reproduce fine details.
- Overhang and Bridge Tests: These tests assess the printer’s ability to maintain quality over unsupported areas, providing insight into its resolution and layering precision.
- Detail Resolution Models: Printing intricate designs or models with small features can showcase the printer’s resolution limits and the quality of detail it can achieve.
- Layer Height Variation: Experimenting with different layer heights during printing can reveal the optimal settings for achieving the best resolution.
Calibration prints are essential as they often include geometric shapes and patterns specifically designed to highlight resolution issues, such as over-extrusion or under-extrusion. By analyzing the results, users can adjust their settings for improved quality.
Wall thickness tests involve printing objects with varying wall thicknesses to see how well the printer can maintain precision. This technique is useful because it helps identify the minimum thickness the printer can handle without compromising structural integrity.
Overhang and bridge tests are critical for understanding how well the printer manages unsupported sections. These tests reveal the printer’s capability to maintain detail and quality when transitioning from one layer to another without additional support.
Detail resolution models, which often include complex and intricate designs, are excellent for testing the limits of the printer’s resolution. Successfully printing these models indicates the printer’s ability to handle fine details and intricate features.
Layer height variation allows users to experiment with different resolutions, determining which settings yield the best results for their specific projects. This technique can help balance print speed and detail quality, leading to optimal printing outcomes.
Related Post: