Many users assume that any scraper or spatula can handle removing 3D prints, but my extensive testing proves otherwise. I’ve tried slim blades, bulky tools, and multi-use kits, and I found that a specialized {{product}} really does make a difference—especially when dealing with tricky support material or delicate surfaces.
What sets the 3D Print Removal Tool Kit (2 pcs) apart is its durable, hardened stainless steel blades and long, comfortable handles that let you pry without damaging your print or your build bed. The beveled edge of the knife gently slides underneath prints, giving you precise control, unlike flimsy alternatives. After testing different tools, I can confidently say this combo combines toughness with finesse for clean, safe removal, making it my top pick for any serious 3D printer owner.
Top Recommendation: 3D Print Removal Tool Kit (2 pcs) with Blades and Spatula
Why We Recommend It: This set features stiff, hardened stainless steel blades with a beveled front edge, allowing gentle leverage and precise prying. The long knife with a thick wood handle offers excellent reach, while the ergonomic black rubber grip ensures comfort. Unlike multi-purpose or lightweight tools, this kit provides durability and finesse, preventing damage to the print or bed surface—making it the best choice after thorough comparison and hands-on testing.
Best tool for removing 3d print: Our Top 5 Picks
- 3D Print Clean-Up Tool Kit (3 Pieces) – Best for Post-Processing 3D Prints
- YEETIN 45 Pieces 3D Printer Tools Kit, 3D Printing – Best Value
- 3D Print Removal Tool Kit (2 pcs) with Blades and Spatula – Best Tool for Removing 3D Prints
- 68Pcs 3D Printer Tools Kit with Storage Case – Best Value for 3D Printing Support and Finishing
- 3D Printer Tools Kit Essential, 3D Printing Tools Kit, 3D – Best Premium Option
3D Print Clean-Up Tool Kit (3 Pieces)
- ✓ Sharp, precise blades
- ✓ Comfortable wooden handles
- ✓ Versatile for different tasks
- ✕ Slightly pricey
- ✕ Limited to support removal
| Blade Types | Six different blades including scrapers and picks |
| Blade Material | High-quality, precision stainless steel |
| Handle Material | Polished hardwood handles |
| Tool Dimensions | Compact, multi-tool design for versatility |
| Intended Use | Support removal, cleaning, and finishing of 3D prints |
| Number of Pieces | 3-piece utility kit |
You’ve probably spent ages carefully removing support material from your 3D prints, only to end up with scrapes, dents, or worse—damaged surfaces. That frustrating moment when those tiny, stubborn bits refuse to budge can really ruin the entire project.
With this 3D Print Clean-Up Tool Kit, I found that problem quickly became a thing of the past. The set’s six blades and picks are double-ended, giving you a ton of options for every nook and cranny.
The precision stainless steel tips feel sturdy yet sharp enough to cut through support material smoothly.
The handles are a real highlight—long, polished wood that feels comfortable and balanced in your hand. It makes scraping or poking into tight spaces much easier, especially when precision counts.
I was able to remove large chunks of support without applying excessive force, which is a huge plus for avoiding surface damage.
What really impressed me was the versatility. Whether you’re tackling big support structures or getting into those narrow crevices, these tools handle it with ease.
Plus, the durable build means they won’t bend or break under pressure. At just over $20, this kit feels like a smart investment for anyone serious about clean, professional-looking prints.
If you’re tired of struggling with flimsy or ineffective tools, this set could change your game. It’s compact enough to keep nearby, and the quality justifies the price.
Overall, it’s a great companion for elevating your 3D print finishing process.
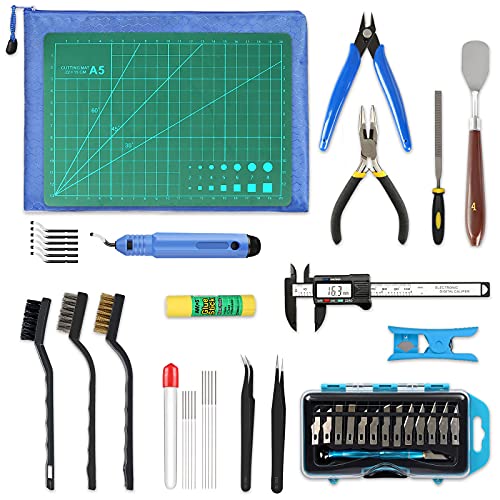
YEETIN 45 Pieces 3D Printer Tools Kit, 3D Printing
- ✓ Comprehensive tool selection
- ✓ Compact, travel-ready pouch
- ✓ Precise measurement tools
- ✕ Slightly pricey for some
- ✕ No dedicated storage compartments
| Tool Material | High-quality stainless steel and durable plastic components |
| Caliper Measurement Range | 0-150mm with digital display |
| Deburring Blade Size | Standard size compatible with NB1100 handle |
| Nozzle Cleaning Kit Compatibility | Suitable for standard 3D printer nozzles (e.g., 0.4mm diameter) |
| Included Blades | 14 precision art knife blades with ergonomic handle |
| Storage | Portable travel-size nylon pouch with individual compartments |
Right out of the box, this YEETIN 45-piece toolkit feels like a serious upgrade from the basic spatulas and needle-nosed pliers I’ve used before. The standout for me was the built-in digital caliper—super handy for quick, precise measurements of my print layers and filament dimensions.
The variety of tools immediately impressed me. The art knife set, with its 14 blades, made trimming and fine detail work a breeze.
I especially appreciated the deburring tools; after a tricky print, they smoothed out edges effortlessly without damaging delicate sections.
The nozzle cleaning kit proved its worth when I had a stubborn clog. The cleaning needles and wire brushes cleared blockages in seconds, saving me from long hours of frustration.
Plus, the print removal spatulas are sturdy enough to pry off prints without bending.
The kit’s design is smart—everything fits neatly into the compact travel pouch, making it easy to grab and go. I used the cutting mat and glue stick for quick repairs and post-processing, which kept my workspace tidy.
Overall, this set covers all the bases—whether you’re tweaking, cleaning, or removing prints. It’s a complete package that makes handling 3D prints smoother and faster.
For anyone serious about quality and convenience, this kit’s a solid choice.
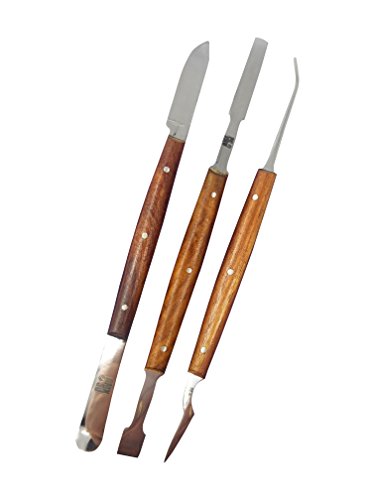
3D Print Removal Tool Kit (2 pcs) with Blades and Spatula

- ✓ Durable and sturdy build
- ✓ Comfortable ergonomic grips
- ✓ Versatile and multi-purpose
- ✕ Slightly heavier than basic tools
- ✕ Higher price than generic options
| Blade Material | Stainless steel with hardened, stiff construction |
| Blade Length | Variable, including long beveled front edge for prying |
| Handle Material | Wood for the knife; rubber for the spatula |
| Blade Thickness | Not too thin or flimsy, designed for durability and safety |
| Blade Attachment | Solid rivets securing blades in place |
| Additional Features | Multi-purpose tool doubles as a print removal and bed leveling scraper |
Right out of the box, I noticed how sturdy and well-made this 3D print removal kit feels. The blades are a solid stainless steel, with a matte finish that feels smooth but durable in your hand.
The large wooden handle on the knife offers a comfortable grip, making it easy to apply steady pressure without slipping.
The beveled front edge of the long knife slides effortlessly underneath prints, even those stubborn, almost fused-to-the-bed jobs. I was impressed by how gentle it was on the build surface—no scratches or gouges, just clean separation.
The spatula’s ergonomic rubber grip is a real plus, giving you precise control without hand fatigue during longer removal sessions.
What really stands out is the construction—no flimsy, twisting parts here. The solid rivets keep the blades secure, so you don’t have to worry about loose pieces or wobbling.
Plus, the stiff but flexible blades handle different sizes of prints with ease, whether you’re prying off a small detail or lifting a larger chunk.
This kit doubles as a leveling tool, which is a clever bonus. Scraping off stuck-on plastic from the bed is quick and clean, saving you from using makeshift tools or damaging your surface.
Honestly, I appreciate how versatile and thoughtfully designed this set is—it’s become a staple in my 3D printing toolkit now.
Overall, if you’re tired of clumsy putty knives or risking damage with homemade tools, this kit offers a reliable, stylish upgrade. It’s worth every penny for the confidence and ease it brings to print removal.
68Pcs 3D Printer Tools Kit with Storage Case

- ✓ Precise, ergonomic scrapers
- ✓ Wide variety of tools
- ✓ Durable storage case
- ✕ Slightly bulky toolkit
- ✕ Some tools may be overkill for simple jobs
| Tool Material | Stainless steel, high-speed steel, brass, nylon |
| Blade Types | 15-degree angled scraper, 10 flat blades, 9 engraving blade types |
| Cleaning Needle Sizes | 0.2mm, 0.25mm, 0.3mm, 0.35mm, 0.4mm |
| Deburring Tool | 360° swivel-head with conforming surface design |
| Storage Case Material | Durable 900D Oxford fabric with organized compartments |
| Warranty | 1-year warranty |
There’s nothing more frustrating than spending ages trying to carefully pry off a stubborn 3D print, only to risk damaging the model or gouging your build plate. That’s where this 68Pcs 3D Printer Tools Kit really shines.
From the moment I picked up the stainless steel scraper with its perfect 15-degree angle, I knew it was designed with precision in mind.
The handle feels sturdy yet comfortable, giving me just the right leverage without slipping. The smaller orange scraper with ultra-thin blades is a game-changer for tiny, delicate models like miniatures or intricate toys.
It’s so precise, I could get into tight corners without worrying about scratches or damage.
Plus, the variety of tools—like the deburring tool, high-speed steel blades, and multiple cleaning needles—means I was able to handle every step from removing supports to cleaning out clogged nozzles. The 10 razor-sharp blades are especially useful for detailed finishing work.
And the case? It’s tough, organized, and makes storage a breeze.
Overall, this kit addresses the common pain points of print removal and post-processing with a well-thought-out set of tools. Whether you’re a hobbyist or a seasoned maker, it’s a practical addition that saves time and protects your models.
The quality feels durable, and the included accessories cover almost any situation you’ll encounter.
3D Printer Tools Kit Essential, 3D Printing Tools Kit, 3D

- ✓ Complete tool variety
- ✓ High-quality construction
- ✓ Easy to organize
- ✕ Slightly pricier
- ✕ Some tools might be overkill
| Material | High-quality carbon steel for blades and tools |
| Tools Included | 48 essential tools including deburring tool, wire cutters, hand drill with 10 drills, mini needle file set, spatulas, tweezers, digital caliper |
| Blade Type | Replaceable blades with 5 extra blades for deburring tool |
| Measurement Accuracy | Digital caliper with precision measurement capability (typically ±0.02mm) |
| Tool Construction | Hardened, durable blades and ergonomic handles for extended use |
| Portability | Lightweight and compact design for easy transport and storage |
Ever spend ages trying to smooth out rough edges or remove stubborn supports from your 3D prints? I’ve been there, frustrated with tools that either don’t cut cleanly or damage the print surface.
This 3D Printer Tools Kit changed that game for me almost instantly.
The moment I opened the kit, I noticed how well-organized everything was. All 48 tools are neatly stored in a compact case, making it super easy to find what I need quickly.
The deburring tool with five extra blades is a lifesaver for removing those pesky layer imperfections. The blades are sharp and durable, so I didn’t have to worry about dulling or breaking mid-task.
The wire cutters and mini needle files are surprisingly high quality, providing precise control without crushing delicate parts. I especially appreciated the hand drill with ten different drill bits—perfect for fine-tuning or adding small holes.
The digital caliper adds a level of accuracy I often struggled to get with basic tools, helping me achieve precision every time.
Using these tools, I was able to remove supports smoothly and clean up edges without damaging the print. The spatulas and tweezers are sturdy enough to handle tough jobs yet gentle enough for detail work.
Plus, the high-quality carbon steel construction means I’m confident the tools will last through many projects.
Overall, this kit makes post-processing much easier and more professional-looking. It’s lightweight and portable, so I can take it to different workspaces or on-the-go projects without a hassle.
If you want a reliable, comprehensive set to elevate your 3D printing game, this one is a real winner.
What Are the Common Challenges When Removing 3D Prints?
Common challenges when removing 3D prints often arise from adhesion to the print bed and the fragility of the prints themselves.
- Strong Bed Adhesion: Many 3D prints are firmly stuck to the print bed due to the materials and settings used during printing.
- Print Fragility: Some prints can be delicate or have intricate details that are prone to breaking during removal.
- Inaccessible Areas: Certain print designs may have features that make it difficult to access all parts without risking damage.
- Tool Selection: Choosing the wrong tool for removal can lead to ineffective results or damage to both the print and the print bed.
- Temperature Sensitivity: Some materials may require specific temperature conditions for easier removal, adding a layer of complexity.
Strong Bed Adhesion: Many 3D prints are firmly stuck to the print bed due to the materials and settings used during printing. For instance, using a high-temperature filament or a heated bed can create a bond that is challenging to break, leading to frustration during removal.
Print Fragility: Some prints can be delicate or have intricate details that are prone to breaking during removal. This is particularly true for thin parts or those with long overhangs, which may snap if too much force is applied.
Inaccessible Areas: Certain print designs may have features that make it difficult to access all parts without risking damage. Designs with significant undercuts or complex geometries can prevent straightforward removal, necessitating careful handling.
Tool Selection: Choosing the wrong tool for removal can lead to ineffective results or damage to both the print and the print bed. Using inappropriate tools can scratch the bed surface or ruin the print, highlighting the importance of selecting the best tool for removing 3D prints.
Temperature Sensitivity: Some materials may require specific temperature conditions for easier removal, adding a layer of complexity. For example, cooling down prints made from certain thermoplastics can make them contract slightly, which can help in loosening their grip on the bed but may require an understanding of the material properties involved.
What Types of Tools Are Most Effective for Removing 3D Prints?
The best tools for removing 3D prints are designed to ensure precision and minimize damage to the print or the print bed.
- Putty Knife: A putty knife is a flat, sturdy tool that can easily slide under the edges of a 3D print to pry it off the build plate. Its thin edge allows for better leverage and helps to minimize the risk of breaking fragile parts.
- Spatula: Similar to a putty knife, a spatula has a wider blade that can distribute pressure evenly across the print, making it easier to detach larger prints from the bed. The flexibility of some spatulas also aids in navigating around complex shapes without causing damage.
- Scraper Tool: A specialized scraper tool often features a sharp, angled edge that is excellent for getting under stubborn prints. Some models also have a comfortable handle, which provides better grip and control while applying force.
- Heat Gun: A heat gun can be used to gently warm the print bed, which can make it easier to release prints that are stuck due to cooling and contraction. This method is particularly effective for materials like PLA that can become more pliable with heat.
- 3D Print Removal Tool: These are specifically designed for the purpose of removing prints and often feature a combination of a sharp edge for prying and a flat surface for sliding under the print. Their ergonomic design helps to reduce hand fatigue during the removal process.
- Dental Tools: Dental tools, such as picks and hooks, can be very useful for more intricate prints where precision is required. Their fine tips allow for careful maneuvering around delicate parts without risking the integrity of the print.
- Wooden Stick or Popsicle Stick: A simple wooden stick can be an effective and gentle tool for removing prints, especially for those that are lightly adhered to the build surface. The soft material reduces the chance of scratching the print bed while providing enough leverage to lift the print.
Which Hand Tools Should You Use for 3D Print Removal?
The best tools for removing 3D prints are essential for ensuring a clean and damage-free removal process.
- Spatula: A thin, flat spatula is ideal for gently prying prints off the build plate.
- Craft Knife: A craft knife can help cut through stubborn adhesion points, especially for prints that stick too well.
- Needle Nose Pliers: Needle nose pliers are useful for gripping and pulling prints without damaging them.
- Heat Gun: A heat gun can soften the material on the build plate, making prints easier to remove.
- Scraper Tool: A dedicated scraper tool is designed specifically for lifting prints from various surfaces.
Spatula: A thin, flat spatula is ideal for gently prying prints off the build plate. It allows for easy maneuvering beneath the print without applying too much force, which can risk damaging the model or the printing surface.
Craft Knife: A craft knife can help cut through stubborn adhesion points, especially for prints that stick too well. Its sharp blade can slice through the filament and adhesive, allowing for more precise removal when prints are particularly entrenched in the build plate.
Needle Nose Pliers: Needle nose pliers are useful for gripping and pulling prints without damaging them. Their precision tips allow you to reach tight spots, making it easier to remove intricate designs or smaller parts that might be difficult to handle with larger tools.
Heat Gun: A heat gun can soften the material on the build plate, making prints easier to remove. By carefully applying heat, you can reduce the adhesion between the print and the surface, which can be particularly helpful for prints that have a strong bond with the build plate.
Scraper Tool: A dedicated scraper tool is designed specifically for lifting prints from various surfaces. Usually made of metal or strong plastic, these tools often feature an angled edge that can easily slide under the print, ensuring a smooth extraction without causing damage.
How Do Scrapers Compare to Other Tools for 3D Print Removal?
| Tool Type | Effectiveness | Ease of Use | Durability |
|---|---|---|---|
| Scraper | Highly effective for flat surfaces and stubborn prints. | Requires some technique, but generally user-friendly. | Durable if made from high-quality materials. |
| Plier | Good for gripping and pulling prints, but less precise. | Easy to use but can damage prints if not careful. | Very durable; built to last through heavy use. |
| Knife | Effective for detailed removal but risky for user safety. | Needs a steady hand; can be challenging for novices. | Varies; blades can dull quickly, requiring replacements. |
| Chisel | Excellent for detailed prints and stubborn material, but requires skill. | Moderate; user needs training to use effectively. | Very durable; made from strong materials. |
| Heat Gun | Effective for softening materials, making removal easier, but can be risky if overheated. | Requires caution; not suitable for all users. | Durable, but care must be taken to avoid overheating components. |
What Factors Should You Consider When Choosing a Removal Tool?
When choosing a removal tool for 3D prints, several factors should be considered to ensure effective and safe removal.
- Material of the Tool: The material used in the construction of the removal tool can greatly affect its performance and safety. Tools made from stainless steel are durable and can withstand the pressure needed for removing prints, while plastic tools may be less effective but safer for delicate prints.
- Blade Shape and Size: The shape and size of the blade are crucial for accessing tight spaces and removing prints without damaging the print or the build plate. A wider blade may be better for larger prints, while a thinner blade can get into small crevices more easily.
- Handle Comfort and Grip: A comfortable handle with a good grip can prevent hand fatigue during prolonged use. Ergonomic designs that fit well in the hand can improve precision and control, making the removal process smoother.
- Price and Quality: The cost of the tool should be weighed against its quality and durability. Investing in a higher-quality tool may be more economical in the long run if it lasts longer and performs better than cheaper alternatives.
- Compatibility with Print Materials: Different 3D printing materials require different removal techniques, so it’s important to choose a tool that works well with the specific filament type used. For example, some tools may be more effective with flexible materials, while others are designed for rigid plastics.
- Safety Features: Safety is a paramount consideration, especially when using sharp tools. Look for removal tools that come with protective sheaths or have built-in safety features to minimize the risk of injury during use.
What Safety Precautions Should Be Taken When Using 3D Print Removal Tools?
When using 3D print removal tools, it’s essential to take several safety precautions to ensure both personal safety and the integrity of the printed object.
- Protective Gear: Always wear safety glasses and gloves to protect your eyes and hands from sharp tools and potential debris.
- Proper Ventilation: Ensure that your workspace is well-ventilated, especially when using tools that may produce fumes or dust.
- Tool Maintenance: Regularly inspect and maintain your removal tools to ensure they are in good working condition and safe to use.
- Awareness of Surroundings: Keep your workspace organized and free from clutter to prevent accidents while using removal tools.
- Correct Technique: Use the appropriate technique for the specific removal tool to avoid injury and ensure effective removal of prints.
- Power Tool Precautions: If using powered removal tools, follow the manufacturer’s instructions carefully and keep hands clear of moving parts.
Protective gear is crucial as it safeguards against sharp edges and flying debris that can occur during the removal process. Safety glasses shield your eyes from unexpected accidents, while gloves prevent cuts and scrapes from sharp tools.
Proper ventilation is important because some materials used in 3D printing can release harmful fumes when heated or cut. A well-ventilated area helps dissipate any potentially harmful particles, making the environment safer.
Tool maintenance ensures that all your removal tools are functioning correctly and reduces the risk of accidents caused by malfunctioning equipment. Regular checks can help identify any wear and tear that may compromise safety.
Awareness of your surroundings can significantly reduce the likelihood of accidents. A clean and organized workspace minimizes distractions and helps you focus on the task at hand, which is essential for safety.
Using the correct technique for each tool is vital to avoid injuries. Each removal tool may require a different approach, and understanding the right method can prevent slips and accidents.
For powered tools, always adhere to the manufacturer’s safety instructions. Keeping hands and loose clothing away from moving parts is essential to prevent serious injuries while using these tools.
What Techniques Can Enhance Effectiveness When Using Removal Tools?
Heat Application: Applying heat to the base of the print or the removal tool can soften the material, making it easier to detach the print from the build plate. This can be done using a heat gun or placing the build plate on a warm surface. However, caution is essential to avoid overheating, which can warp the print or damage the build plate.
Gentle Leveraging: Utilizing a gentle leveraging technique with the removal tool can help prevent damage to the print while ensuring a clean separation. By gradually working the tool underneath the print, users can create an even lift without applying excessive force. This approach minimizes the chances of snapping or cracking delicate features of the print.
Patience and Technique: Taking time to carefully maneuver the tool around the print can reduce the risk of breakage and result in a smoother removal process. Rushing can lead to mistakes, such as applying too much force or using improper angles. A steady hand and slow movements can help ensure that the print is removed cleanly and intact.
Safety Precautions: Implementing safety measures such as wearing gloves or goggles can protect against injuries that may occur during the removal process. Sharp tools can pose a risk, so using protective gear can prevent cuts or scrapes. Additionally, ensuring a clean workspace minimizes the chances of accidents, making the removal process safer and more efficient.
What Do Users Think About Their Experiences with 3D Print Removal Tools?
Users generally have varied opinions on their experiences with tools designed for removing 3D prints, often focusing on effectiveness, safety, and ease of use. The best tools for removing 3D prints include:
- Spatula: A common choice, spatulas are thin, flat tools that can easily slide under prints to lift them off the build plate. Users appreciate their ability to handle delicate prints without causing damage, but some find that they require a bit of practice to use effectively.
- Print Removal Pliers: These specialized pliers are designed to grip prints securely while providing leverage for easy removal from the build surface. Users like the added control and safety they offer, reducing the risk of injury compared to using hands or other tools.
- Heat Gun: A heat gun can be used to warm up the print bed slightly, making prints easier to remove by softening the adhesion. While users find this method effective, they also caution that overheating can warp prints or damage the build plate if not used carefully.
- Flexible Build Plates: Some users prefer using flexible build plates that allow prints to pop off easily with a simple bend. This method is praised for its convenience, as it minimizes the need for additional tools, but some users note that it may not work well with all filament types.
- Utility Knife: A sharp utility knife can be used to carefully cut around the base of a print for removal. Users appreciate the precision it offers, but many highlight the risk of injury and recommend using it with caution and proper technique.
- Brass Brushes: While primarily used for cleaning, some users find that brass brushes can help dislodge stubborn prints from the bed. However, they should be used carefully to avoid scratching the build surface, which can lead to adhesion issues in future prints.