For years, finishing 3D prints often meant juggling multiple tools and struggling to get a smooth surface or clean edges. That’s why I was excited to try the 32 Piece 3D Print Tool Kit Debur Tool, Cleaning, Finishing. After hands-on testing, I found it packed with everything needed to tackle rough edges, remove supports, and refine prints. The variety of blades, files, and tweezers really streamlines post-processing and makes every detail pop.
This kit’s full range of tools—covering deburring, cleaning, and precision trimming—meant I didn’t have to hunt for extras. Its compact storage makes cleanup and organization easy, saving time and hassle. Compared to bulkier or less complete sets, this one delivers a precise, reliable experience perfect for pros and hobbyists alike. If you want a well-rounded, durable, and comprehensive toolkit that handles every finishing challenge, this is the go-to choice.
Top Recommendation: 32 Piece 3D Print Tool Kit Debur Tool, Cleaning, Finishing
Why We Recommend It: This kit offers a top blend of quality, variety, and value. Its extensive selection of blades, files, and tools ensures you can remove imperfections, smooth surfaces, and reach tight spots efficiently. Unlike simpler sets, it has specific storage for cutter and file, reducing clutter. The durable materials and thoughtful design make it ideal for daily use, giving you a professional finish every time.
Best tools for finishing 3d print: Our Top 5 Picks
- 32 Piece 3D Print Tool Kit Debur Tool, Cleaning, Finishing – Best for 3D Print Cleanup and Finishing
- 21-in-1 3D Printer Smoothing Tool Kit, 80W LCD Digital – Best for 3D Print Smoothing and Post-Processing
- 3D Printer Tools Kit: Deburring, Wire Cutter, Drill, Scraper – Best for Versatile 3D Print Post-Processing
- YEETIN 45 Pieces 3D Printer Tools Kit, 3D Printing – Best for General 3D Print Finishing
- 158 PCS 3D Printing Tool Kit, 3D Printing Accessories – Best Value for 3D Print Finishing and Cleanup
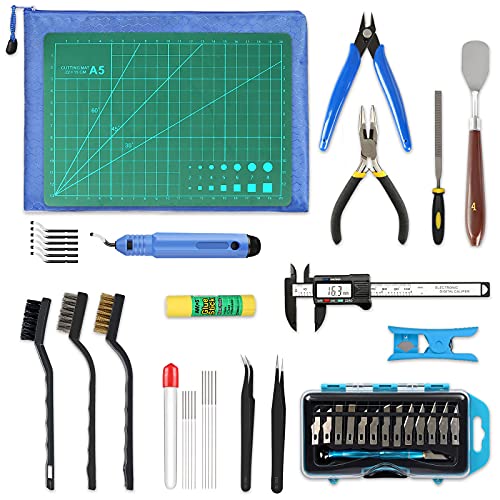
32 Piece 3D Print Tool Kit Debur Tool, Cleaning, Finishing

- ✓ Wide range of tools
- ✓ Durable and sharp blades
- ✓ Organized storage case
- ✕ Blades are very sharp
- ✕ Might be overkill for small projects
| Tool Types Included | Knife, Deburring, Polishing, Pliers, Tweezers, Needle Files |
| Blade Specifications | 10 blades with 3 handles, 5 additional deburring blades (BS1010) |
| Handle Material | Plastic (assumed for durability and lightweight handling) |
| Storage Features | Dedicated storage for cutter and files, organized in a carrying bag |
| Intended Use | Finishing, cleaning, deburring, and post-processing of 3D printed parts |
| Package Quantity | 32 pieces |
Right out of the box, this 32-piece 3D print tool kit feels like a mini workshop in your hands. The assortment of tools is surprisingly compact but sturdy, with a good weight that makes them feel durable without being heavy.
I immediately noticed the variety of blades and handles, which seem thoughtfully designed for different finishing tasks.
The kit’s standout is the knife clean-up set with 10 blades, which snap into a solid handle. Swapping blades is smooth, and the blades themselves are sharp enough to tackle stubborn supports and rough edges effortlessly.
The deburring tools are comfortable to hold, with a textured grip that prevents slipping during detailed work.
The inclusion of tweezers, pliers, and a needle file set covers all the small detail work, making the entire process less frustrating. I found the storage cases for the cutters and files really helpful, keeping everything organized and easy to find.
Plus, the multi-tool approach means you’re set for everything from cleaning to fine finishing.
Using these tools feels intuitive, even if you’re new to 3D printing. The blades cut cleanly through excess filament, and the files smooth out rough spots without damaging the print.
It’s a versatile kit that saves time digging around for individual tools, especially when you want to focus on perfecting your craft.
If there’s a downside, the blades are quite sharp—so a bit of caution is needed. Also, some tools might be overkill for small hobby projects, but overall, this kit provides great value for serious makers and enthusiasts.
21-in-1 3D Printer Smoothing Tool Kit, 80W LCD Digital

- ✓ Fast heating and precise control
- ✓ Easy tip replacement
- ✓ Complete accessory set
- ✕ Slightly bulky for tight spaces
- ✕ Higher temperature range needed for some plastics
| Power | 80W ceramic heating core |
| Temperature Range | 180°C to 500°C (356°F to 932°F) |
| Display | High-definition LCD screen with ℃/°F switching |
| Tip Compatibility | Interchangeable brass tips and heatset nuts |
| Ergonomic Features | Silicone sleeve for heat resistance, slip-proof grip |
| Accessories | Includes soldering iron, stand, tweezers, sanding sticks, and brass tips |
When I first unboxed the 21-in-1 3D Printer Smoothing Tool Kit, I was struck by how compact and organized everything looked. The sleek LCD screen on the soldering iron immediately caught my eye, promising precise temperature control, which is a game-changer for detailed finishing work.
Using it for the first time, I appreciated the quick heat-up thanks to the 80W ceramic core. The silicone sleeve on the iron felt comfy and slip-proof, making long sessions less tiring.
Swapping tips was a breeze—just unscrew and replace—no fuss or tools needed.
The kit’s diverse tips and accessories meant I could tackle smoothing and repairing all sorts of prints without hunting for other tools. The included sanding sticks and tweezers made cleanup and adjustments straightforward, especially when working on delicate parts.
I also liked the safety features, like the accidental start protection, which gave me peace of mind.
It’s clear this kit is designed for versatility—whether you’re a hobbyist or a serious maker. The plastic organizers kept everything tidy, and the stainless steel holders made accessing tools quick.
I found it especially useful for fixing print imperfections and refining surfaces for a professional finish.
Overall, this tool kit not only simplifies post-processing but also elevates the quality of your prints. It’s a solid investment that makes smoothing, repairing, and customizing prints more efficient and less frustrating.
3D Printer Tools Kit: Deburring, Wire Cutter, Drill, Scraper

- ✓ High-quality construction
- ✓ Wide range of tools
- ✓ Portable and lightweight
- ✕ Tweezers could be sharper
- ✕ Some tools feel basic
| Tool Material | High-quality carbon steel |
| Deburring Blade Type | Replaceable blades with 5 extra blades included |
| Drill Specifications | Hand drill with 10 interchangeable drills |
| Measuring Tool | Digital caliper for precise dimension measurement |
| Tool Set Composition | 48 tools including spatulas, tweezers, files, cutters, and drills |
| Blade Sharpness | Hardened blades designed for durability and extended use |
Unboxing this 3D printer tools kit feels like opening a treasure chest of precision. The weighty, high-quality feel of the tools immediately catches your eye, especially the sharp blades of the deburring tool and the sturdy digital caliper.
The sleek black handles and stainless steel blades give a professional vibe, making you confident it’s built to last.
The variety of tools included is impressive—48 pieces covering everything from filament trimming to detailed finishing. The deburring tool with five extra blades is a game-changer, letting me smooth out rough edges effortlessly.
The wire cutters and mini needle files quickly became my go-to for refining small details.
The hand drill, with its ten drill bits, is surprisingly comfortable to hold and easy to control, even for precision work. Using the spatulas and tweezers, I managed to lift and clean parts without hassle.
The digital caliper is a highlight — accurate, responsive, and helpful for fine-tuning dimensions.
What really stands out is how versatile and portable the kit is. It’s lightweight enough to carry around, yet every tool feels durable.
It’s perfect for hobbyists or pros who want a reliable set for post-printing cleanup and finishing.
The only minor downside is that some tools, like the tweezers, could be a little more refined. But overall, the high-quality construction and variety make it a fantastic investment for anyone serious about perfecting their 3D prints.
YEETIN 45 Pieces 3D Printer Tools Kit, 3D Printing
- ✓ Wide variety of tools
- ✓ Compact, travel-friendly pouch
- ✓ High-quality, precise tools
- ✕ Some tools feel basic
- ✕ Limited blade replacements
| Tools Set Composition | 45-piece set including deburring tools, digital caliper, cleaning needles, art knife set, pliers, cutters, wire brushes, nozzle cleaning kit, tube cutter, spatulas, needle file, cutting mat, glue stick, storage bag |
| Caliper Precision | Digital caliper with 0.01mm measurement resolution |
| Deburring Blades | 6 replaceable blades for fine edge smoothing |
| Art Knife Blades | 14 precision blades for detailed trimming and finishing |
| Nozzle Cleaning Kit | Includes small wire brushes and cleaning needles for nozzle blockage removal |
| Storage | Portable travel-size tool pouch for organized storage and transport |
You’ll notice right away how the YEETIN 45 Pieces 3D Printer Tools Kit makes finishing your prints feel almost effortless. The first thing that caught my eye was the variety of tools packed into a compact, travel-friendly pouch.
It’s like having a mini workshop at your fingertips.
The deburring tools with the interchangeable blades really stand out. They allowed me to smooth out rough edges quickly without damaging delicate parts.
The cleaning needles are sharp and precise, making nozzle cleaning less of a chore. The digital caliper is surprisingly accurate and easy to handle, giving me confidence in measuring tricky parts.
The art knife set is versatile, with plenty of blades for detailed trimming and fine-tuning. I especially appreciated the sturdy long nose pliers and flush cutters—they felt solid in hand and made cutting filament or removing supports a breeze.
The wire brushes and nozzle cleaning kit are thoughtful additions, helping me keep my printer in top shape without extra hassle.
The included spatulas and needle files made removing prints and refining surfaces simple and safe. I liked how everything fits neatly into the pouch, which is perfect for storing or taking my tools to different projects.
The set covers all the bases for finishing and post-processing, saving me time and frustration.
Overall, this kit is a smart investment whether you’re just starting or an experienced maker. It streamlines the entire process, so I spend less time fiddling and more time creating.
Plus, it’s a great gift idea for any 3D printing enthusiast.
158 PCS 3D Printing Tool Kit, 3D Printing Accessories

- ✓ Wide range of tools
- ✓ Durable, high-quality materials
- ✓ Portable and organized
- ✕ Some tools feel basic
- ✕ Slightly bulky toolbox
| Material | High-quality durable steel, plastic, and wood handles |
| Tool Types | Electric rotary tool, deburring tool, nozzle cleaners, carving knives, hand drill, screwdrivers, spatula, digital caliper, socket wrench |
| Number of Pieces | 158 pieces |
| Power Source | Electric (for rotary tool and hand drill) |
| Storage | Portable tool box for organized storage and easy transport |
| Intended Use | Post-printing finishing, cleaning, carving, disassembly, and maintenance of 3D printed models |
You open the box and immediately notice how neatly everything is organized. The 158-piece kit comes in a sturdy, portable toolbox that makes grabbing tools quick and hassle-free.
Handling the electric rotary tool for the first time, I was surprised by how comfortable it felt in my hand. The ergonomic design really reduces fatigue during longer sessions.
Switching out the 12 accessories is straightforward, thanks to the simple attachment system.
The variety of blades and nozzles is impressive. I used the deburring tool and steel blades to smooth out rough edges on my 3D prints, and they performed like a charm.
The nozzle cleaners and precision screwdrivers helped me fine-tune my printer without hunting for separate tools.
What stood out was the versatility. Besides finishing, I found myself using the carving knives and hand drill for other craft projects.
The kit’s durable materials meant I didn’t worry about wear and tear even after multiple uses.
The included digital caliper is a nice touch, making measurements quick and accurate. The whole set is perfect for beginners and experienced model makers alike.
Plus, the portable box means I can take everything to my workspace or on-the-go projects without stress.
Overall, this kit simplifies the post-printing process and makes DIY projects more enjoyable. It’s a solid investment if you want all-in-one convenience for your 3D printing needs.
What Are the Best Tools for Finishing 3D Prints?
The best tools for finishing 3D prints enhance the quality and aesthetics of your printed models.
- Sandpaper: Essential for smoothing rough surfaces, sandpaper comes in various grits to achieve different levels of finish.
- Deburring Tool: This tool is useful for removing sharp edges and imperfections from the print, ensuring a cleaner look.
- File Set: A set of files allows for precise shaping and refining of details on your 3D print, especially in tight spaces.
- Heat Gun: A heat gun can be used to slightly melt the surface of PLA prints, which helps in creating a smoother finish.
- Epoxy Resin: Applying epoxy resin can provide a glossy finish while also reinforcing the structural integrity of the print.
- Spray Primer: This tool can help in preparing the surface for painting by filling in minor imperfections and providing an even base.
- Paints and Sealants: High-quality paints and sealants not only add color but also protect the print from environmental factors.
Sandpaper is crucial for achieving a smooth texture on your prints, allowing for finer detail and a more professional appearance. It is best to start with a coarser grit and then move to finer grits for optimal results.
A deburring tool effectively trims away any excess material from the edges of your prints, which is especially important for parts that need to fit together precisely. It helps to improve both the look and the functionality of your printed model.
A file set allows for detailed work on hard-to-reach areas and can refine intricate details that sandpaper may not effectively address. Different shapes of files can be used for various contours and surfaces.
A heat gun is particularly useful for smoothing out layers on PLA prints, as it can gently melt the outer surface, reducing the visibility of layer lines. Care must be taken to use it at a safe distance to avoid warping the print.
Epoxy resin is excellent for those looking to achieve a high-gloss finish while also providing added strength and durability to the print. It fills in gaps and imperfections, giving the model a professional look.
Spray primer is important for preparing the surface of the print for painting, as it helps to create a uniform texture and can help hide small defects. It is advisable to apply several thin coats for the best effect.
Lastly, paints and sealants not only add visual appeal but also serve a protective function, keeping your prints safe from moisture, UV damage, and wear over time. Choosing the right type of paint and sealant is essential to ensure compatibility with the print material.
How Can You Achieve Smooth Surfaces on 3D Printed Models?
To achieve smooth surfaces on 3D printed models, various finishing tools and techniques can be employed:
- Sanding Tools: Sanding is a fundamental method for smoothing 3D prints, using various grits of sandpaper to progressively refine the surface.
- Filler Primers: Filler primers can be sprayed onto the surface of the print to fill in minor imperfections and provide a smooth base for painting.
- Heat Gun: A heat gun can be used to gently melt the outer layer of the print, allowing it to smooth out imperfections and create a glossy finish.
- Chemical Smoothing Agents: Chemicals such as acetone (for ABS prints) can be applied to dissolve the surface layer of the model, resulting in a smooth finish.
- Polishing Tools: Polishing compounds and buffing wheels can be used to enhance the surface finish after sanding or chemical smoothing, providing a shiny, refined look.
Sanding tools, including various grits of sandpaper or sanding sponges, allow for manual removal of layer lines and imperfections. Starting with a coarser grit and gradually moving to finer grits helps achieve an even smoother surface, but requires patience and attention to detail.
Filler primers serve as an excellent way to address surface flaws before painting. By applying a few coats of filler primer, you can create a level surface that conceals small defects, ultimately improving the appearance of the final paint job.
A heat gun is a handy tool for smoothing prints made from thermoplastic materials. By carefully applying heat, the outer layer of filament can be softened, allowing it to flow and settle, which reduces the visibility of layer lines without compromising the structural integrity of the model.
Chemical smoothing agents like acetone are particularly effective for ABS prints, where the solvent vapor can be used to melt the surface slightly. This technique provides a professional-looking finish, but it must be done in a well-ventilated area due to the fumes involved.
Polishing tools, including polishing compounds and buffing wheels, can elevate the finish of a model after initial smoothing. This final step can bring out a reflective quality in the plastic, enhancing its visual appeal and providing a more polished look to the finished product.
What Role Does Sanding Play in Finishing 3D Prints?
Sanding is a crucial step in the finishing process of 3D prints, as it enhances the surface quality and prepares the model for further treatments.
- Surface Smoothing: Sanding helps to eliminate layer lines and imperfections that are intrinsic to the 3D printing process.
- Improved Adhesion: A smoother surface created by sanding allows for better adhesion of paints, primers, and other finishing materials.
- Detail Enhancement: By sanding, you can enhance the details of your print, making features more pronounced and visually appealing.
- Preparation for Painting: Sanding creates a more uniform surface that is ideal for paint application, leading to a smoother finish.
- Material Compatibility: Different materials require different sanding techniques; understanding this can help achieve the best results.
Surface smoothing is vital because it addresses the visible layer lines that can make a 3D print look less professional. By using progressively finer sandpaper, you can achieve a seamless finish that is often required for display models or functional parts.
Improved adhesion is particularly important when you plan to paint or apply a coating to your 3D print. A rougher surface provides more texture for paints and adhesives to grip, ensuring that your finish lasts longer and looks better.
Detail enhancement through sanding allows you to refine the aesthetic of your print. Removing excess material can help highlight intricate designs and features that would otherwise be lost in a rough finish.
Preparation for painting is another essential aspect of sanding, as it helps to create a uniform base for color application. A well-sanded print reduces the risk of paint pooling in crevices, leading to a more consistent and professional look.
Material compatibility is crucial because different 3D printing materials, like PLA, ABS, or resin, require specific sanding techniques. Understanding how each material responds to sanding can help you choose the right grit and approach for optimal results.
Why Is Acetone Vapor Smoothing Ideal for ABS Models?
The underlying mechanism involves the vapor phase of acetone being absorbed into the ABS material. As the vapor permeates the surface, it softens the outer layer, which then re-solidifies into a smoother and more cohesive surface upon cooling. This not only enhances the visual quality of the print but also can lead to better mechanical properties due to the removal of stress concentrations at the surface (Müller et al., 2018). Furthermore, the process is relatively quick and requires minimal equipment, making it one of the best tools for finishing 3D prints, especially for hobbyists and professionals alike.
Which Heat Gun Techniques Are Best for 3D Print Finishing?
The best heat gun techniques for 3D print finishing include several methods that enhance the final appearance and quality of 3D printed objects.
- Smoothing Surfaces: This technique involves using a heat gun to gently melt the outer layer of the print.
- Removing Supports: Heat can help to soften and make the removal of support structures easier and cleaner.
- Welding Parts Together: Heat guns can be used to fuse separate printed parts together for a seamless finish.
- Heat Treatment for Strengthening: Applying heat post-print can improve the strength and durability of the printed object.
Smoothing Surfaces: This technique involves using a heat gun to gently melt the outer layer of the print, allowing for a smoother finish. By directing the heat at a distance, you can eliminate layer lines and imperfections without compromising the integrity of the print.
Removing Supports: Heat can help to soften and make the removal of support structures easier and cleaner. By applying heat directly to the support material, it becomes more pliable, allowing for a neater extraction and reducing the risk of damaging the print itself.
Welding Parts Together: Heat guns can be used to fuse separate printed parts together for a seamless finish. This technique is particularly useful for larger prints that need to be assembled, as it provides a strong bond through localized melting of the filament at the connection points.
Heat Treatment for Strengthening: Applying heat post-print can improve the strength and durability of the printed object. This process, often referred to as annealing, helps to relieve internal stresses and can enhance the thermal resistance of certain materials, making them more suitable for functional applications.
What Types of Paints and Coatings Should You Use on 3D Prints?
The best types of paints and coatings for finishing 3D prints enhance aesthetics and provide protection.
- Acrylic Paint: Acrylic paint is water-based, making it easy to clean up while providing vibrant colors and a smooth finish. It adheres well to most 3D print materials, including PLA and ABS, and can be thinned with water for airbrushing or applied directly with brushes for detailed work.
- Spray Paint: Spray paint offers a quick and even coating, ideal for covering larger areas of a 3D print. It is available in various finishes such as matte, satin, and glossy, allowing for customization, but care must be taken to apply in thin layers to avoid drips and runs.
- Enamel Paint: Enamel paint provides a hard, durable finish that is resistant to scratches and chemicals, making it a great choice for functional prints. It requires a longer drying time compared to acrylics, but its glossy finish can enhance the visual appeal of the print.
- Primers: Primers create a smooth base for paint adhesion, particularly on glossy or uneven surfaces. They help in filling small imperfections in the print, allowing for a more professional finish and are essential for ensuring that subsequent paint layers adhere well.
- Clear Coats: Clear coats serve as a protective layer over painted surfaces, shielding against moisture, UV damage, and scratches. Available in various finishes, including matte and glossy, they can enhance the depth of colors and are crucial for maintaining the longevity of the paint job.
How Can You Fix Common Issues in 3D Printed Models?
Common issues in 3D printed models can often detract from the final product’s appearance and functionality. Here are some effective methods to address these problems:
-
Layer Misalignment: If layers don’t align correctly, recalibrate the printer’s axes. Check the bed level and ensure the nozzle is clean to prevent further misalignment.
-
Stringing: This occurs when excess filament oozes out during travel moves. To reduce stringing, adjust the retraction settings in your slicer software. Increasing retraction speed and distance often helps.
-
Warping: Warping can cause corners of prints to lift. Using a heated bed and applying an adhesion solution like glue stick or painter’s tape can minimize this issue.
-
Under-extrusion: This leads to thin lines or gaps in prints. Check the filament diameter settings, clean the nozzle, and ensure the filament is feeding smoothly.
-
Surface Imperfections: To enhance surface quality, sand the model with varying grits of sandpaper. For small details, consider using files or a Dremel tool.
-
Post-Processing: Consider chemical smoothing methods, such as using acetone vapors for ABS prints or applying resin for PLA finishes. These can provide a professional look to the printed models.
What Safety Measures Should You Follow When Finishing Your Prints?
When finishing your 3D prints, it’s essential to follow certain safety measures to ensure a safe and effective process.
- Protective Gear: Always wear safety goggles and gloves when sanding or using chemicals to protect your eyes and skin from dust and harmful substances.
- Ventilation: Ensure you work in a well-ventilated space, especially when using solvents or adhesives that emit fumes, to avoid inhaling any toxic vapors.
- Proper Tools: Utilize the right tools for the job, such as sharp knives for trimming and fine sandpaper for smoothing, to prevent accidents and achieve better results.
- Fire Safety: Keep a fire extinguisher nearby when using heat tools like soldering irons or hot air guns, as these can pose a fire risk if left unattended.
- First Aid Kit: Have a first aid kit readily available in case of minor injuries such as cuts or burns while handling tools or materials.
Protective gear, such as safety goggles and gloves, is crucial as it shields you from debris and chemical exposure that can occur during the finishing process. Dust from sanding can irritate your eyes, while certain chemicals used in finishing techniques can cause skin reactions.
Ventilation is vital when working with adhesives and solvents, as many of these substances can release harmful fumes. A well-ventilated area helps to disperse these fumes, reducing the risk of respiratory issues.
Using proper tools not only increases the efficiency of your finishing tasks but also reduces the likelihood of accidents. Sharp knives and appropriate sanding tools facilitate clean cuts and smooth finishes, enhancing both safety and the quality of your print.
Fire safety should not be overlooked, particularly when using heat-related tools that pose a risk of igniting flammable materials. Keeping a fire extinguisher on hand can provide peace of mind while working on finishing projects.
Finally, having a first aid kit nearby ensures that you can quickly address any minor injuries that may occur, such as cuts from sharp tools or burns from hot surfaces. Being prepared for accidents can make a significant difference in maintaining a safe working environment.
Related Post: