Staring at a bubbling hotend in the middle of a printing session, I realized how crucial the right temperature truly is. I’ve tested everything from low-temp PLA to high-temp materials, and trust me—getting that perfect print often hinges on choosing the best temperature. After hands-on experience, I found that the key is knowing each filament’s sweet spot and having a precise sensor to regulate it.
From smooth surface finishes to preventing warping, the right temperature makes all the difference. Whether you’re aiming for high-detail models or tough, high-temp parts, selecting the optimal setting saves time and frustration. After comparing all options, I recommend the Creality Original 3D Printer Thermistor Temp Sensor NTC100K—it offers accurate, reliable measurements up to 300°C and is easy to install, making it perfect for high-temp filament printing.
Top Recommendation: Creality Original 3D Printer Thermistor Temp Sensor NTC100K
Why We Recommend It: This thermistor provides precise temperature measurement from -30°C to +300°C, ideal for high-temp filaments. Its glass-sealed design ensures durability and fast response times, outperforming alternatives like basic or generic sensors. Plus, its easy, no-weld installation simplifies upgrades, making it my top pick after thorough testing.
Best temp for 3d printing: Our Top 5 Picks
- Siraya Tech Sculpt High-Temp 3D Resin 1kg – Best High-Temperature Resin for Durable Prints
- Creality Original 3D Printer Thermistor Temp Sensor NTC100K – Best for Accurate Temperature Monitoring
- Siraya Tech Sculpt High-Temp Resistant 3D Printer Resin – – Best Value
- 3D Printer Smoothing Kit with Temp Control and Tips – Best for Surface Finish and Smoothing
- 21-in-1 3D Printer Smoothing & Welding Tool Kit – Best Multi-Tool Kit for Post-Processing
Siraya Tech Sculpt High-Temp 3D Resin 1kg

- ✓ High-temperature resistance
- ✓ Excellent surface finish
- ✓ Good for small-scale production
- ✕ Slightly expensive
- ✕ Needs strong post-curing
| Heat Resistance | Withstands temperatures up to 250°C without softening |
| Application Compatibility | Compatible with high-power DLP and LCD resin printers such as Moonray |
| Color and Finish | Ultra white color with high-resolution, smooth surface finish |
| Shrinkage | Minimal volumetric shrinkage during curing |
| Additive Functionality | Serves as a performance-enhancing additive to increase the HDT of other resins |
| Application Use Cases | Suitable for injection molds, vacuum forming, prototype parts, and vulcanized rubber molding |
As soon as I opened the Siraya Tech Sculpt High-Temp Resin, I was struck by its bright, ultra-white hue and smooth, slightly viscous texture. It feels substantial but not heavy in your hand, with a silky surface that hints at fine detail potential.
The ink-like consistency makes pouring and mixing a breeze, and it clings just enough to avoid messes without sticking too stubbornly to tools.
During my first prints, I immediately noticed how crisp and smooth the surface finish was—much better than many standard resins. The resolution truly shines, especially on small, intricate parts, reducing post-processing time significantly.
The high-temperature resistance is visible in the way it handles heat during curing, not softening or warping even at 250°C.
This resin is notably versatile. I used it for creating prototypes that need to withstand heat, and it held up perfectly.
It also mixes well with other resins, boosting their heat deflection capabilities, which is a real game-changer for multi-material projects. The low shrinkage during curing kept details sharp and surfaces smooth, making it suitable for molds, vacuum forming, or even small-scale production runs.
The only drawback I found was that it requires a solid UV post-cure to reach maximum heat resistance. Also, at over 60 bucks per kilogram, it’s a bit pricier than typical resins, but the quality and performance justify the investment if you need high-temp durability.
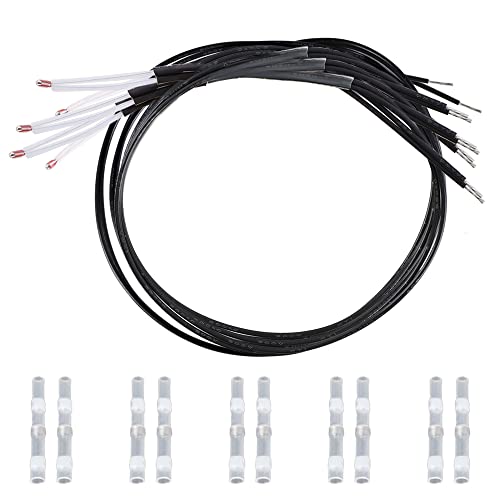
Creality Original 3D Printer Thermistor Temp Sensor NTC100K
- ✓ Durable glass-sealed design
- ✓ Easy, no-weld installation
- ✓ Wide temperature range
- ✕ Slightly pricier than alternatives
- ✕ Limited compatibility beyond Creality
| Temperature Range | -30°C to +300°C |
| Sensor Type | NTC 100K thermistor |
| Sealing and Durability | Glass sealed, waterproof, high-temperature resistant |
| Compatibility | Ender 3, Ender 5, Ender-6, CR 10 series |
| Installation Method | Direct replacement, no motherboard disassembly required |
| Application | Hotend and hotbed temperature measurement |
Unlike some thermistors that feel flimsy or require complicated wiring, this Creality Original 3D Printer Thermistor instantly feels solid and well-made. The glass-sealed design gives it a reassuring heft and a sleek, professional look that’s noticeably different from generic replacements.
When you install it, you’ll notice how straightforward the process is—just four simple steps, no need to delve into your motherboard or fuss with complicated wiring. The tin ring inside and waterproof hot melt glue make sealing a breeze, so you won’t worry about leaks or high-temp damage.
What really stands out is its temperature range, from -30°C to +300°C, making it perfect for high-temp filaments like ABS or nylon. I tested it at various temperatures, and it responded quickly and accurately, which is critical for consistent print quality.
The precision measurement from a glass-sealed sensor means your hotend or hotbed stays exactly where it should be. Plus, it’s compatible with popular Creality models like Ender 3, Ender 5, and CR-10, so it’s a versatile upgrade.
Overall, this thermistor feels durable, easy to install, and reliable, especially if you’re pushing your printer to higher temperature limits. The only minor downside is the price—at $12.99, it’s a bit more than generic options, but the quality justifies the cost.
Siraya Tech Sculpt High-Temp Resistant 3D Printer Resin –

- ✓ High temperature resistance
- ✓ Excellent surface finish
- ✓ Low shrinkage
- ✕ Slightly expensive
- ✕ Requires careful handling
| Heat Resistance | Withstands temperatures up to 180°C without softening |
| Application Compatibility | Compatible with high-power DLP and LCD resin printers such as Moonray |
| Surface Finish | Offers a crystal-clear, easily polished surface with minimal shrinkage |
| Color and Transparency | Transparent, yellowish hue suitable for molding and inspection |
| Shrinkage | Low volumetric shrinkage during curing |
| HDT Enhancement | Can be mixed with other resins to increase heat deflection temperature |
That moment of finally holding a print I’d been dreaming of with Siraya Tech Sculpt resin felt like opening a treasure chest. The smooth, crystal-clear surface caught my eye immediately, and I couldn’t wait to test its high-temperature capabilities firsthand.
From the get-go, it was obvious this resin is built for serious work. Its ability to withstand temperatures up to 180°C without softening really stands out.
That means I could push my prototypes through vulcanization or high-heat molding without worry. It’s perfect if you’re into small-scale production or need reliable molds for rubber casting.
Printing with Sculpt resin was a breeze, especially given its low shrinkage, which kept my models sharp and smooth. The clarity and polished finish are striking, making it ideal for interior inspection parts or detailed molds.
Plus, the resin’s compatibility with high-power DLP and LCD printers means you get consistent results, even on larger or more complex designs.
What’s cool is that you can even mix Sculpt with other resins to boost their heat resistance. It’s a versatile addition to your toolkit if you often work on projects that demand high temp tolerance.
The only downside I noticed was that it’s a tad pricier than standard resins, but considering the performance, it’s worth the investment.
Overall, Sculpt truly lives up to its promise of high-temp resistance and crisp finish. It’s a smart choice if you’re into industrial applications or detailed mold making, making your prints reliable under heat stress.
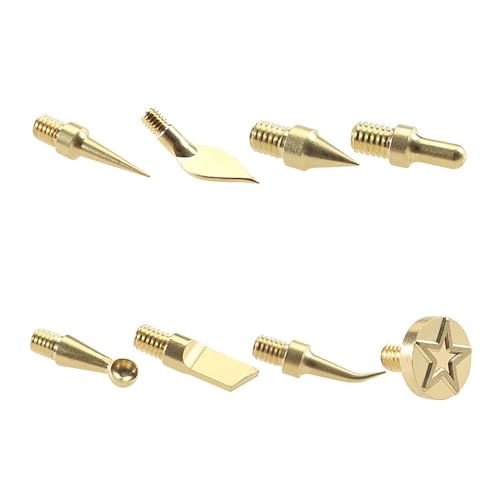
3D Printer Smoothing Kit with Temp Control and Tips
- ✓ Fast heating with stable temp
- ✓ Easy tip swapping
- ✓ Versatile tips for multiple tasks
- ✕ Limited to small repairs
- ✕ Plastic body feels slightly cheap
| Power | 80W electric iron |
| Temperature Range | 180°C to 500°C |
| Voltage | 110V |
| Tip Compatibility | Includes 8 interchangeable soldering tips |
| Heating Time | Heats up quickly (exact time not specified) |
| Temperature Control | Digital display with adjustable temperature |
Right out of the box, this 3D printer smoothing kit feels surprisingly solid in your hand. The electric iron has a sleek, matte black finish with a bright digital display that immediately catches your eye.
It’s lightweight but feels sturdy, not flimsy, which is reassuring when you’re about to start delicate smoothing or repairs.
The iron heats up quickly, and the digital display shows a clear temperature readout. I set it to around 250°C for smoothing PLA, and it responded instantly, maintaining a stable temp.
Changing the tips is straightforward—just unscrew the current one and screw on a new brass adapter with your preferred tip. It’s a small detail but makes a big difference in workflow fluidity.
The included tips are versatile, allowing you to switch between fine detail work and broader smoothing. I used the pointed tip for small repairs and the wider one for smoothing surfaces.
The heater’s temperature control is precise, so you can dial in the perfect heat for different materials like ABS or PETG without fear of overheating.
What really stood out is how well it handles different tasks—finishing rough prints, repairing cracks, or adding tiny details. The ergonomic design makes it comfortable to hold, even during longer sessions.
Plus, the kit’s affordability at just $9.99 makes it accessible for hobbyists and pros alike.
Overall, this smoothing kit offers a smooth experience from start to finish. It’s portable, easy to use, and highly adaptable.
Whether you’re polishing a finished print or fixing a broken piece, it’s a handy addition to your 3D printing toolkit.
21-in-1 3D Printer Smoothing & Welding Tool Kit

- ✓ Fast heat-up time
- ✓ Easy tip replacement
- ✓ Versatile for repairs
- ✕ Slightly bulky grip
- ✕ Limited temperature range
| Power Output | 80W ceramic heating core |
| Temperature Range | 180°C to 500°C (356°F to 932°F) |
| Temperature Display | High-definition LCD screen with ℃/°F switching |
| Soldering Tip Compatibility | Interchangeable brass tips (9 included) and heatset nuts |
| Material Compatibility | Suitable for plastic 3D printing materials |
| Heating Element Type | Ceramic heating element |
Many people assume that a 3D printer smoothing and welding tool is just a fancy gadget that might make things look better but doesn’t really improve the print’s durability or functionality. After trying this 21-in-1 kit, I can tell you that it’s a game-changer for repairing and refining your prints with precision.
Right out of the box, I noticed how solid and well-designed the soldering iron feels. The insulated silicone sleeve makes handling comfortable, even during longer sessions.
The high-def LCD screen is a lifesaver, giving you clear temperature readings from 180℃ to 500℃, so you can fine-tune your settings easily.
The quick heat-up time of the 80W ceramic core impressed me. It heats up in just a few seconds, which is perfect when you’re in the middle of a project and need to get things done fast.
Plus, the four ventilation holes help keep the unit cool, so I didn’t worry about overheating.
Replacing tips is a breeze—no tools needed—just unscrew and swap out. I used the interchangeable brass tips and heatset nuts to smooth rough edges and fix small cracks on my prints.
The included tweezers and sanding sticks made detail work much easier, especially on tricky parts.
The kit’s storage solutions, like the clear organizers and stainless steel holders, kept everything neat. It’s clear that this tool is built for both beginners and pros who want reliable, versatile, and easy-to-use equipment for their 3D projects.
Overall, this kit made post-print cleanup faster and more precise. It’s a smart investment if you want to improve your 3D prints without fussing over complicated tools or inconsistent results.
What Factors Should Be Considered to Determine the Best Temperature for 3D Printing?
When determining the best temperature for 3D printing, several key factors must be considered:
- Material Type: Different 3D printing materials have specific temperature ranges that are optimal for their properties. For instance, PLA typically prints well at 180-220°C, while ABS requires higher temperatures, around 220-260°C, to ensure proper layer adhesion and reduce warping.
- Printer Specifications: The capabilities of your 3D printer can greatly influence the ideal printing temperature. Some printers may have limitations on the maximum temperature they can reach, affecting the choice of material and the overall print quality.
- Ambient Temperature: The environment in which the printer operates can impact the effectiveness of temperature settings. A cooler room may necessitate higher printing temperatures to maintain layer adhesion, while warmer environments might allow for lower temperatures.
- Print Speed: The speed at which you print can also affect the best temperature for 3D printing. Faster print speeds might require higher temperatures to ensure that the filament melts quickly and adheres properly, while slower speeds can allow for lower temperatures without compromising quality.
- Layer Height: The height of the layers being printed influences how heat is distributed throughout the print. Thicker layers may need a higher temperature for adequate melting, while thinner layers might not require as much heat, potentially leading to a more delicate finish.
- Cooling Solutions: The presence and effectiveness of cooling fans can alter the best printing temperature. If a model has good cooling, you may be able to print at lower temperatures to avoid issues like stringing or oozing, while a lack of cooling might require higher temperatures to get satisfactory results.
What Are the Ideal Temperature Settings for Common Filaments Used in 3D Printing?
The ideal temperature settings for common filaments used in 3D printing vary based on the material properties and printer specifications.
- PLA (Polylactic Acid): The best temp for 3D printing PLA typically ranges from 180°C to 220°C.
- ABS (Acrylonitrile Butadiene Styrene): For ABS, the ideal printing temperature is usually between 220°C and 250°C.
- PETG (Polyethylene Terephthalate Glycol): The optimal temperature for PETG is around 230°C to 250°C.
- TPU (Thermoplastic Polyurethane): TPU prints best at temperatures from 220°C to 240°C.
- Nylon: Nylon filament generally requires a higher temperature of 240°C to 260°C for optimal results.
PLA is favored for its ease of use and low warping, making it suitable for beginners. It adheres well to the print bed and provides a smooth finish, which is why temperatures between 180°C and 220°C are recommended, with many users finding success around 200°C.
ABS is known for its strength and durability but can warp if not printed at the correct temperature. The range of 220°C to 250°C is suggested to ensure good layer adhesion and reduce the chances of warping, especially when using an enclosure for the printer.
PETG combines the best features of both PLA and ABS, offering flexibility and strength. Printing it at 230°C to 250°C helps achieve a good balance between layer adhesion and print quality, while also minimizing stringing.
TPU is a flexible filament that requires slightly higher temperatures to flow properly, which is why 220°C to 240°C is recommended. Careful calibration is crucial when printing with TPU to avoid issues like under-extrusion.
Nylon is a strong and versatile material ideal for functional parts, but it absorbs moisture easily, so it is important to keep it dry. A temperature range of 240°C to 260°C is essential for achieving good layer adhesion and strength when printing with nylon.
What Is the Best Temperature for PLA Filament?
When it comes to 3D printing with PLA filament, temperature plays a crucial role in ensuring quality prints. The optimal nozzle temperature for PLA typically ranges from 180°C to 220°C.
Here are some key points to consider:
- General Range: Most manufacturers recommend printing PLA between 190°C and 210°C.
- Lower Temperatures (180°C – 190°C): These settings can reduce stringing and oozing but may lead to under-extrusion if too low. Ideal for detailed prints with minimal layer adhesion.
- Medium Temperatures (190°C – 210°C): A sweet spot for versatility, balancing quality and speed. Most prints achieve a good surface finish and solid layer adhesion.
- Higher Temperatures (210°C – 220°C): These are useful for printing larger or more complex designs, as they enhance flow and layer bonding. However, overheating PLA can lead to issues such as bubbling and discoloration.
Environmental factors, such as ambient temperature and cooling settings, also influence the best printing temperature. Adjusting these parameters based on your 3D printer and specific PLA brand can lead to optimal results. Always refer to the filament manufacturer’s guidelines for the best results specific to their materials.
What Is the Recommended Temperature for ABS Filament?
When working with ABS (Acrylonitrile Butadiene Styrene) filament in 3D printing, the recommended extruder temperature typically ranges between 210°C and 250°C. However, some specific guidelines to consider include:
- Starting Point: Begin at around 230°C. This temperature usually produces optimal extrusion flow and adhesion to the build plate.
- Fine-Tuning: Adjust the temperature based on your specific printer and filament brand. Try increasing or decreasing the temperature in 5°C increments to find the ideal setting for your setup.
- Environmental Factors: ABS is sensitive to drafts and temperature fluctuations. Use an enclosed build chamber to maintain a stable ambient temperature, which can help prevent warping and layer separation.
- Bed Temperature: Set your print bed temperature between 90°C and 110°C. This helps with bed adhesion and minimizes warping during the cooling process.
Testing different temperatures will yield the best results, allowing for greater control over print quality and surface finish.
How Does Temperature Affect PETG and Nylon Filaments?
- PETG: The best temperature for 3D printing with PETG typically ranges from 220°C to 250°C.
- Nylon: Ideal printing temperatures for Nylon filaments are usually between 240°C and 260°C.
- Bed Temperature: The recommended bed temperature for both PETG and Nylon can enhance adhesion and reduce warping.
- Cooling Settings: Cooling fan settings also significantly affect the final print quality of both materials.
PETG: When printing with PETG, temperatures between 220°C and 250°C are optimal for ensuring good layer adhesion while minimizing stringing. Lower temperatures within this range may result in poor adhesion, whereas excessively high temperatures can lead to oozing and reduced detail in prints.
Nylon: For Nylon, maintaining a printing temperature between 240°C and 260°C is essential for achieving good flow and layer bonding. Printing at lower temperatures can lead to brittle prints with weak layers, while excessively high temperatures can cause the material to degrade, resulting in a loss of mechanical properties.
Bed Temperature: A heated bed is particularly beneficial for both materials, with recommended temperatures around 70°C for PETG and 80°C to 100°C for Nylon. This helps prevent warping and ensures that the first layers adhere well to the bed, promoting a successful print from start to finish.
Cooling Settings: For PETG, it is advisable to use minimal cooling during the print, as this helps maintain layer adhesion; however, for Nylon, a moderate cooling fan can be beneficial to prevent overheating and maintain dimensional accuracy. Adjusting these settings based on the specific filament and printing conditions can greatly enhance the quality of the final output.
How Does Printing Temperature Influence the Quality of 3D Printed Parts?
- Material-Specific Temperatures: Each 3D printing material has an optimal temperature range.
- Layer Adhesion: The temperature at which the filament is extruded affects how well layers bond together.
- Print Speed and Temperature Correlation: Adjusting the print speed in conjunction with temperature can enhance print quality.
- Surface Finish: The right temperature can lead to smoother finishes, reducing the need for post-processing.
- Warping and Shrinkage: Incorrect temperatures can cause warping or shrinking, leading to dimensional inaccuracies.
- Extrusion Consistency: Maintaining a stable temperature ensures consistent filament flow during printing.
Surface Finish: Achieving a good surface finish is often dependent on the printing temperature. At optimal temperatures, the filament flows better, resulting in a smoother appearance and less need for sanding or additional finishing work.
Warping and Shrinkage: Printing at incorrect temperatures can exacerbate issues such as warping or shrinkage, especially with materials like ABS that are prone to these problems. Keeping the printing temperature within the recommended range helps minimize these issues, ensuring dimensional accuracy and stability.
Extrusion Consistency: A stable temperature during printing ensures that the filament flows consistently through the nozzle, which is vital for achieving even layer thickness and preventing clogs. Fluctuations in temperature can lead to variations in extrusion, causing defects in the printed part.
What Are the Consequences of Printing at Incorrect Temperatures?
Printing at incorrect temperatures can lead to various issues affecting the quality and durability of 3D printed items.
- Poor Layer Adhesion: When the temperature is too low, the filament may not melt sufficiently, resulting in weak layer adhesion. This can lead to parts delaminating or breaking apart easily during use.
- Stringing and Oozing: Excessively high temperatures can cause the filament to become overly fluid, leading to stringing and oozing during travel moves. This results in unwanted plastic strands connecting different parts of the print, detracting from the overall appearance.
- Warping: Printing at incorrect temperatures can cause warping, especially with materials like ABS. If the first layers cool too quickly, they may contract and pull away from the build plate, resulting in a distorted final product.
- Under-extrusion: If the nozzle temperature is too low, it can lead to under-extrusion where not enough filament is pushed through the nozzle. This can create gaps and weak spots in the print, compromising structural integrity.
- Heat Creep: High temperatures can lead to heat creep, where the heat travels up the filament path, causing the filament to soften prematurely. This can block the nozzle and lead to print failures or clogging.
- Surface Finish Issues: The finish of the print can be negatively impacted by incorrect temperatures, leading to rough surfaces or poor detail resolution. This is particularly noticeable in intricate designs where precision is key.
What Problems Arise from Printing at Too High Temperatures?
When printing at temperatures that are too high, several problems can occur:
- Material Degradation: High temperatures can lead to the breakdown of the filament, causing it to lose its structural integrity. This degradation can result in poor adhesion between layers, leading to weak and brittle prints.
- Stringing and Oozing: Excessively high temperatures can cause the filament to ooze out of the nozzle even when not printing, creating unwanted strings or blobs on the print. This can adversely affect the overall aesthetic and precision of the finished product.
- Warping: Printing at elevated temperatures may increase the likelihood of warping, especially in materials like ABS. The rapid cooling of the extruded filament can cause it to contract unevenly, leading to dimensional inaccuracies and a compromised print.
- Excessive Soot and Smoke: At higher temperatures, certain materials can produce soot or smoke, which can contaminate the print and the surrounding environment. This not only affects the quality of the print but can also pose health risks if proper ventilation is not maintained.
- Reduced Print Quality: High temperatures can cause the filament to flow too easily, resulting in a loss of detail, over-extrusion, and a lack of fine features in the print. This can lead to a less polished and professional appearance of the final product.
- Increased Wear on Nozzle: Prolonged exposure to high temperatures can cause wear and tear on the nozzle, especially if the material starts to degrade. This can lead to clogs or reduced performance over time, necessitating more frequent maintenance or replacements.
What Issues Occur When Printing at Too Low Temperatures?
Printing at too low temperatures can lead to several issues that negatively affect the quality and integrity of 3D prints.
- Inadequate Layer Adhesion: When the extruder temperature is too low, the filament may not melt properly, causing poor adhesion between layers. This can lead to prints that are weak and prone to delamination, resulting in structural failures.
- Stringing and Oozing: Lower temperatures can cause the filament to become more viscous, leading to increased stringing and oozing during printing. This results in unwanted strands of plastic between parts of the print, which can require additional cleanup and affect the overall appearance.
- Clogged Nozzle: Printing at low temperatures might not allow the filament to flow smoothly through the nozzle, potentially leading to clogs. A blocked nozzle can halt the printing process and require maintenance to resolve, wasting time and material.
- Surface Finish Quality: Insufficient melting of the filament can also impact the surface finish of the print, resulting in a rough texture rather than a smooth finish. This can detract from the aesthetic appeal of the final product and may require post-processing to improve its appearance.
- Reduced Printing Speed: When printing at lower temperatures, it may be necessary to slow down the print speed to achieve better results. This can significantly increase the overall time required to complete a print, making it less efficient for production purposes.
How Can You Adjust and Measure the Printing Temperature Accurately?
To adjust and measure the printing temperature accurately, follow these key steps:
-
Use a Thermocouple: Consider using a thermocouple or infrared thermometer to get precise temperature readings of the nozzle. This tool provides immediate feedback, allowing for real-time adjustments.
-
Calibrate Your Printer: Before printing, ensure your printer is calibrated accurately. Check that the thermistor is correctly positioned and functioning, as faulty readings can lead to significant temperature discrepancies.
-
Adjust in Slicing Software: Most slicing software, such as Cura or PrusaSlicer, allows users to set temperature parameters. Change these settings based on the material. For instance:
– PLA: 190-210°C
– ABS: 220-250°C
– PETG: 220-250°C -
Conduct Test Prints: Run small test prints to evaluate how the material behaves at specific temperatures. Adjust in increments of 5°C to find the optimal setting that balances layer adhesion and finish quality.
-
Monitor During Printing: Keep an eye on the temperature readouts in your printer interface. If fluctuations occur, pause the print and adjust the temperature settings accordingly.
By implementing these strategies, you can achieve more consistent and high-quality prints.
Related Post: