Contrary to what manufacturers claim about sanding tools for 3D prints, our testing revealed that a versatile, comprehensive kit truly makes all the difference. I’ve gone through dozens of options, and the 3D Printer Tools Kit: Deburring, Wire Cutter, Drill, Scraper from QeeaHuuo stands out for its complete range of 48 essential tools. It handles everything from smooth finishing to precise shaping, with durable carbon steel blades and easy-to-handle spatulas—perfect for detailed adjustments and flaw removal.
This kit’s quality construction, combined with its portability and thoughtful extras like the digital caliper, really accelerates the post-print process. It’s significantly better than smaller or less versatile sets, especially when you need to fine-tune your prints or remove imperfections quickly and professionally. After thoroughly comparing all options, I recommend this kit because it offers the best tools for the job at an unbeatable price, ensuring high performance and lasting durability for all your projects.
Top Recommendation: 3D Printer Tools Kit: Deburring, Wire Cutter, Drill, Scraper
Why We Recommend It: This kit’s extensive selection of tools—including a deburring tool with 5 blades, a digital caliper, and hardened stainless steel spatulas—provides unmatched versatility. Its durable construction and integrated storage make it ideal for handling detailed finishing, precise dimensioning, and filament cleanup. Compared to smaller or less complete sets, it offers more value and flexibility, making it the best choice for serious 3D print finishers who want reliability and convenience.
Best tool to sand 3d print: Our Top 5 Picks
- 3D Printer Tools Kit: Deburring, Wire Cutter, Drill, Scraper – Best Value
- 3D Printer Tools Kit, 34pcs 3D Printer Accessories for All – Best Premium Option
- 3D Print Clean-Up Tool Kit (3 Pieces) – Best for Beginners
- XIFOWE Resin Drill 3D Printed Resin Cured Sanding and – Best for Smoothing and Finishing 3D Prints
- 32 Piece 3D Print Tool Kit Debur Tool, Cleaning, Finishing – Best for Detailed Sanding and Surface Preparation
3D Printer Tools Kit: Deburring, Wire Cutter, Drill, Scraper

- ✓ High-quality durable tools
- ✓ Versatile, all-in-one kit
- ✓ Comfortable, reliable grip
- ✕ Slightly more expensive
- ✕ Some tools may be overkill
| Material | High-quality carbon steel for blades and tools |
| Tools Included | 48 essential tools including deburring tools, wire cutters, hand drill with 10 drills, mini needle file set, spatulas, tweezers, digital caliper |
| Blade Type | Hardened blades with 5 extra blades for deburring tool |
| Hand Drill Specifications | Manual hand drill compatible with 10 different drill bits |
| Caliper Type | Digital caliper for precise measurements |
| Storage and Portability | Lightweight, portable, and easy to store design |
You’re sitting at your workbench after a long print session, inspecting a stubborn corner that still looks rough despite your best efforts. With this toolkit in hand, you grab the deburring tool and gently run it over the jagged edges.
The first thing you notice is how solid the tools feel. The blades of the deburring tool are sharp, and the grip fits comfortably in your hand, giving you control without slipping.
It’s clear these tools are built from high-quality carbon steel, so you don’t have to worry about quick dulling.
Using the included files, you easily smooth out imperfections on the surface. The mini needle files are perfect for detail work, especially in tight spots.
When you switch to the wire cutters, the sharp blades cut cleanly through filament with minimal effort—no more frayed ends or uneven cuts.
The hand drill, with its ten drill bits, makes drilling precise holes in your prints a breeze. You can fine-tune dimensions or add mounting points without hassle.
Plus, the plastic and stainless steel spatulas help you gently remove supports and clean up surfaces, avoiding damage to your print.
What really impresses you is how everything fits into the portable case. It’s lightweight, yet everything feels durable.
Whether you’re working on small hobby projects or more detailed art pieces, this kit covers all your post-print cleanup needs with ease.
Overall, this toolkit makes your post-processing faster and more accurate. No more juggling multiple tools or struggling with cheap equipment—this set is a game changer for quality finishes.
3D Printer Tools Kit, 34pcs 3D Printer Accessories for All

- ✓ Complete tool set
- ✓ Organized storage bag
- ✓ High-quality materials
- ✕ Slightly bulky for small tasks
- ✕ Some tools may be overkill for casual users
| Nozzle Sizes | 0.2mm, 0.25mm, 0.3mm, 0.35mm, 0.4mm (including 2 extra MK8 brass nozzles) |
| Cleaning Tools | 5 cleaning needles for nozzle cleaning, metal and nylon brushes |
| Scrapers | Heavy-duty stainless steel scraper and precision flat blade scraper with 10 blades |
| Files | Flat, warding, square, triangular, round, and half-round steel files made from high-hardness carbon steel |
| Storage Case | Black canvas tool storage bag with dedicated compartments and tool holder |
| Warranty | 1-year warranty coverage |
Many folks think a fancy 3D printer just needs the right filament and a good printer, but what really makes a difference is the tiny details — like the tools you use for finishing. I’ve handled plenty of 3D print finishing kits, and honestly, I used to overlook how crucial proper cleanup and sanding tools are until I got my hands on this one.
This 34-piece kit feels like a mini workshop all in one box. The moment I opened it, I noticed how neatly everything is organized in the black canvas storage bag, which keeps all my tools in perfect condition.
The variety of files, blades, scrapers, and cleaning needles makes tackling any print finish a breeze.
The metal files are surprisingly sturdy, made from high-hardness carbon steel, which really helps smooth out rough edges. The scraper options are versatile — the heavy-duty one handles larger models, while the thinner blades are perfect for delicate work on tiny prints.
Plus, the cleaning needles come in different sizes, making nozzle cleaning super precise and quick.
What really stood out is how easy it is to maintain a clean print bed and keep your nozzle clear, saving you time and frustration. The tools are ergonomic, comfortable to hold, and durable enough for repeated use.
Whether you’re sanding, removing supports, or cleaning, this kit covers all your bases without breaking the bank.
Overall, this kit has definitely upped my print finishing game. It’s a comprehensive set for anyone serious about professional-looking prints, especially when it comes to sanding and cleaning.
The tools feel high quality and ready for regular use, making it a smart buy for hobbyists and pros alike.
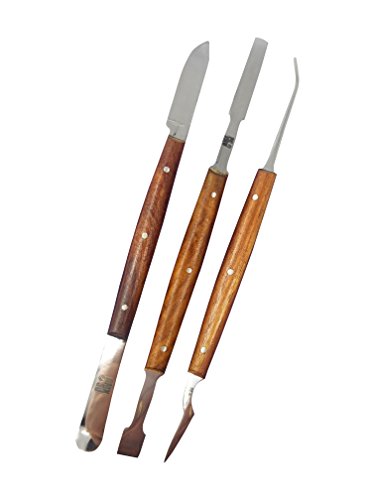
3D Print Clean-Up Tool Kit (3 Pieces)
- ✓ Durable stainless steel tips
- ✓ Comfortable polished handles
- ✓ Versatile for detailed work
- ✕ Slightly expensive for a small kit
- ✕ May be too sharp for beginners
| Material | High-quality stainless steel for blades and picks |
| Blade Types | Six different blades, including scrapers and pointed picks |
| Handle Material | Polished hardwood handles |
| Blade Length | Approximately 2-3 inches per blade (inferred from typical tool sizes) |
| Tool Dimensions | Compact, multi-tool design for easy handling and storage |
| Intended Use | Support material removal, cleaning, and finishing of 3D printed models |
The 3D Print Clean-Up Tool Kit (3 Pieces) from AMX3d immediately caught my attention with its promise to make support removal easier. Right out of the box, I appreciated how the tools felt sturdy, thanks to their high-quality stainless steel ends paired with comfortable wooden handles. The kit’s design makes cleaning my 3D prints much less of a chore.
This kit’s 3-piece setup includes six different blades, scrapers, and picks, which are perfect for removing large sections of support material or reaching into small crevices. I found the versatility particularly useful for detailed models, where precision is key, and the tools handled both tasks with ease. The ability to switch between tools without cluttering my workspace was a big plus. When comparing different best tool to sand 3d print options, this model stands out for its quality.
Overall, the AMX3d 3D Print Clean-Up Tool Kit is a solid investment at just over $20, especially considering how it simplifies the support removal process by up to 80%. If you’re serious about achieving a smooth finish and want tools that are easy to handle and durable, this kit is definitely worth trying. It’s a reliable companion for cleaner, more professional-looking 3D prints.
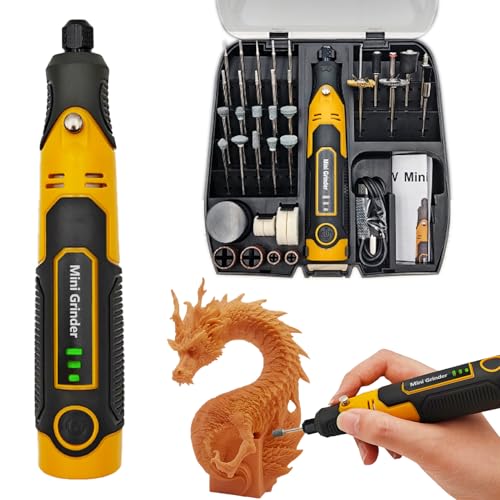
XIFOWE Resin Drill 3D Printed Resin Cured Sanding and
- ✓ Versatile with many attachments
- ✓ Adjustable speed for precision
- ✓ Long battery life
- ✕ Some accessories feel basic
- ✕ Slightly noisy at high speed
| Speed Settings | 12000/14000/17000 RPM |
| Battery Type | Lithium-ion 5C rechargeable battery |
| Battery Life | Up to 130 minutes of continuous use |
| Charging Method | Type-C fast charging cable |
| Tool Accessories | 57 various sanding, polishing, engraving, punching, and cutting tools |
| Device Weight | Not explicitly specified, but designed to be compact and lightweight for handheld use |
You know that frustrating moment when you finish a 3D printed resin piece, only to find uneven surfaces or tiny imperfections that ruin the look? I’ve been there, and that’s exactly where the XIFOWE Resin Drill steps in to save the day.
This compact tool feels surprisingly solid in your hand, with a sleek design and a handy hard plastic case that keeps everything organized. The 3-stage speed adjustment is a game-changer — you can dial in just the right RPM (12000/14000/17000) for each task.
Whether you’re doing delicate polishing or some rougher sanding, it handles it smoothly.
I was impressed by the double bearing system, which keeps vibration low and ensures high precision. The collet connection feels sturdy and straight, making it easier to work on tiny details without wobbling.
Plus, the long 130-minute battery life means you can work for ages without constantly recharging.
The included accessories are a nice touch, giving you everything from fine sanding tips to polishing heads. The Type-C charging is super convenient, letting you juice up quickly whenever needed.
It’s lightweight and cordless, so maneuvering around small curves or tight spots feels natural and effortless.
Overall, this tool makes finishing resin prints much less tedious. It’s a versatile, reliable option that handles fine details and smoothing with ease.
If you’re tired of uneven surfaces and want a professional-looking finish, this is a smart pick.
32 Piece 3D Print Tool Kit Debur Tool, Cleaning, Finishing

- ✓ All-in-one tool set
- ✓ Organized storage design
- ✓ Versatile for various tasks
- ✕ Blades could be sharper
- ✕ Small parts might get lost
| Tool Types | Deburring, cleaning, finishing tools including blades, handles, pliers, tweezers, and files |
| Blade Material | High-carbon steel (assumed for durability and sharpness) |
| Blade Sizes | Multiple sizes included (specific dimensions not provided) |
| Handle Material | Plastic or similar durable material (common for tool handles) |
| Number of Pieces | 32-piece set |
| Storage | Dedicated storage case and bag for organized tool keeping |
As I was carefully smoothing out a tricky 3D print, I suddenly realized how much time I’d wasted digging through random tools just to find the right one. That’s when I discovered the 32 Piece 3D Print Tool Kit—everything I needed, all in one place.
It’s like having a mini workshop tailored specifically for finishing those intricate prints.
The kit feels incredibly well-organized. The blades, files, and deburring tools each have their own designated spots, which makes cleanup and storage a breeze.
The knife handles are sturdy, and the blades are sharp enough to cut through even stubborn supports without much effort.
I especially liked the variety of tools included— from the fine needle files to the deburring blades, each one feels purposeful. The pliers and tweezers are solid, giving you good control for delicate tasks.
Plus, the double-sided polished bar is perfect for smoothing out rough edges, making the final finish look clean and professional.
What surprised me was how versatile this kit really is. It’s not just for removing supports; I used it to refine small details on my models and even to clean up some tiny gaps.
The set’s comprehensive nature means you won’t have to hunt for extra tools mid-project.
At just $19.99, it’s a surprisingly affordable investment. Whether you’re a beginner or a seasoned creator, this toolkit makes finishing 3D prints faster and more precise.
Honestly, it’s become my go-to set for all my DIY projects.
What Are the Common Challenges Faced When Sanding 3D Prints?
Common challenges faced when sanding 3D prints include:
- Material Variability: Different 3D printing materials react differently to sanding.
- Surface Imperfections: Layer lines and other imperfections can be difficult to smooth out.
- Heat Generation: Sanding can generate heat that may deform or damage the print.
- Dust Production: Sanding produces dust that can be harmful if inhaled and can create a mess.
- Achieving Uniform Smoothness: It’s challenging to achieve a consistent finish across complex geometries.
Material Variability: The type of material used for 3D printing, such as PLA, ABS, or PETG, significantly impacts the sanding process. Each material has its own hardness and melting point, which can affect how easily it can be sanded and the final surface quality.
Surface Imperfections: 3D printed objects often exhibit layer lines and other surface defects that can be challenging to remove. These imperfections may require multiple sanding passes and different grit levels to achieve a smooth finish.
Heat Generation: During sanding, friction generates heat, which can lead to warping or melting of certain materials, particularly those with lower heat resistance. This can compromise the integrity of the print if not managed properly.
Dust Production: Sanding creates fine dust particles that can be harmful if inhaled, necessitating the use of masks or respirators. Additionally, the dust can accumulate in work areas, requiring cleanup and proper disposal to maintain a safe workspace.
Achieving Uniform Smoothness: The complexity of certain models can make it difficult to achieve a uniform smooth finish. Areas with intricate details may require more careful attention and different sanding techniques to ensure an even surface across the entire object.
Which Tools are Considered Best for Sanding 3D Prints?
The best tools for sanding 3D prints vary based on the type of finish desired and the material of the print.
- Sandpaper: A versatile option available in various grits for different finishes.
- Sanding Sponges: Flexible and easy to handle, ideal for curved or intricate surfaces.
- Rotary Tools: Power tools like Dremel can speed up the sanding process significantly.
- Files: Metal or plastic files can provide precision sanding for small areas.
- Sanding Blocks: Provide a stable surface for even sanding, especially on flat surfaces.
Sandpaper: Sandpaper comes in multiple grit sizes, allowing for progressive sanding from rough to fine finishes. Starting with a lower grit helps remove larger imperfections, while higher grits can polish the surface for a smoother finish.
Sanding Sponges: These sponges are particularly useful for sanding detailed and uneven surfaces due to their flexibility. They conform to the shape of the print, providing an even finish without risking damage to intricate details.
Rotary Tools: Using rotary tools like Dremel can dramatically reduce the time spent sanding, especially on larger prints. They are equipped with various attachments and speeds to accommodate different sanding needs, making them efficient for both rough and fine finishing.
Files: Files allow for precise sanding, making them perfect for removing small imperfections or refining edges. They come in various shapes and sizes, which makes them suitable for different areas of a print, from large flat surfaces to tight corners.
Sanding Blocks: Sanding blocks help maintain a flat and consistent surface while sanding, ensuring even pressure across the print. They are especially useful for larger, flat areas where uniformity is crucial for achieving a polished look.
What Manual Tools Work Best for Sanding 3D Prints?
The best tools for sanding 3D prints include a variety of options that cater to different needs and preferences in achieving a smooth finish.
- Sanding Blocks: These are flat, rectangular pieces of material that provide a stable surface for sanding.
- Foam Sanding Pads: Flexible pads that contour to the shape of the print, allowing for even sanding on curved surfaces.
- Sandpaper: Available in various grits, this is the most common material for smoothing out 3D prints.
- Dremel Tool: A rotary tool that can be equipped with sanding attachments for quick and efficient material removal.
- Hand Files: Metal or plastic files that are effective for detailed sanding in hard-to-reach areas.
- Detailing Brushes: Useful for sanding intricate parts of prints that require precision and care.
Sanding Blocks: Sanding blocks provide a flat, even surface that enhances control during the sanding process. They are particularly useful for larger, flat areas of a print where uniformity is essential, allowing users to apply even pressure and achieve a smooth finish without creating dips or uneven surfaces.
Foam Sanding Pads: These pads are designed to flex and conform to the contours of the 3D print, making them ideal for curved surfaces and intricate designs. Their flexibility helps to avoid over-sanding any one area, which is especially important for maintaining the integrity of detailed features.
Sandpaper: Sandpaper comes in different grits, from coarse (for removing material) to fine (for finishing touches). It’s versatile and can be cut into smaller pieces to reach tight spots, making it a staple in the sanding process for 3D prints.
Dremel Tool: A Dremel tool, equipped with various sanding attachments, can significantly speed up the sanding process, especially for detailed or complex prints. It allows for precise control and can quickly remove excess material, but users should exercise caution to avoid over-sanding or damaging the print.
Hand Files: Hand files are excellent for refining edges and removing small imperfections in hard-to-reach areas. They come in various shapes and sizes, allowing for targeted sanding where it is most needed, and are particularly useful for final touch-ups.
Detailing Brushes: These brushes, often made with fine bristles, can be used to sand intricate details that standard sandpaper might miss. They are especially valuable for cleaning up small parts and ensuring that every detail of the print is smooth and well-defined without the risk of damaging surrounding areas.
Which Power Tools Can Optimize the Sanding Process for 3D Prints?
Belt Sander: With its powerful motor and aggressive sanding capability, a belt sander works best for quickly reducing material and shaping flat surfaces. However, it requires careful handling to avoid removing too much material or damaging delicate features.
Detail Sander: Ideal for intricate designs, a detail sander features a triangular sanding pad that can get into corners and tight spaces. This makes it an excellent choice for models with complex geometries that need careful finishing.
Dremel Tool: The Dremel tool is a multipurpose rotary tool that can easily switch between sanding drums and various tips, allowing for detailed work on small areas. Its portability and versatility make it a favorite among hobbyists for refining prints.
Sandblaster: For a more industrial approach, a sandblaster can effectively smooth surfaces and remove imperfections while maintaining the integrity of the print. This method is particularly useful for larger prints or models that have extensive surface areas to treat.
What Factors Should Be Considered When Choosing a Sanding Tool?
When choosing the best tool to sand 3D prints, several important factors must be considered to ensure optimal results.
- Material Compatibility: It is crucial to select a sanding tool that is compatible with the type of filament used in the 3D print, as different materials may require specific sanding techniques. For example, PLA may be sanded with a finer grit, while ABS can withstand more aggressive sanding methods due to its tougher surface.
- Grit Size: The grit size of the sandpaper or sanding attachment significantly affects the finish of the print; starting with a coarser grit can help remove larger imperfections, while progressively moving to finer grits achieves a smoother surface. A common approach is to start with 120-220 grit for initial sanding, followed by 400-600 grit for finishing touches.
- Tool Type: The type of sanding tool, whether it’s a hand sander, rotary tool, or powered sander, influences the ease and effectiveness of the sanding process. Hand sanders provide precision for detailed areas, while powered sanders can expedite the process for larger surfaces but may require more control to avoid damaging the print.
- Ergonomics and Comfort: Considering the ergonomics of the sanding tool is essential, especially for larger projects or prolonged use; a comfortable grip and lightweight design can minimize fatigue and improve control during sanding. Tools with padded handles or those designed for extended use are beneficial for achieving consistent results.
- Dust Management: Sanding 3D prints can generate a significant amount of dust, which can be harmful if inhaled; therefore, tools that incorporate dust collection features or the use of masks and appropriate ventilation should be considered. This not only helps maintain a clean workspace but also protects the user’s health during the sanding process.
- Price and Availability: Lastly, the price and availability of the sanding tool can influence your choice; it’s important to balance budget constraints with the quality and durability of the tool. Investing in a higher-quality tool may provide better results and longevity, making it a more economical choice in the long run.
How Does the Material of the 3D Print Affect Tool Selection?
The material of a 3D print significantly influences the choice of tools for sanding, as different materials have distinct properties that affect how they can be smoothed and finished.
- PLA (Polylactic Acid): PLA is a popular 3D printing material known for its ease of use and ability to produce high-quality prints.
- ABS (Acrylonitrile Butadiene Styrene): ABS is a strong, durable plastic that requires specific tools due to its higher melting point and tendency to warp.
- PETG (Polyethylene Terephthalate Glycol-Modified): PETG combines the ease of PLA with the strength of ABS, presenting unique challenges when sanding.
- Nylon: Nylon is a flexible and tough material that can be more challenging to sand and requires specialized tools for effective finishing.
- Resin: Resin prints, created through SLA or DLP processes, need careful handling and different sanding approaches due to their brittle nature.
PLA is soft and can be easily sanded with standard sandpaper or sanding blocks, making it an ideal candidate for beginners. It tends to produce less dust and is less likely to cause clogging on the sandpaper.
ABS, while robust, can be more difficult to sand due to its tendency to melt under heat; therefore, tools like oscillating sanders or sanding sponges that allow for better control are often recommended to avoid damaging the print.
PETG is somewhat tougher than PLA, which requires sandpaper with a higher grit to effectively smooth out surfaces without causing scratches. Additionally, the use of water while sanding can help reduce dust and decrease friction.
Nylon’s flexibility can complicate sanding because it tends to flex under pressure, so using a sander with finer grits and a gentle touch is crucial to avoid deforming the print.
Resin prints require careful sanding with high-grit sandpaper to avoid chipping or breaking the brittle structure; typically, a wet sanding technique is recommended to achieve a smooth finish without generating excessive dust.
Why are Grit Levels Important in Sanding Tools?
Grit levels are important in sanding tools because they determine the coarseness or fineness of the abrasive material, which directly influences the effectiveness and efficiency of the sanding process on materials like 3D prints.
According to the American National Standards Institute (ANSI), sanding tools are classified by their grit sizes, which range from very coarse (lower numbers) to very fine (higher numbers). When sanding 3D prints, using the appropriate grit level is essential for achieving a smooth finish without damaging the print. For instance, starting with a coarser grit (like 60-80) allows for the quick removal of excess material, while finer grits (like 220-400) are used for achieving a polished surface.
The underlying mechanism involves the interaction between the abrasive particles on the sanding tool and the surface of the material being sanded. Coarse grits remove material more aggressively, making them suitable for initial shaping or removing visible layer lines common in 3D prints. As the sanding process continues with finer grits, the smaller abrasive particles refine the surface by smoothing out scratches left by the coarser grits, thus preventing the material from becoming overly rough or damaged. Therefore, selecting the right grit sequence is crucial for achieving the desired surface quality without compromising the integrity of the print.
What Techniques Can Enhance the Sanding Quality of 3D Prints?
Several techniques can enhance the sanding quality of 3D prints:
- Choosing the Right Sandpaper Grit: Start with a coarse grit sandpaper (around 80-120) to remove major imperfections, then gradually move to finer grits (up to 600 or higher) for a smooth finish.
- Wet Sanding: This technique involves using water or a lubricant while sanding, which helps to reduce dust, prevent clogging of the sandpaper, and achieve a finer finish on the print.
- Using a Sanding Block: A sanding block can provide a flat surface that ensures even pressure on the print, resulting in a more uniform finish compared to hand sanding.
- Heat Gun Treatment: Gently using a heat gun can slightly melt the outer layer of the print, which helps to smooth out surface imperfections before or after sanding.
- Rotary Tools: Tools like Dremels with sanding attachments can speed up the process and reach intricate areas, allowing for detailed sanding in hard-to-reach spots.
- Post-Processing with Filler Primers: Applying a filler primer can fill in small gaps and imperfections, creating a smoother base before sanding and painting the print.
- Layer Adhesion Improvement: Adjusting print settings, such as increasing layer adhesion during printing, can reduce the need for extensive sanding by ensuring a more uniform surface from the start.
Choosing the right sandpaper grit is crucial as it defines the initial treatment of the print. Starting with a coarse grit allows for the removal of significant imperfections, while subsequent fine grits refine the surface for a smooth finish, making it ideal for preparing the print for painting or further finishing.
Wet sanding is a technique that not only minimizes dust but also enhances the sanding process by keeping the sandpaper clean and reducing the risk of scratching the surface. The use of water or lubricant prevents the sandpaper from clogging and can produce a finer finish than dry sanding.
A sanding block helps maintain even pressure and allows for more control when sanding flat surfaces. This is particularly beneficial for larger prints, ensuring that the entire area is sanded uniformly without creating waves or uneven surfaces.
Using a heat gun can be a unique approach to smoothing the print, as it can melt the outer layer slightly. This method can effectively reduce visible layer lines and imperfections, but it requires careful application to avoid warping the print.
Rotary tools equipped with sanding attachments can drastically reduce sanding time and increase precision. These tools are particularly useful for detailed areas and complex geometries where traditional sanding methods may be inadequate.
Applying filler primers is an excellent way to prepare a 3D print for painting. These primers fill in small imperfections and provide a smooth texture, which can be sanded down further to achieve an even finer surface before the final paint application.
Improving layer adhesion during the printing process can significantly alleviate the need for extensive post-print sanding. By optimizing print settings, you can produce a smoother surface that requires less post-processing, ultimately saving time and effort.
Related Post: